【筆記-Laravel】Laravel 7 CRUD 範例
資料來源:Laravel 7 CRUD Example | Laravel 7 Tutorial Step By Step
說明:
這是PHP Laravel的一個CRUD範例,示範如何一步一步建立一個CRUD的應用。
PHP Laravel是一個後端系統框架,可以讓一個程式設計師專注於應用程式問題邏輯(解決商用/工業問題),不用花太多心思在技術細節上,也就是說,一個資訊系的學生只需要建立技術觀念,在不需要實作技術細節的狀況下,就能建立一個面面俱到的應用程式。一般來說,一個資訊系的學生要要能力寫一個應用系統往往要學非常多的學科、技術、觀念等,才有辦法建立一個”完整”的應用程式,難度之高,連我都覺得寫系統是一個超級有挑戰的工作,底下這張圖非常傳神,”嚇死一堆寶寶了”,不少念了四年的資訊系學生不想碰程式設計(特別是女生,大部份是因為社會刻板印象吧,自覺女生本來應該很”不理工”。)。因為要寫一個好的系統不容易,導入適當的框架到學生的學習是有必要的,不要coding底層細節來建立一個完整的系統,只是要學Laravel框架,基礎也是要有的,JavaScript、HTML、CSS、PHP、Bootstrap(前端UI)、SQL、資料庫模型、系統分析與設計…,有好的基礎才能在框架協助下建立好的應用程式(框架不是銀子彈)。

新增專案:
- laravel new crud-example
或者使用下列的指令:
- composer create-project –prefer-dist laravel/laravel crud-example
執行完畢會新增一個目錄crud-example,進入該目錄,並且更新前端的相依資料
- cd crud-example
- npm install
編輯.env檔,修改資料庫連接資料:
DB_CONNECTION=mysql
DB_HOST=127.0.0.1
DB_PORT=3306
DB_DATABASE=wellsche_crud_example
DB_USERNAME=wellsche_laravel
DB_PASSWORD=xxxxxxxx
首先編輯/app/Providers/AppServiceProvider.php,加入表料庫schema相關的修改:
<?php

namespace App\Providers;
use Illuminate\Support\Facades\Schema;
use Illuminate\Support\ServiceProvider;

class AppServiceProvider extends ServiceProvider
{
    /**
     * Register any application services.
     *
     * @return void
     */
    public function register()
    {
        //
    }

    /**
     * Bootstrap any application services.
     *
     * @return void
     */
    public function boot()
    {
      Schema::defaultStringLength(191);
    }
}
執行:
- php artisan migrate
所需要的資料表格schema會建立好
建立model與mirgation檔
- php artisan make:model Corona -m
上面指令會產生2個檔案:
- app目錄:Corona.php
- database/migrations目錄:[timestamp]create_coronas_table.php
編輯[timestamp]create_coronas_table.php
原來的create_coronas_table.php裏的up函式:
public function up()
{
    Schema::create('coronas', function (Blueprint $table) {
        $table->id();
        $table->timestamps();
    });
}
改為:(加入2個字串表格欄位:country_name與symptoms,1個整數表格欄位cases)
public function up()
{
        Schema::create('coronas', function (Blueprint $table) {
            $table->id();
            $table->string('country_name');
            $table->string('symptoms');
            $table->integer('cases');
            $table->timestamps();
        });
 }
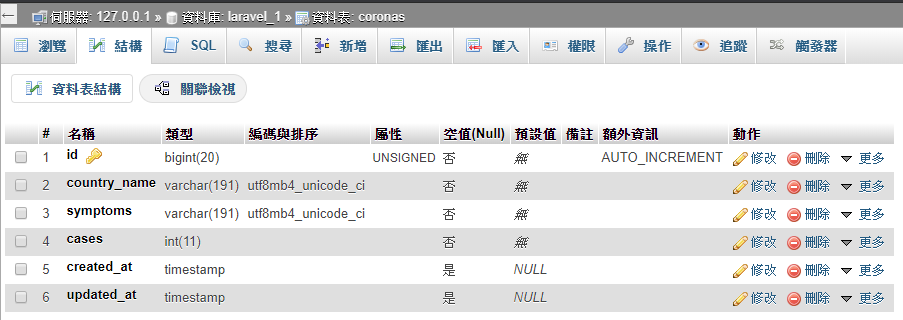
上面定義了corons資料表格的欄位schema,定義完後再下一次指令,完成資料表格的schema設定:
- php artisan migrate
此時可到資料庫那邊檢視coronas這個表格的欄位建立情形。
如果要反轉migration的過程,可以執行php artisan migrate:rollback來刪除coronas這個表格 (會執行down()函式)。
接著編輯Corona.php,來加入fillable的屬性:(設置’country_name’, ‘symptoms’, ‘cases’這三個欄位是可以填寫的。)
<?php

// Corona.php

namespace App;

use Illuminate\Database\Eloquent\Model;

class Corona extends Model
{
    protected $fillable = ['country_name', 'symptoms', 'cases'];
}
Step 3. 建立路由與控制器
- php artisan make:controller CoronaController –resource
會在CoronaController.php(app\Http\Controllers)建立6個方法:
- index 顯示Coronas資料清單
- Create 顯示Coronas的新增表單
- Store 將Create那邊的表單所傳來的資料儲存至資料庫。
- Show 顯示一個特定的Coronas資料
- Edit 顯示Coronas資料的修改表單
- Update 將Edit那邊的資料新增至資料庫
- Destroy 刪除一筆Corona
CoronaController.php列表:
<?php

namespace App\Http\Controllers;

use Illuminate\Http\Request;

class CoronaController extends Controller
{
    /**
     * Display a listing of the resource.
     *
     * @return \Illuminate\Http\Response
     */
    public function index()
    {
        //
    }

    /**
     * Show the form for creating a new resource.
     *
     * @return \Illuminate\Http\Response
     */
    public function create()
    {
        //
    }

    /**
     * Store a newly created resource in storage.
     *
     * @param  \Illuminate\Http\Request  $request
     * @return \Illuminate\Http\Response
     */
    public function store(Request $request)
    {
        //
    }

    /**
     * Display the specified resource.
     *
     * @param  int  $id
     * @return \Illuminate\Http\Response
     */
    public function show($id)
    {
        //
    }

    /**
     * Show the form for editing the specified resource.
     *
     * @param  int  $id
     * @return \Illuminate\Http\Response
     */
    public function edit($id)
    {
        //
    }

    /**
     * Update the specified resource in storage.
     *
     * @param  \Illuminate\Http\Request  $request
     * @param  int  $id
     * @return \Illuminate\Http\Response
     */
    public function update(Request $request, $id)
    {
        //
    }

    /**
     * Remove the specified resource from storage.
     *
     * @param  int  $id
     * @return \Illuminate\Http\Response
     */
    public function destroy($id)
    {
        //
    }
}
編輯routes\web.php,插入以下程式碼:
// web.php

Route::get('/', function () {
    return view('welcome');
});
Route::resource('coronas', 'CoronaController');
透過–resource, 你可以使用這個方法resource()產生以上所有的路由,而不需要一一個別地指定以上的路由。
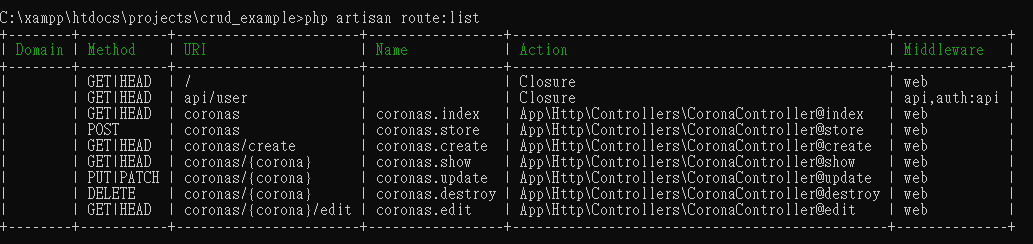
Actually, by adding the following code line, we have registered the multiple routes for our app. We can check it using the following command.
實際上,藉由加入該程式碼,我們已經為我們的應用註冊了多個路由,我們可使用底下的命令來檢視這些路由:
php artisan route:list
輸出:
Step 4: Configure Bootstrap 4
安裝Bootstrap和Vue套件:
- composer require laravel/ui
安裝bootstrap ui鷹架:
- php artisan ui bootstrap
編譯初生的鷹架:
- npm install && npm run dev
Step 5: Create the views
建立並編輯views目錄下的layout.blade.php,加入下列的code:
<!DOCTYPE html>
<html lang="en">
<head>
  <meta charset="UTF-8">
  <meta name="viewport" content="width=device-width, initial-scale=1.0">
  <meta http-equiv="X-UA-Compatible" content="ie=edge">
  <title>Laravel 7 CRUD Example</title>
  <link href="{{ asset('css/app.css') }}" rel="stylesheet" type="text/css" />
</head>
<body>
  <div class="container">
    @yield('content')
  </div>
  <script src="{{ asset('js/app.js') }}" type="text/js"></script>
</body>
</html>
一樣,在views目錄建立三個檔案:
- create.blade.php
- edit.blade.php
- index.blade.php
在create.blade.php加入:
@extends('layout')

@section('content')
<style>
  .uper {
    margin-top: 40px;
  }
</style>
<div class="card uper">
  <div class="card-header">
    Add Corona Virus Data
  </div>
  <div class="card-body">
    @if ($errors->any())
      <div class="alert alert-danger">
        <ul>
            @foreach ($errors->all() as $error)
              <li>{{ $error }}</li>
            @endforeach
        </ul>
      </div><br />
    @endif
      <form method="post" action="{{ route('coronas.store') }}">
          <div class="form-group">
              @csrf
              <label for="country_name">Country Name:</label>
              <input type="text" class="form-control" name="country_name"/>
          </div>
          <div class="form-group">
              <label for="symptoms">Symptoms :</label>
              <textarea rows="5" columns="5" class="form-control" name="symptoms"></textarea>
          </div>
          <div class="form-group">
              <label for="cases">Cases :</label>
              <input type="text" class="form-control" name="cases"/>
          </div>
          <button type="submit" class="btn btn-primary">Add Data</button>
      </form>
  </div>
</div>
@endsection
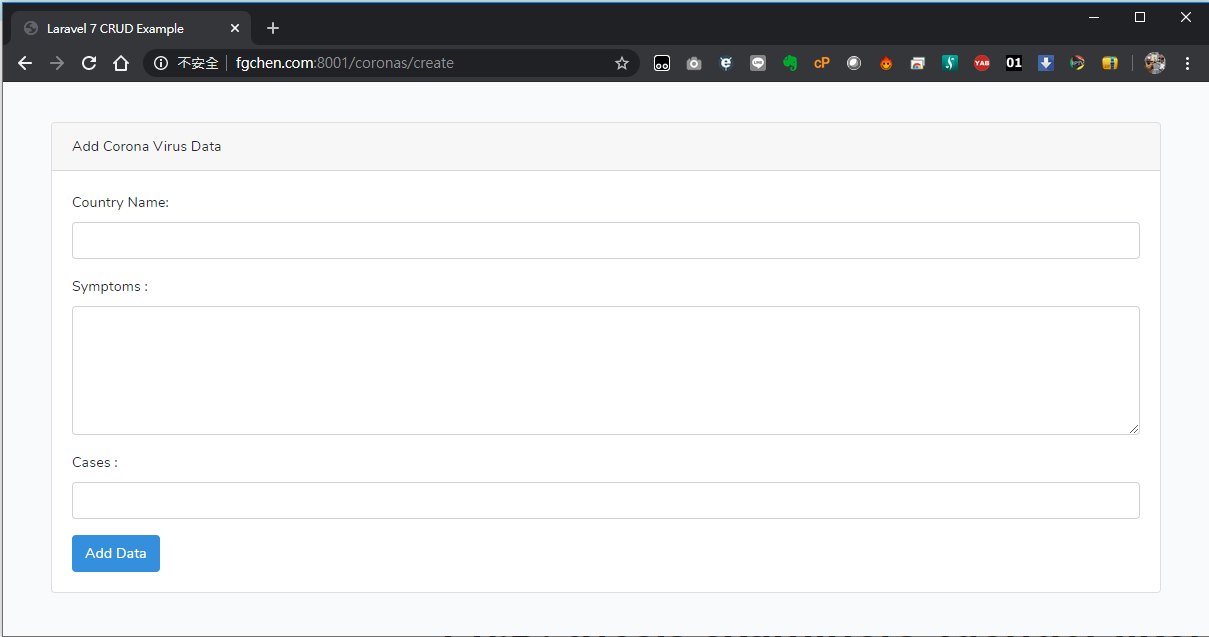
編輯CoronaController.php,在create方法下加入
// CoronaController.php

public function create()
{
   return view('create');
}
此時,到http://fgchen.com:8000/coronas/create,會看到底下的畫面:
Step 6: Add Validation rules and save data
在這個步驟,我們要加上Laravel form Validation
編輯CoronalController.php,加入app\Corona的名稱空間的使用:
<?php

// CoronaController.php

namespace App\Http\Controllers;

use Illuminate\Http\Request;
use App\Corona;
並且在CoronalController.php的store方法加入:
// CoronaController.php

public function store(Request $request)
{
        $validatedData = $request->validate([
            'country_name' => 'required|max:255',
            'symptoms' => 'required',
            'cases' => 'required|numeric',
        ]);
        $show = Corona::create($validatedData);

        return redirect('/coronas')->with('success', 'Corona Case is successfully saved');
}
store()方法接收到從建立表單來的$request資料物件,我們使用$request->validate這個方法定義資料的確認規則,使用關聯陣列分別對不同欄位給定確認規則,每一個欄位的確認規則以”|”指定多的規則。
加入的規則在確保當使用者沒有給資料(required)、最大255個字元、數值的規則下,驗證失效,畫面會有適當的紅色提示字眼:

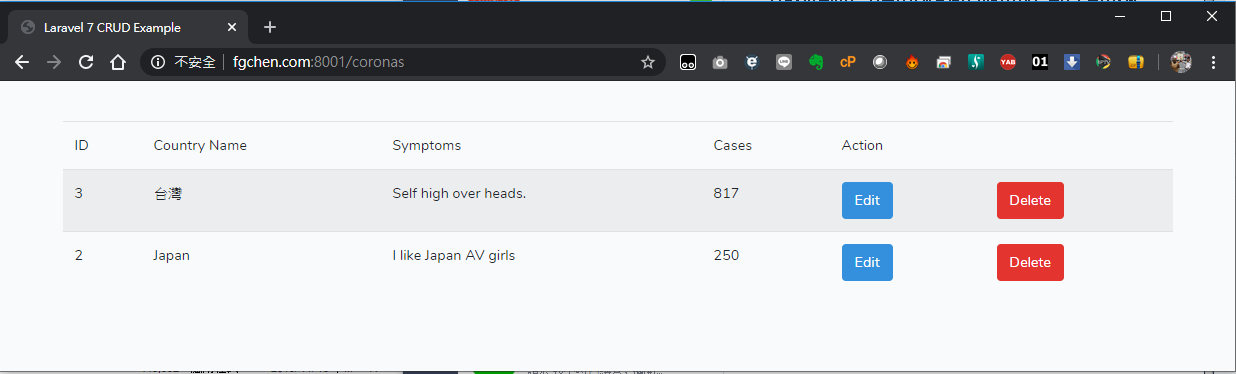
Step 7: Display the data
我們接著編輯CoronaController的index功能:
// CoronaController.php

public function index()
{
        $coronacases = Corona::all();

        return view('index', compact('coronacases'));
}
建立views目錄下的index.blade.php
@extends('layout')

@section('content')
<style>
  .uper {
    margin-top: 40px;
  }
</style>
<div class="uper">
  @if(session()->get('success'))
    <div class="alert alert-success">
      {{ session()->get('success') }}
    </div><br />
  @endif
  <table class="table table-striped">
    <thead>
        <tr>
          <td>ID</td>
          <td>Country Name</td>
          <td>Symptoms</td>
          <td>Cases</td>
          <td colspan="2">Action</td>
        </tr>
    </thead>
    <tbody>
        @foreach($coronacases as $case)
        <tr>
            <td>{{$case->id}}</td>
            <td>{{$case->country_name}}</td>
            <td>{{$case->symptoms}}</td>
            <td>{{$case->cases}}</td>
            <td><a href="{{ route('coronas.edit', $case->id)}}" class="btn btn-primary">Edit</a></td>
            <td>
                <form action="{{ route('coronas.destroy', $case->id)}}" method="post">
                  @csrf
                  @method('DELETE')
                  <button class="btn btn-danger" type="submit">Delete</button>
                </form>
            </td>
        </tr>
        @endforeach
    </tbody>
  </table>
<div>
@endsection
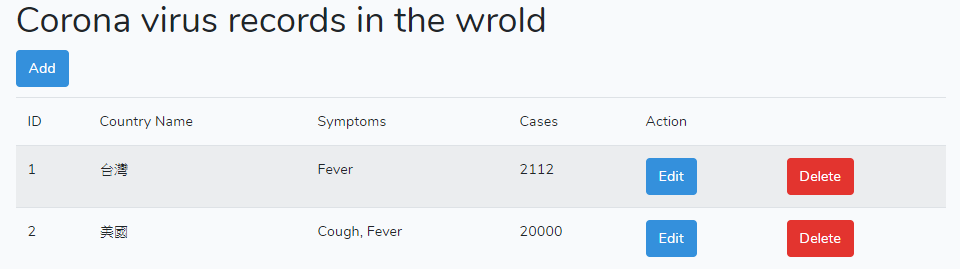
結果畫面:
Step 8: Create Edit and Update Operation
我們接著編輯CoronaController的edit功能:
// CoronaController.php

public function edit($id)
{
        $coronacase = Corona::findOrFail($id);

        return view('edit', compact('coronacase'));
}
建立與編輯edit.blade.php
@extends('layout')

@section('content')
<style>
  .uper {
    margin-top: 40px;
  }
</style>
<div class="card uper">
  <div class="card-header">
    Edit Corona Virus Data
  </div>
  <div class="card-body">
    @if ($errors->any())
      <div class="alert alert-danger">
        <ul>
            @foreach ($errors->all() as $error)
              <li>{{ $error }}</li>
            @endforeach
        </ul>
      </div><br />
    @endif
      <form method="post" action="{{ route('coronas.update', $coronacase->id ) }}">
          <div class="form-group">
              @csrf
              @method('PATCH')
              <label for="country_name">Country Name:</label>
              <input type="text" class="form-control" name="country_name" value="{{ $coronacase->country_name }}"/>
          </div>
          <div class="form-group">
              <label for="symptoms">Symptoms :</label>
              <textarea rows="5" columns="5" class="form-control" name="symptoms">{{ $coronacase->symptoms }}</textarea>
          </div>
          <div class="form-group">
              <label for="cases">Cases :</label>
              <input type="text" class="form-control" name="cases" value="{{ $coronacase->cases }}"/>
          </div>
          <button type="submit" class="btn btn-primary">Update Data</button>
      </form>
  </div>
</div>
@endsection
編輯CoronaController的update功能:
// CoronaController.php

public function update(Request $request, $id)
{
        $validatedData = $request->validate([
            'country_name' => 'required|max:255',
            'symptoms' => 'required',
            'cases' => 'required|numeric',
        ]);
        Corona::whereId($id)->update($validatedData);

        return redirect('/coronas')->with('success', 'Corona Case Data is successfully updated');
}
Step 9: Create Delete Functionality
編輯CoronaController destroy 方法:
// CoronaController.php

public function destroy($id)
{
        $coronacase = Corona::findOrFail($id);
        $coronacase->delete();

        return redirect('/coronas')->with('success', 'Corona Case Data is successfully deleted');
}
整個CoronaController.php列表:
<?php

// CoronaController.php

namespace App\Http\Controllers;

use Illuminate\Http\Request;
use App\Corona;

class CoronaController extends Controller
{
    /**
     * Display a listing of the resource.
     *
     * @return \Illuminate\Http\Response
     */
    public function index()
    {
        $coronacases = Corona::all();

        return view('index', compact('coronacases'));
    }

    /**
     * Show the form for creating a new resource.
     *
     * @return \Illuminate\Http\Response
     */
    public function create()
    {
        return view('create');
    }

    /**
     * Store a newly created resource in storage.
     *
     * @param  \Illuminate\Http\Request  $request
     * @return \Illuminate\Http\Response
     */
    public function store(Request $request)
    {
        $validatedData = $request->validate([
            'country_name' => 'required|max:255',
            'symptoms' => 'required',
            'cases' => 'required|numeric',
        ]);
        $show = Corona::create($validatedData);

        return redirect('/coronas')->with('success', 'Corona Case is successfully saved');
    }

    /**
     * Display the specified resource.
     *
     * @param  int  $id
     * @return \Illuminate\Http\Response
     */
    public function show($id)
    {
        //
    }

    /**
     * Show the form for editing the specified resource.
     *
     * @param  int  $id
     * @return \Illuminate\Http\Response
     */
    public function edit($id)
    {
        $coronacase = Corona::findOrFail($id);

        return view('edit', compact('coronacase'));
    }

    /**
     * Update the specified resource in storage.
     *
     * @param  \Illuminate\Http\Request  $request
     * @param  int  $id
     * @return \Illuminate\Http\Response
     */
    public function update(Request $request, $id)
    {
        $validatedData = $request->validate([
            'country_name' => 'required|max:255',
            'symptoms' => 'required',
            'cases' => 'required|numeric',
        ]);
        Corona::whereId($id)->update($validatedData);

        return redirect('/coronas')->with('success', 'Corona Case Data is successfully updated');
    }

    /**
     * Remove the specified resource from storage.
     *
     * @param  int  $id
     * @return \Illuminate\Http\Response
     */
    public function destroy($id)
    {
        $coronacase = Corona::findOrFail($id);
        $coronacase->delete();

        return redirect('/coronas')->with('success', 'Corona Case Data is successfully deleted');
    }
}
最後,我自己在首頁index.blade.php加上一個”Add a new coron virus record”按鈕:
@extends('layout')

@section('content')
<style>
  .uper {
    margin-top: 40px;
  }
</style>
<div class="uper">
  @if(session()->get('success'))
    <div class="alert alert-success">
      {{ session()->get('success') }}
    </div><br />
  @endif
  <h1 class="dislay-1">Corona virus records in the wrold</h1>
  <a class="btn btn-primary" href="{{ route('coronas.create') }}" role="button" style="margin-bottom:10px">Add</a>
  <table class="table table-striped">
    <thead>
        <tr>
          <td>ID</td>
          <td>Country Name</td>
          <td>Symptoms</td>
          <td>Cases</td>
          <td colspan="2">Action</td>
        </tr>
    </thead>
    <tbody>
        @foreach($coronacases as $case)
        <tr>
            <td>{{$case->id}}</td>
            <td>{{$case->country_name}}</td>
            <td>{{$case->symptoms}}</td>
            <td>{{$case->cases}}</td>
            <td><a href="{{ route('coronas.edit', $case->id)}}" class="btn btn-primary">Edit</a></td>
            <td>
                <form action="{{ route('coronas.destroy', $case->id)}}" method="post">
                  @csrf
                  @method('DELETE')
                  <button class="btn btn-danger" type="submit">Delete</button>
                </form>
            </td>
        </tr>
        @endforeach
    </tbody>
  </table>
<div>
@endsection