分類與標籤
What’s the difference between categories vs tags? What’s better for SEO Learn the best practices for sorting your WordPress content.
來源: Categories vs Tags – SEO Best Practices for Sorting your Content
Education and research resources
What’s the difference between categories vs tags? What’s better for SEO Learn the best practices for sorting your WordPress content.
來源: Categories vs Tags – SEO Best Practices for Sorting your Content
基本步驟:
1.用球體畫出一個100mm(10公分)的球體,並用「薄殼」功能將球體內部挖空,厚度為2.5mm。
2.繪製寶貝球的按鈕,按鈕大小直徑為30mm,外圍直徑為40mm,作法是進入草圖模式,將草圖平面移出到球體外,以圓形方式繪製2個圓40mm與30mm,形成一個環形,進入3D模式,使用拉動功能,設定減去,往球體方向拉動此環形,將空心球體去掉此一環形體,就可以得到按鈕。
3.生成2個平面,將這2個平面分開為3mm(離中心各為1.5mm),利用這2個平面以「劃分主體」功能,將此空心球體切分為2個空心半球。
4.繪製球體腰帶部份,使用「球體」功能從球心拉出95mm的球體(也就是原本球體的內部直徑,扣掉殼體厚度),同樣用「薄殼」功能,將此球體空心,再用步驟3的方式,切掉上下部份,留下中間腰部。
5.底座的部份是從腰帶複製切半而來的,這部份請直接看教學影片示範。
6.設定顏色,切到顯示,設定三個部份的顏色,腰帶與底座為黑色,上半球體為紅色,下半球體與按鈕為白色。

Untitled from Fuh-Gwo Chen on Vimeo.
Adding File Selection Manager DLL to your .NET C# project allows you to carry out advanced recursive file selection, using pseudo SQL statements. A time saver for any programming project, this allows you to quickly add features that would otherwise take weeks to program!
來源: File Selection Manager: Advanced recursive file selection, using pseudo SQL statements
以 BBC 延伸出來的 BBC Language 提供了許多課程、影片,以及語言要點,其中包括法文、德文、西班牙文,和義大利文。 你可以先從網站上的 “A Guide to …” 開始,因為裡面分享了許多有趣的知識,像是「使用某語言的人數」或是「語言的起源」等。

MeArm是一個扁平設計的機器手臂套件,只需要一支起子和對事物熱情的心即可以完成MeArm的組裝,MeArm能夠帶你進入程式設計、電子、機器人和工程的世界,Lifehacker網站描述MeArm是對初學者一個完美的Arduino專案。
MyArm是我們根據MeArm的開源圖,加上為本地學童精心建造的教學套件,初階版本包括機械手臂、電路板、雙搖桿,進階版本則加上紅外線遙控控制、藍芽與手機控制、無線WiFi物聯網的功能,初階版本在於帶領初學者進入MyArm的世界,透過雙搖桿來控制機械手臂的四顆伺服馬達,可完成手臂的三個維度的運動,以及機械手臂爪子的動作。
紅外線遙控版本,可讓我們用紅外線遙控器控制機械手臂,藉此我們可以學習紅外線遙控的原理與操作,我們也可以用家電的遙控器來做為控制器,甚至透過手機利用一個紅外線發射器,就可以做成一個強大的紅外線遙控器,控制所有家中的電器設備,像是電視、冷氣機等。
藍芽與手機控制版本則是利用智慧型手機內建的藍芽,來連結機械手臂,透過此版本,我們可以學習如何在手機或平板上設計程式。
無線WiFi版本則是因應現今最夯的物聯網科技,此版本可以透過Web對機械手臂進行控制,可實現遠端遙控機械,任何想要學習物聯網科技的不能錯過此一版本。
本教學是我們為了本地學童所建立的完整中文學習資源,希望讓大家夠透過MyArm進入創客的世界。
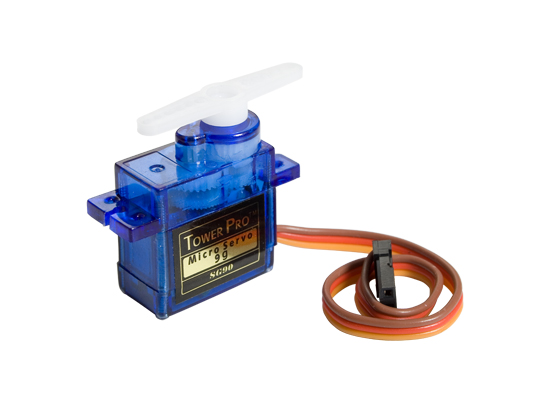

單一馬達測試
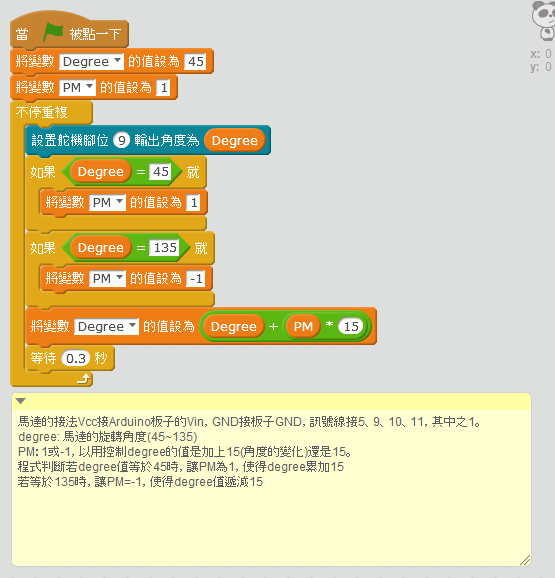
mBlock:(程式下載)
Arduino IDE (程式下載)
/*
馬達的接法Vcc接Arduino板子的Vin,GND接板子GND,訊號線接5、9、10、11,其中之1。
degree: 馬達的旋轉角度(45~135)
PM:1或-1,以用控制degree的值是加上15(角度的變化)還是15。
程式判斷若degree值等於45時,讓PM為1,使得degree累加15
若等於135時,讓PM=-1,使得degree值遞減15
 */

#include <Servo.h>
Servo motor; //定義馬達變數(物件)
void setup() {
  // put your setup code here, to run once:
  motor.attach(9); //設定馬達訊號腳連接至Arduino板子的數位接腳9
}

int pm = 1;
int degree = 45;
void loop() {
  // put your main code here, to run repeatedly:
  motor.write(degree); //讓馬達轉至degree角度
  delay(300); //馬達若以高速方式旋轉會燒毀,必須加上延遲,這邊單位是毫秒,也就是1/1000秒。
  if (degree == 45) {
    pm = 1;
  }
  if (degree == 135) {
    pm = -1;
  }
  degree = degree + (pm * 15); //變化degree,
}
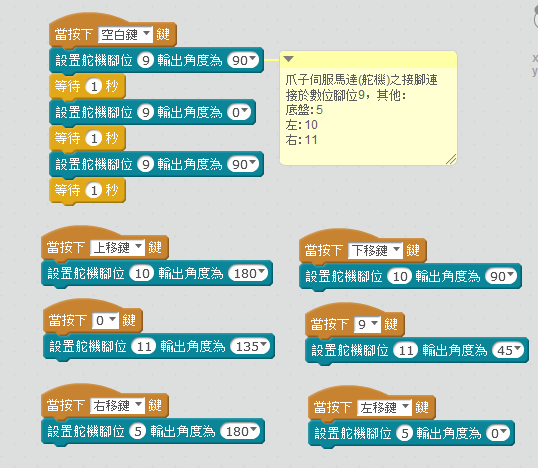
四顆馬達的控制-mBlock參考:
參考資料:
1.Arduino: MeArm 與雙搖桿,http://gsyan888.blogspot.tw/2014/11/arduino-mearm-dual-joystick.html
在這個教學中,我們使用下面的遙桿(可變電阻x2,按鈕開關x1),搖桿提供三個讀值VRx(左右,水平), VRy(上下,垂直), 與SW(按鈕開關)。

我們依照下圖來接線:

Vcc – 5V
GND – GND
VRX – A0 (類比腳位0)
VRY – A1 (類比腳位1)
SW-接數位腳位2
接好之後,輸入底下程式:

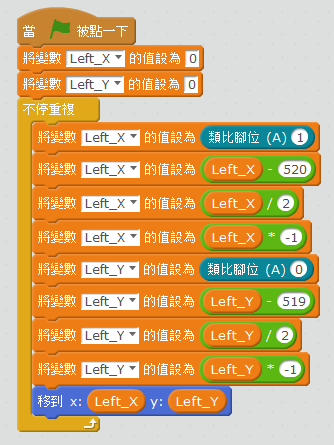
在上面的程式後,我們先設定2個變數VRx與VRy,這2個變數分別對應/連接到類比腳位1和0(也就是我們遙桿的VRx與VRy),完成後,按一下旗子,執行程式(記得你必須先進行連接與上傳靭體),此時你會看到熊貓左上角的2個變數值,這個值就是遙桿傳回來的數值。
由上圖可知,VRx的讀值為519,VRy的讀值為520。(每個遙桿的初始讀值不會一樣)
VRx, VRy為類比訊號,讀值從0到1023,由於搖桿平時處於中間位置,讀值應該為1023/2=512或513。
接下來,我們要控制角色熊貓的移動,我們必須先查出移動的範圍,假設水平的活動範圍是從-250~250(大約值),那麼我們的作法就讓讀值減去512,再除以2,舉例來說,若讀值是0,0-512=-512,除以2之後得-256,若讀值是1023,減去512,得511,除以2得255。
我們的程式如下:
UI 與 UX 有什麼不同?Conversion Lab 整理了網路上常見的 UI 與 UX 差異圖,一圖勝千言,讓我們用這些圖來看一下 UI & UX 不同之處吧,已經了解差異的讀者也可以來數數看自己曾經看過的圖有幾張。 1.倒過來的蕃茄醬瓶設計,考慮到番茄醬快用完時很難倒出的使用情境。 Source:Techtic 2.從定義來解釋 UI 與 UX 之間的差異,兩者定義有很大的不同So… Continue reading
註:本文資料參考自Walkthrough: Creating and Running Unit Tests for Managed Code,提供給課堂上學生學習參考。
本教學的目的在學習如何使用Visual Studio來撰寫單元測試程式,並透過測試的執行發現程式問題及修正問題。另外,我們也將會學習如何測試程式單元是否完整地處理錯誤與程式執行時期的例外,以確保程式單元的品質。
在這個測試實作中,必須完成底下幾件工作:
1.建立Bank專案
2.建立單元測試專案
3.建立測試類別
5.建置和執行測試
【建立Bank專案】
1.打開Visual Studio
2.開啟檔案->新增->專案
3.新增專案的對話方塊會顯示
4.在安裝的範本中,選擇Visual C#
5.選擇類別庫
6.專案名稱設為Bank,點擊確定。
此時,一個新的Bank專案被建立,並且顯示在方案總管視窗上,專案內有一個Class1.cs檔,被自動地開啟在程式碼編輯視窗上。
6.從專案範例複製原始碼
7.將Class1.cs檔案的內容換成剛剛複製的原始碼
8.將檔案存成BankAccount.cs
9.從建置選單,按建置方案功能
現在,你已經建置了Bank專案,其中包含了我們所要進行測試的原始碼,以及所要使用的測試工具。Bank的命名空間, BankAccountNS, 包含了公用類別BankAccount, 其中裏面的方法是你在底下的程序要進行測試的。
在這個快速的實作中,我們專注在Debit方法(帳戶的提款),當帳戶裏的錢被取出時,借支方法Debit會被叫用,底下是程式碼:
using System;

namespace BankAccountNS
{
    /// <summary>
    /// Bank Account demo class.
    /// </summary>
    public class BankAccount
    {
        private string m_customerName; //帳戶名稱

        private double m_balance;//帳戶餘額

        private bool m_frozen = false; //帳戶是否凍結布林變數

        private BankAccount() //建構子
        {
        }

        public BankAccount(string customerName, double balance) //建構子,傳入新增帳戶名稱和淨額/餘額(開戶金額)
        {
            m_customerName = customerName; //新增BankAccount物件中的帳戶名稱設為傳入的名稱
            m_balance = balance;//新增BankAccount物件中的淨值設為傳入的淨值
        }

        public string CustomerName //成員變數 m_customerName的存取方法
        {
            get { return m_customerName; }
        }

        public double Balance //帳戶淨值的存取方法
        {
            get { return m_balance; }
        }

        public void Debit(double amount) //從帳戶中借支,金額是由amount決定
        {
            if (m_frozen) //若帳戶凍結了
            {
                throw new Exception("Account frozen"); //程式丟出一個例外,例外字串為Account frozen,意思是帳戶凍結
            }

            if (amount > m_balance) //若要借支的金額大於帳戶的淨額
            {
                throw new ArgumentOutOfRangeException("amount"); //程式丟出一個ArgumentOutOfRangeException例外,例外字串為amount
            }
            //註:ArgumentOutOfRangeException的意思是參數超出範圍的例外

            if (amount < 0) //若要借支的金額是負值
            {
                throw new ArgumentOutOfRangeException("amount"); //程式丟出一個ArgumentOutOfRangeException例外,例外字串為amount
            }

            m_balance += amount; // intentionally incorrect code   一開始這個程式是錯誤的,借支後淨值應該是減去amount,不是加上amount,這是為了等會兒測試產生錯誤…
        }

        public void Credit(double amount) //貸款
        {
            if (m_frozen) //若帳戶凍結了
            {
                throw new Exception("Account frozen");
            }

            if (amount < 0) //若要貸款的金額是負值
            {
                throw new ArgumentOutOfRangeException("amount");
            }

            m_balance += amount; //帳戶淨額加上貸入的金額
        }

        private void FreezeAccount() //凍結帳戶方法
        {
            m_frozen = true;
        }

        private void UnfreezeAccount() //解除帳戶的凍結
        {
            m_frozen = false;
        }

        public static void Main() //主程式,程式的進入點
        {
            BankAccount ba = new BankAccount("Mr. Bryan Walton", 11.99); //新增一個BankAccount物件,帳戶名稱是Mr. Bryan Walton,開啟金額是11.99

            ba.Credit(5.77); //存款5.77
            ba.Debit(11.22); //取款11.22
            Console.WriteLine("Current balance is ${0}", ba.Balance); //印出帳戶淨額
        }

    }
}
1.從檔案選單,選擇加入,再選擇新專案。
2.在新增專案的對話方塊中,選擇Visual C#裏的測試。
3.選擇單元測試專案
4.在名稱的方塊中,輸入BankTest,選擇確定。
5.完成上面的步驟後,BankTests專案會加到Bank方案中。
6.在BankTests專案中,加入Bank專案到參考中。
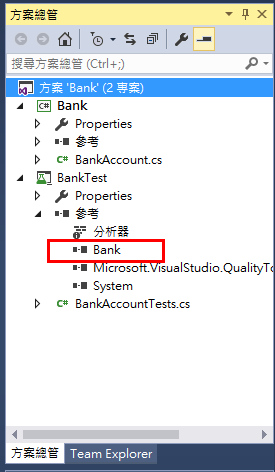
我們需要一個測試類別來驗證BankAccount類別,我們可以使用由專案範本產生的UnitTest1.cs,只是我們應該給予該檔案一個更有意義的名稱,變更名稱只需要在方案總管中一個步驟就完成。
變更類別檔的名稱
在方案總管中,選擇在BankTests專案中的UnitTest1.cs 檔案,更名的方式可以直接點擊檔案來更名,或在檔案上按右鍵選取重新命名來更名,此時我們將檔案重新命名為BankAccountTests.cs,原始碼列表如下:
// unit test code
using System;
using Microsoft.VisualStudio.TestTools.UnitTesting;

namespace BankTests
{
    [TestClass]
    public class BankAccountTests
    {
        [TestMethod]
        public void TestMethod1()
        {
        }
    }
}
在上面檔案using處,加入底下這行,宣告使用BankAccountNS命名空間,以便呼叫該命名空間下的專案。
using BankAccountNS;
測試類別需求
一個測試類別的最小需求為:
.在微軟Microsoft單元測試框架之下,任何類別若包含要在測試總管下執行的單元測試方法,必須加上[TestClass] 屬性。
.每一個由測試總管執行的測試方法必須在開頭加上[TestMethod]屬性。
在一個測試專案下,可以有其他未加上[TestClass] 屬性的類別,也可以在測試類別下,未加上 [TestMethod] 屬性的方法,你可以在你的測試方法中,使用這些類別與方法。
接下來,我們要寫測試方法來測試 BankAccount類別裏Debit方法的行為,藉由分析該方法,我們決定至少有三個行為必須要檢查:
1.如果借支金額大於帳戶淨額,該方法丟出一個ArgumentOutOfRangeException例外。
2.如果借支金額小於零,該方法丟出一個ArgumentOutOfRangeException例外。
3.如果在1.) and 2.) 中的檢查通過,該方法則將帳戶淨額減去借支金額。
在我們第一個測試中,我們驗證一個有效的金額(小於帳戶淨額,並且大於零的數字),讓我們從帳戶中取出正確的金額。
建立一個測試方法
加入”using BankAccountNS;”敘述到BankAccountTests.cs檔案中。
加入下列方法到BankAccountTests類別:
BankAccountTests.cs
using System;
using Microsoft.VisualStudio.TestTools.UnitTesting;
using BankAccountNS;

namespace BankTest
{
    [TestClass]
    public class BankAccountTests
    {
        [TestMethod]
        public void Debit_WithValidAmount_UpdatesBalance()
        {
            // arrange
            double beginningBalance = 11.99; //開戶的金額
            double debitAmount = 4.55; //借支的金額
            double expected = 7.44; //預期借支後,帳戶的預期金額
            BankAccount account = new BankAccount("Mr. Bryan Walton", beginningBalance);
            //建立BankAccount物件,名為account,上面的建構子用來指正名稱及開戶的金額

            // account物件借支debitAmount金額
            account.Debit(debitAmount);

            // assert,斷言,斷言程式不會發生指定的條件,若發生,則產生斷言例外,斷言是可以在程式正式版中關掉的。
            //斷言用來測試假設條件是否成立,當測試完都無問題後,釋出正式版本後,斷言機制就需要關閉,以提升程式的效能。
            double actual = account.Balance;
            Assert.AreEqual(expected, actual, 0.001, "Account not debited correctly");
            //斷言expected與actual兩個雙精度浮點數值相等,或在在指定精確度內(0.001),若斷言失敗,則丟出一個AssertError。
        }
    }
}
這個方法相當簡單,我們設置了一個新的BankAccount物件,內含初始的淨額,然後從中取出一個有效的借支金額。我們使用微軟單元測試框架中的 AreEqual 方法來驗證最後的淨額是否為我們所預期的。
測試方法規範
一個測試方法必須滿足下列規範:
1.方法必須加上冠上 [TestMethod]屬性。
2.方法不回傳值,也就是必宣告為void。
3.方法不可以帶入參數。
1.選擇建置選單,建置方案。若沒有錯誤發生,測試總管視窗會出現Debit_WithValidAmount_UpdatesBalance 在未執行個測試清單上,如果測試總管沒有出現,那麼選擇測試選單,選擇視窗,選擇測試總管,那麼測試總管視窗就會出現了。
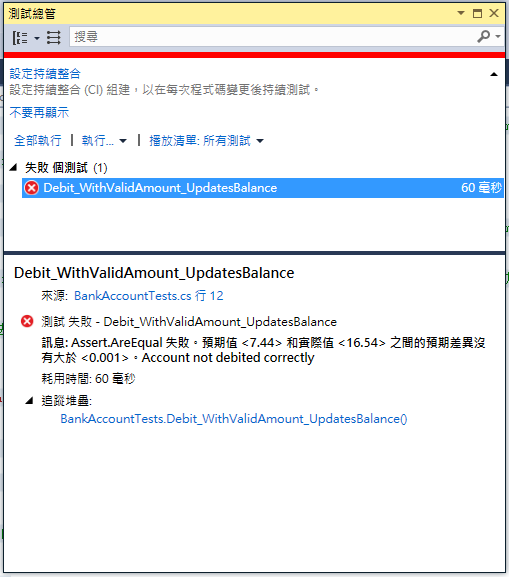
2.在測試總管視窗中,點選全部執行(或從測試選單->執行->所有測試),測試執行時,測試總管上方的狀態條會呈現動態變化,當測試執行完畢後,若所有的測試都通過了,那麼該狀態條會呈現綠色,若測試失敗,該狀態條會呈現紅色。我們這個測試是失敗的,所以你會看到紅色的狀態條,測試總管中可以檢視測試的細節。
首先,我們分析執行測試後的結果,測試結果包含了一個Assert.AreEquals 失敗訊息:
測試名稱: Debit_WithValidAmount_UpdatesBalance 測試 FullName: BankTest.BankAccountTests.Debit_WithValidAmount_UpdatesBalance 測試
BankAccountTests.cs : 行 12
測試失敗 Debit_WithValidAmount_UpdatesBalance
訊息: Assert.AreEqual 失敗。預期值 <7.44> 和實際值 <16.54> 之間的預期差異沒有大於 <0.001>。
上面的測試失敗訊息顯示執行借支方法後,預期的帳戶淨額不是所預期的,因此,我們檢查Debit方法那個環節出錯了。我們發現,程式碼顯示借支方法是將帳戶淨額加上借支金額,而正確的方法是程式碼應該將帳戶淨額減去借支金額!
修正程式錯誤
為了修正上面的錯誤,我們只要把原本的程式敘述
m_balance += amount;
換成:
m_balance -= amount;
再次地執行測試
在測試總管中,選擇全部執行,執行測試完畢之後,我們發現測試總管的狀態條呈現綠色了,表示通過了程式的測試!我們看到了底下的訊息:
測試成功 – Debit_WithValidAmount_UpdatesBalance
This section describes how an iterative process of analysis, unit test development, and refactoring can help you make your production code more robust and effective.
這個章節描述了一個分析、單元測試發展、和重構的迭代過程是如何地協助你來產生更強固及有效的產品程式碼。
Analyze the issues 分析問題
After creating a test method to confirm that a valid amount is correctly deducted in the Debit method, we can turn to remaining cases in our original analysis: 在建立了一個測試方法來確認在Debit方法中的有效扣減額之後,我們緊接著處理在我們一開始的分析中的其他狀況:
ArgumentOutOfRangeException if the debit amount is greater than the balance.ArgumentOutOfRangeException例外ArgumentOutOfRangeException if the debit amount is less than zero.ArgumentOutOfRangeException例外。Create the test methods 建立測試方法
A first attempt at creating a test method to address these issues seems promising:
第一次嘗試建立一個測試方法來定位出上面討論的問題
//unit test method
[TestMethod]
[ExpectedException(typeof(ArgumentOutOfRangeException))]
public void Debit_WhenAmountIsLessThanZero_ShouldThrowArgumentOutOfRange()
{
    // arrange
    double beginningBalance = 11.99;
    double debitAmount = -100.00;
    BankAccount account = new BankAccount("Mr. Bryan Walton", beginningBalance);

    // act
    account.Debit(debitAmount);

    // assert is handled by ExpectedException
}
We use the ExpectedExceptionAttribute attribute to assert that the right exception has been thrown. 我們使用ExpectedExceptionAttribute 屬性來斷定正確的例外已經被丟出來。The attribute causes the test to fail unless an ArgumentOutOfRangeException is thrown. Running the test with both positive and negative debitAmount values and then temporarily modifying the method under test to throw a generic ApplicationException when the amount is less than zero demonstrates that test behaves correctly. 除非一個ArgumentOutOfRangeException 被拋擲出來,否則該屬性是導致測試的失敗,To test the case when the amount withdrawn is greater than the balance, all we need to do is: 為了測試withdrawn這個提款的數值大於balance餘額這個案例,我們所要做的事情有:
Debit_WhenAmountIsMoreThanBalance_ShouldThrowArgumentOutOfRange.Debit_WhenAmountIsLessThanZero_ShouldThrowArgumentOutOfRange這個方法複製程式碼到新的方法。debitAmount數值大於balance餘額。Run the tests 執行測試
Running the two methods with different values for debitAmount demonstrates that the tests adequately handle our remaining cases. Running all three tests confirm that all cases in our original analysis are correctly covered. 分別以不同的debitAmount數值來執行這2個方法來檢視這2個測試是否處置後續的案例,執行所有3個測試來確認在我們原始分析中的所有案例是否正確地涵蓋。
Continue the analysis 進一步地分析
However, the last two test methods are also somewhat troubling. We cannot be certain which condition in the code under test throws when either test runs. Some way of differentiating the two conditions would be helpful. As we think about the problem more, it becomes apparent that knowing which condition was violated would increase our confidence in the tests. This information would also very likely be helpful to the production mechanism that handles the exception when it is thrown by the method under test. Generating more information when the method throws would assist all concerned, but the ExpectedException attribute cannot supply this information..
Looking at the method under test again, we see both conditional statements use an ArgumentOutOfRangeException constructor that takes name of the argument as a parameter:
throw new ArgumentOutOfRangeException("amount");
From a search of the MSDN Library, we discover that a constructor exists that reports far richer information. ArgumentOutOfRangeException(String, Object, String) includes the name of the argument, the argument value, and a user-defined message. We can refactor the method under test to use this constructor. Even better, we can use publicly available type members to specify the errors.
Refactor the code under test
We first define two constants for the error messages at class scope:
// class under test
public const string DebitAmountExceedsBalanceMessage = "Debit amount exceeds balance";
public const string DebitAmountLessThanZeroMessage = "Debit amount less than zero";
We then modify the two conditional statements in the Debit method:
// method under test
// ...
    if (amount > m_balance)
    {
        throw new ArgumentOutOfRangeException("amount", amount, DebitAmountExceedsBalanceMessage);
    }

    if (amount < 0)
    {
        throw new ArgumentOutOfRangeException("amount", amount, DebitAmountLessThanZeroMessage);
    }
// ...
Refactor the test methods
In our test method, we first remove the ExpectedException attribute. In its place, we catch the thrown exception and verify that it was thrown in the correct condition statement. However, we must now decide between two options to verify our remaining conditions. For example in the Debit_WhenAmountIsMoreThanBalance_ShouldThrowArgumentOutOfRange method, we can take one of the following actions:
ActualValue property of the exception (the second parameter of the ArgumentOutOfRangeException constructor) is greater than the beginning balance. This option requires that we test the ActualValue property of the exception against the beginningBalancevariable of the test method, and also requires then verify that the ActualValue is greater than zero.DebitAmountExceedsBalanceMessage defined in the BankAccount class.The StringAssert.Contains method in the Microsoft unit test framework enables us to verify the second option without the calculations that are required of the first option.
A second attempt at revising Debit_WhenAmountIsMoreThanBalance_ShouldThrowArgumentOutOfRange might look like:
[TestMethod]
public void Debit_WhenAmountIsMoreThanBalance_ShouldThrowArgumentOutOfRange()
{
    // arrange
    double beginningBalance = 11.99;
    double debitAmount = 20.0;
    BankAccount account = new BankAccount("Mr. Bryan Walton", beginningBalance);

    // act
    try
    {
        account.Debit(debitAmount);
    }
    catch (ArgumentOutOfRangeException e)
    {
        // assert
        StringAssert.Contains(e.Message, BankAccount. DebitAmountExceedsBalanceMessage);
    }
}
Retest, rewrite, and reanalyze
When we retest the test methods with different values, we encounter the following facts:
debitAmount that is greater than the balance, the Contains assert passes, the exception is ignored, and so the test method passes. This is the behavior we want.debitAmount that is less than 0, the assert fails because the wrong error message is returned. The assert also fails if we introduce a temporary ArgumentOutOfRange exception at another point in the method under test code path. This too is good.debitAmount value is valid (i.e., less than the balance but greater than zero, no exception is caught, so the assert is never caught. The test method passes. This is not good, because we want the test method to fail if no exception is thrown.The third fact is a bug in our test method. To attempt to resolve the issue, we add a Fail assert at the end of the test method to handle the case where no exception is thrown.
But retesting shows that the test now fails if the correct exception is caught. The catch statement resets the exception and the method continues to execute, failing at the new assert. To resolve the new problem, we add a return statement after the StringAssert. Retesting confirms that we have fixed our problems. Our final version of the Debit_WhenAmountIsMoreThanBalance_ShouldThrowArgumentOutOfRange looks like the following:
[TestMethod]
public void Debit_WhenAmountIsMoreThanBalance_ShouldThrowArgumentOutOfRange()
{
    // arrange
    double beginningBalance = 11.99;
    double debitAmount = 20.0;
    BankAccount account = new BankAccount("Mr. Bryan Walton", beginningBalance);

    // act
    try
    {
        account.Debit(debitAmount);
    }
    catch (ArgumentOutOfRangeException e)
    {
        // assert
        StringAssert.Contains(e.Message, BankAccount. DebitAmountExceedsBalanceMessage);
        return;
    }
    Assert.Fail("No exception was thrown.");
}
In this final section, the work that we did improving our test code led to more robust and informative test methods. But more importantly, the extra analysis also led to better code in our project under test.