【筆記-Laravel】建立第一支Laravel應用程式
根據:Laravel Tutorial: Step by Step Guide to Building Your First Laravel Application
-
composer create-project --prefer-dist laravel/laravel links "7.*"
- 使用phpMyAdmin建立一個供專案使用的資料庫、使用者帳號/密碼,修改.env
DB_CONNECTION=mysql
DB_HOST=127.0.0.1
DB_PORT=3306
DB_DATABASE=wellsche_lara_links
DB_USERNAME=wellsche_laravel
DB_PASSWORD=XXXXXXXX
- php artisan migrate
遇到錯誤,說是key的長度超過,修改 app/Providers/AppServiceProvider.php,加上:
use Illuminate\Support\Facades\Schema;
(略)
public function boot()
{
    //
    Schema::defaultStringLength(191);
}
-
composer require laravel/ui
php artisan ui bootstrap --auth
提示:Please run “npm install && npm run dev” to compile your fresh scaffolding.
- npm install && npm run dev
- php artisan make:migration create_links_table –create=links
上面指令會在database/migrations下產生一個{{建立日期}}_create_links_table.php,編輯這個檔案,修改/加入up方法:
Schema::create('links', function (Blueprint $table) {
      $table->increments('id');
      $table->string('title');
      $table->string('url')->unique();
      $table->text('description');
      $table->timestamps();
});
執行:
-
php artisan migrate
php artisan migrate:fresh
php artisan make:model --factory Link
- 編輯 database/factories/LinkFactory.php,加入:
<?php

/** @var \Illuminate\Database\Eloquent\Factory $factory */

use App\Link;
use Faker\Generator as Faker;

$factory->define(Link::class, function (Faker $faker) {
    return [
        'title' => substr($faker->sentence(2), 0, -1),
        'url' => $faker->url,
        'description' => $faker->paragraph,
    ];
});
上面使用$faker->sentence()方法產生一個標題,並用substr去除句子最後的點。
- php artisan make:seeder LinksTableSeeder
- 編輯 database/seeds/LinksTableSeeder.php,加入:
public function run()
{
    factory(App\Link::class, 5)->create();
}
- 編輯database/seeds/DatabaseSeeder.php,加入:
public function run()
{
    $this->call(LinksTableSeeder::class);
}
上面的方法用來啟用LinksTableSeeder。
-
php artisan migrate:fresh --seed
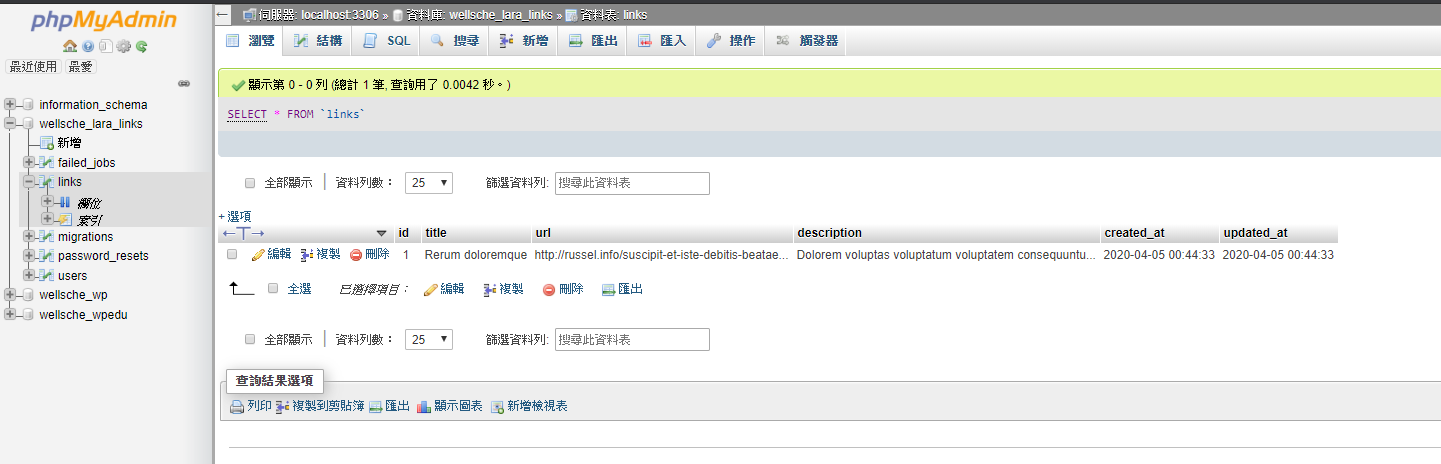
對links資料表格插入一筆資料:
INSERT INTO `links` (`id`, `title`, `url`, `description`, `created_at`, `updated_at`) VALUES
(1, 'Rerum doloremque', 'http://russel.info/suscipit-et-iste-debitis-beatae-repudiandae-eveniet.html', 'Dolorem voluptas voluptatum voluptatem consequuntur amet dolore odit. Asperiores ullam alias vel soluta ut in. Facere quia et sit laudantium culpa ea possimus.', '2020-04-04 16:44:33', '2020-04-04 16:44:33');
Routing and Views
編輯 routes/web.php,原本內容為:
Route::get('/', function () {
    return view('welcome');
});
改為:
Route::get('/', function () {
    $links = \App\Link::all();

    return view('welcome', ['links' => $links]);
});
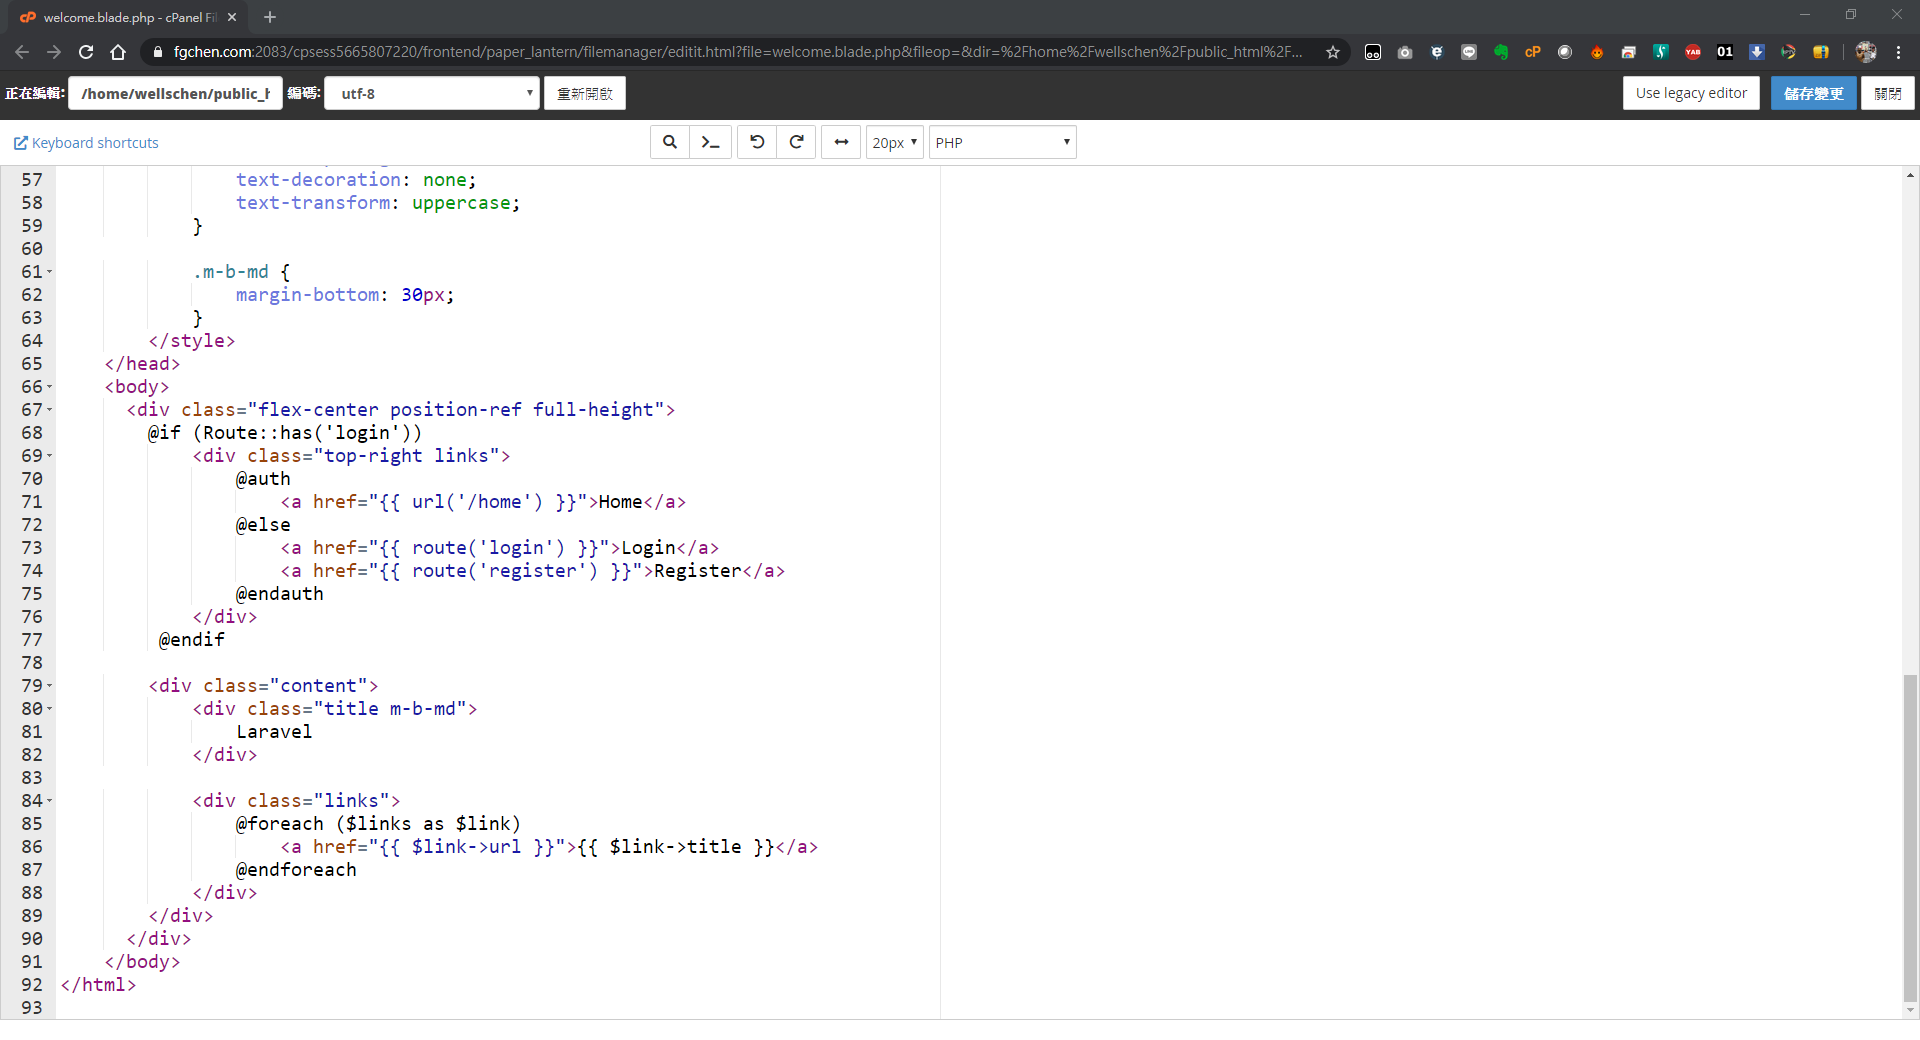
接著編輯 resources/views/welcome.blade.php,加入一個迴圈敘圈來顯示所有的連結:
@foreach ($links as $link)
    <a href="{{ $link->url }}">{{ $link->title }}</a>
@endforeach
整個welcome.blade.php程式碼列表如下:
<body>
    <div class="flex-center position-ref full-height">
        @if (Route::has('login'))
            <div class="top-right links">
                @auth
                    <a href="{{ url('/home') }}">Home</a>
                @else
                    <a href="{{ route('login') }}">Login</a>
                    <a href="{{ route('register') }}">Register</a>
                @endauth
            </div>
        @endif

        <div class="content">
            <div class="title m-b-md">
                Laravel
            </div>

            <div class="links">
                @foreach ($links as $link)
                    <a href="{{ $link->url }}">{{ $link->title }}</a>
                @endforeach
            </div>
        </div>
    </div>
</body>
啟動Web服務:
-
php artisan serve --host=fgchen.com
結果顯示:Laravel development server started: http://fgchen.com:8001 (不一定是8001,會從8000開始找沒用的埠)
看到底下的畫面:
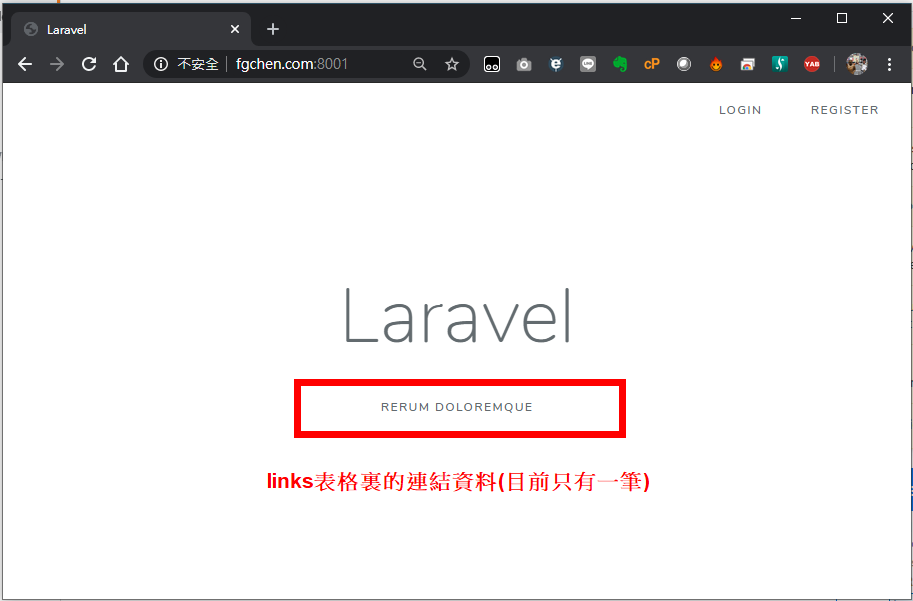
links資料表格的內容 :
製作顯示連結新增表單
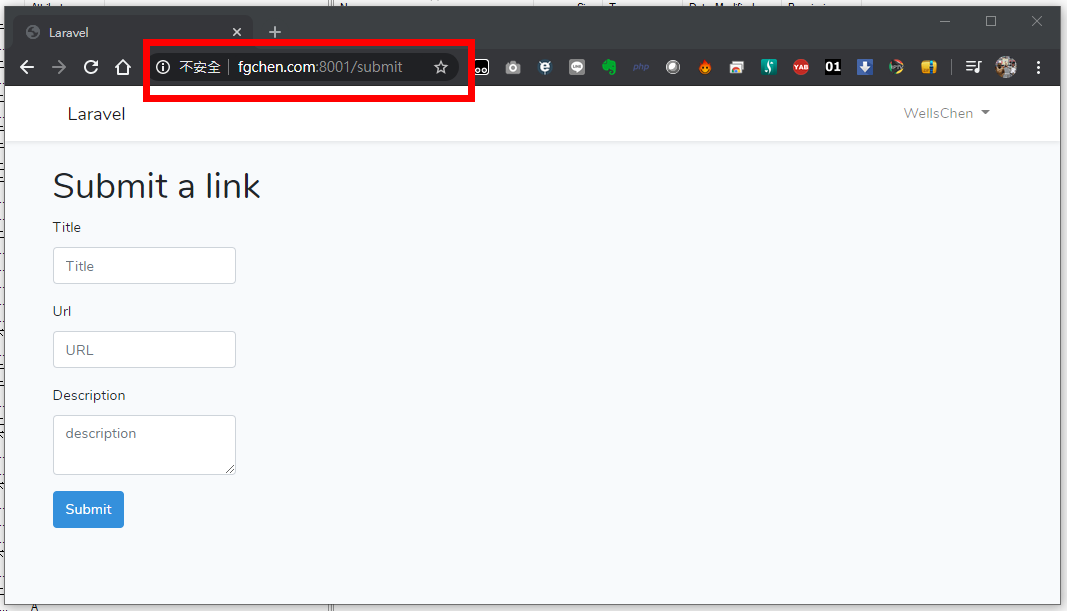
- 編輯routes/web.php,加入submit頁面路由:
Route::get('/submit', function () {
    return view('submit');
});
- 建立resources/views/submit.blade.php,內容:
@extends('layouts.app')
@section('content')
    <div class="container">
        <div class="row">
            <h1>Submit a link</h1>
        </div>
        <div class="row">
            <form action="/submit" method="post">
                @csrf
                @if ($errors->any())
                    <div class="alert alert-danger" role="alert">
                        Please fix the following errors
                    </div>
                @endif
                <div class="form-group">
                    <label for="title">Title</label>
                    <input type="text" class="form-control @error('title') is-invalid @enderror" id="title" name="title" placeholder="Title" value="{{ old('title') }}">
                    @error('title')
                        <div class="invalid-feedback">{{ $message }}</div>
                    @enderror
                </div>
                <div class="form-group">
                    <label for="url">Url</label>
                    <input type="text" class="form-control @error('url') is-invalid @enderror" id="url" name="url" placeholder="URL" value="{{ old('url') }}">
                    @error('url')
                        <div class="invalid-feedback">{{ $message }}</div>
                    @enderror
                </div>
                <div class="form-group">
                    <label for="description">Description</label>
                    <textarea class="form-control @error('description') is-invalid @enderror" id="description" name="description" placeholder="description">{{ old('description') }}</textarea>
                    @error('description')
                        <div class="invalid-feedback">{{ $message }}</div>
                    @enderror
                </div>
                <button type="submit" class="btn btn-primary">Submit</button>
            </form>
        </div>
    </div>
@endsection
- 瀏覽器輸入:http://fgchen.com:8001/submit (埠號不一定是8001)
底下,說明上面程式碼主要的重點。
blade模板條件用來測試檢驗是否有任何驗證上的錯誤,一旦有錯誤發生,啟動程式會發出警告訊息,提示使用者必需修正不合法的表單欄位值。
@if ($errors->any())
    <div class="alert alert-danger" role="alert">
        Please fix the following errors
    </div>
@endif
每一個表單欄位進行有效性的檢查,如果有錯誤會顯示一個錯誤訊、並且輸出一個"has-error"類別: (這是Bootstrap的表單驗證機制,請參考Bootstrap Forms文件說明)
<div class="form-group">
    <label for="title">Title</label>
    <input type="text" class="form-control @error('title') is-invalid @enderror" id="title" name="title" placeholder="Title" value="{{ old('title') }}">
    @error('title')
        <div class="invalid-feedback">{{ $message }}</div>
    @enderror
</div>
如果使用送出無效的資料,網頁路由會儲存此會議階段的驗證,並且將使用者重導向回到該表單。{{ old('title') }}會填上原先送出的資料,如果一個使用者忘了填寫某些欄位,那麼這些已填的欄位資料會在驗證錯誤與顯示錯誤訊息後填寫至重導向後的表單。
如果一個欄位資料出現錯誤,@error指示器(directive)提供一個錯誤訊息變數,讓你在該指示器區塊中使用:
@error('title')
    <div class="invalid-feedback">{{ $message }}</div>
@enderror
另外一種用來檢查與顯示錯誤的方式是使用 $error 變數,可在一個驗證失效與重導向後用於view中:
@if($errors->has('title'))
    <div class="invalid-feedback">{{ $errors->first('title') }}</div>
@endif
@error 指示器也使用了相同的變數,二種方式你可以自己的喜好,選擇使用。
Submitting the Form/送出表單內容
一切就緒後,我們準備將表單內容送出,再次編輯routes/web.php這個檔案,新增頁面路由來進行POST的需求:
use Illuminate\Http\Request;

Route::post('/submit', function (Request $request) {
    $data = $request->validate([
        'title' => 'required|max:255',
        'url' => 'required|url|max:255',
        'description' => 'required|max:255',
    ]);

    $link = tap(new App\Link($data))->save();

    return redirect('/');
});
注意:Illuminate\Http\Request 這行務必要放在web.php頂端處。
這個路由相較於其他的路由複雜了些。
首先,我們注入了 Illuminate\Http\Request物件, 此物件用來處理POST機制的資料,以及POST需求的其他資料。
接著,我們使用了該需求的 validate() 方法來驗證該表單資料,這個驗證的表單方法出現於Laravel 5.5,這是一個很好的快捷方法來使用驗證的其他方法,額外的好處是驗證的欄位儲存在回傳變數 $data 中,我們可以用他們來演化我們的模型。
我們需要三個欄位,並且使用管線字元/pipe character (‘|’)定義多組的規則(也就是規則的組合)。 we can define multiple rules. 這三個欄位所能定義的規則最大長度為255個字元,url欄位需要一個有效的URL(超連結)。
如果驗證失敗,一個例外會被丟出來,網頁路由會回傳給使用者原始的輸入資料,以及驗證的錯誤。
接著,我們使用tap()輔助方法來建立一個新的 Link 模型物件/實例,並儲存起來。使用 tap 可以允許我們來喚用l save() ,並且,在儲存完成後,回傳該模型物件。
一般來說,我們必須在沒有使用tap的情況下執行下列工作,只是增加了一些些的語法糖 (什麼是語法糖?Google一下他的意涵。)。
$link = new \App\Link($data);
$link->save();

return $link;
如果你要使用資料(data)來演化一個新的模型,我們可透過”批量賦值(mass assignment)”的方式允許所有的欄位可以是”fillable”的。 “fillable”屬性的設置目的可以用來避免欄位被大量的賦予不是你在陣列裏所指定的那些資料。 (以後看到實例再來補充說明。)
mass assignment 被翻譯成批量賦值,參考文章:Laravel中批量賦值Mass-Assignment的真正含義詳解
思考一分鐘:在資料模型中,我們正從那些請求與批量賦值取得使用的輸入,需對使用者輸入資料的危險性有所察知,避免使用者直接透過一個表單來操弄資料。
在我們的例子中,我們驗證每一個欄位,使得這些欄位在批量賦值的過程中是安全的。為了允許我們的模型可以指定值給那些欄位,開啟 app/Link.php 檔案,並且透過更新進行檢視,像底下的方式:
<?php

namespace App;

use Illuminate\Database\Eloquent\Model;

class Link extends Model
{
    protected $fillable = [
        'title',
        'url',
        'description'
    ];
}
如果不要批量賦值,可以像我們底下的程式碼進行:
$data = $request->validate([
    'title' => 'required|max:255',
    'url' => 'required|url|max:255',
    'description' => 'required|max:255',
]);

$link = new \App\Link;
$link->title = $data['title'];
$link->url = $data['url'];
$link->description = $data['description'];

// Save the model
$link->save();
最後一件我們在POST路由所做的事情:在儲存連結成功之後,讓使用者頁面導向回到首頁。
此時此刻,我們的表單應該要避免送出那些包含有不合法欄位的連結。
如果該表單通過驗證,資料應該被儲存在資料庫中,然後使用者頁面被導向至首頁。
Testing the Form Submission/測式表單的提交
我們有一個基本的工作表單,但是我們應該確定的是持續地進行測試的撰寫。We have a basic working form, but we should make sure it continues to work by writing tests.
Laravel把HTTP測試變成一件容易的事,那些是在路由與中介軟體上的整合測試執行,我們寫了少量的功能測試來驗證我們的程式碼是如如預期地工作。
在我們開始之前,我們需要對在 phpunit.xml 檔案裏的事情進行些微的調整,我們也才好使用一個內置於記憶體中的SQLite資料庫管理系統。你必須確保適當的PHP模組是已安裝好的。
在Laravel 7, 專案的phpunit.xml 檔案組設定了一個內置於記憶體中的 SQLite資料庫。. 如果你正在使用一個較舊版本的Laravel,為了變更該資料庫的連結,你需要加上如下的操作::
<php>
        <!-- ... -->
    <env name="DB_CONNECTION" value="sqlite"/>
    <env name="DB_DATABASE" value=":memory:"/>
        <!-- ... -->
</php>
接著,移除掉那些伴隨著Laravel而來的預置測試:
rm tests/Feature/ExampleTest.php
我們已經準備好要透過HTTP請求來測試/submit表單,目的是要確保頁面路由的驗證、儲存、與頁面導向正常工作。
首先,我們建立一個新功能測試來看看頁面路由是否正常:(First, let’s create a new feature test to test against our route:)
php artisan make:test SubmitLinksTest
這個命令以適當的相依性建立了一個新的測試檔案,其中包含了一個我們要用來驗證我們有效的連結是否被儲存至資料庫的一個RefreshDatabase。 The command creates a new testing file with the proper dependencies, including a RefreshDatabase trait that we are going to use to verify that our links are being saved to the database when valid.
開啟新的 tests/Feature/SubmitLinksTest.php 檔案,在該類別中寫了幾個骨架測試 (let’s define a few skeleton tests in the body of the class that we are going to flesh out):
/** @test */
function guest_can_submit_a_new_link() {}

/** @test */
function link_is_not_created_if_validation_fails() {}

/** @test */
function link_is_not_created_with_an_invalid_url() {}

/** @test */
function max_length_fails_when_too_long() {}

/** @test */
function max_length_succeeds_when_under_max() {}
These tests should give you a high-level overview of what we are going to test: 這些測試應該給了你們一些我們即將進行測試的一個從高層次的概觀
註:verification 驗證建造出來的事物是否正確,validation 確認製造事物的過程是否正確。這跟製造業的QC與QA有類似的意涵,QC產品正確性檢查,QA製造過程的正確確認。
- Verify that valid links get saved in the database 驗證合法的連結儲存到資料庫。
- When validation fails, links are not in the database 當合法性確認失敗,連結沒有儲存至資料庫。
- Invalid URLs are not allowed 非法的URLs是不允許的
- Validation should fail when the fields are longer than the
max:255validation rule 當欄位值長度超過255個字元,合法性確認不通過。 - Validation should succeed when the fields are long enough according to
max:255. 當欄位值長度在255個字元內,合法性確認通過。
我們可能會漏掉一些事情,但因為這是寫給初入門的第一支Laravel應用,這裏就只列出一些基本的HTTP測試。
Saving a valid link/合規連結的儲存
The first test we’ll write is the test that verifies that valid data gets stored in the database: 我們要進行的第一個測試是驗證合規的連結儲存至資料庫正確性
<?php

namespace Tests\Feature;

use Illuminate\Validation\ValidationException;
use Tests\TestCase;
use Illuminate\Foundation\Testing\RefreshDatabase;

class SubmitLinksTest extends TestCase
{
    use RefreshDatabase;

    /** @test */
    function guest_can_submit_a_new_link()
    {
        $response = $this->post('/submit', [
            'title' => 'Example Title',
            'url' => 'http://example.com',
            'description' => 'Example description.',
        ]);

        $this->assertDatabaseHas('links', [
            'title' => 'Example Title'
        ]);

        $response
            ->assertStatus(302)
            ->assertHeader('Location', url('/'));

        $this
            ->get('/')
            ->assertSee('Example Title');
    }
}
Take note of the RefreshDatabase trait which makes sure that each test has a new database to give each test a pristine database environment with all the migrations.
RefreshDatabase用來確保每一個測試都有一個原始乾淨的資料庫環境。
Our first test submits valid post data, which returns a response object that we can use to assert that our route responded as expected. We verify that the database contains a record with the title we just created. 我們的第一個測試提交了合規的post資料,當中回傳了一個回應物件,透過這個回應物件,我們可以測試我們的路由回應是否正常工作。我們驗證資料庫包含了一個我們所建立的標題資料。
富國註:assert,這個單字叫斷言,在Java裏,assert用來斷言某件事必然發生,如果沒有發生…就丟出一個assertion error。
接著,我們驗證回應是一個302狀態碼,以及一個指向首頁的 Location 檔頭資料。 Next, we verify that the response was a 302 status code with a Location header pointing to the homepage.
最後,我們回到首頁確連結是否正確地被顯示在首頁上。Last, we request the home page and verify that the link title is visible on the homepage.
讓我們執行我們的第一個測試來確認預期的事情是否通過驗證。Let’s run our first test to make sure things pass as expected.
Laravel 7 adds a new artisan test command, or you can use phpunit:
php artisan test

# Or run phpunit directly
vendor/bin/phpunit
You should see that the test suite passes: (畫面要加上來)
Testing Failed Validation
當一個使用者提交一個不好的資料,我們預期驗證過程會觸發一個例外,從而確認我們的確認層次的工作情形:
When a user generally submits bad data, we expect the validation to trigger an exception and we can use that to make sure our validation layer is working:
/** @test */
function link_is_not_created_if_validation_fails()
{
    $response = $this->post('/submit');

    $response->assertSessionHasErrors(['title', 'url', 'description']);
}
我們使用Laravel’s assertSessionHasErrors() 來發出session過程中發生合規錯誤的assertion。因為我們提交了空資料給頁面路由,我們預期required規則會觸發(這英文寫得怪,trigger後面沒有目標詞… S V O)
We use Laravel’s assertSessionHasErrors() to make sure that the session has validation errors for each of our required fields. Because we submitted empty data to the route, we expect the required rule will trigger for each field.
Let’s run the test suite to verify our work thus far:
讓我們執行這系列的測試來驗證我們目前為止的工作:
$ php artisan test tests/Feature/SubmitLinksTest

   PASS  Tests\Feature\SubmitLinksTest
  ✓ guest can submit a new link
  ✓ link is not created if validation fails

  Tests:  2 passed
  Time:   0.32s
Testing URL Validation
We expect only valid URLs to pass validation so that our application doesn’t try to display invalid data. 我們預期僅有合法的URLs可以通過合法性確認,確保我們的應用程式不會試著顯示不合法的資料。
/** @test */
function link_is_not_created_with_an_invalid_url()
{
    $this->withoutExceptionHandling();

    $cases = ['//invalid-url.com', '/invalid-url', 'foo.com'];

    foreach ($cases as $case) {
        try {
            $response = $this->post('/submit', [
                'title' => 'Example Title',
                'url' => $case,
                'description' => 'Example description',
            ]);
        } catch (ValidationException $e) {
            $this->assertEquals(
                'The url format is invalid.',
                $e->validator->errors()->first('url')
            );
            continue;
        }

        $this->fail("The URL $case passed validation when it should have failed.");
    }
}
Laravel has a withoutExceptionHandling() method which disables Laravel’s route exception handling code used to generate an HTTP response after an exception.
withoutExceptionHandling()方法關閉頁面路由的例外處置。
We use this to our advantage so we can inspect the validation exception object and assert against the error messages.
我們設置並走訪每一個狀況(你可以加上你所想要涵蓋的情境),並在每一次的走訪中補捉ValidationException物件。
We loop through various cases (add your own if you’d like to cover more scenarios) and catch instances of ValidationException. If the text makes it past the exception handling, we manually fail the test because we expect the route throws a ValidationExcepiton exception each time.
在catch區塊中,我們使用validator 物件來檢查url錯誤,並且丟出實際的錯誤訊息。 The catch block uses the validator object to check the url error and asserts that the actual error message matches the expected validation error message.
I like using the try/catch technique, followed by a $this->fail() as a safety harness instead of using exception annotations provided by PHPUnit. Be sure to return in the caught exception to avoid confusing test failures. I feel catching the exception allows the ability to do assertions that wouldn’t otherwise be possible and provides a more granular control that I like in most cases.
Testing Max Length Validation
We will test a few scenarios with the max:255 validations rules: when the field fails max-length validation with a length of 256 characters, and when the field is long enough to pass validation at 255 characters.
Although Laravel contains the max validation rule functionality, I like to test it to verify that my application applies the rules. If someone removes the max validation rule, then the tests will catch it.
I like to test the threshold of min and max validation rules as an extra caution to make sure my application respects the min and max boundaries I set.
First, let’s test the “max length” scenario:
/** @test */
function max_length_fails_when_too_long()
{
    $this->withoutExceptionHandling();

    $title = str_repeat('a', 256);
    $description = str_repeat('a', 256);
    $url = 'http://';
    $url .= str_repeat('a', 256 - strlen($url));

    try {
        $this->post('/submit', compact('title', 'url', 'description'));
    } catch(ValidationException $e) {
        $this->assertEquals(
            'The title may not be greater than 255 characters.',
            $e->validator->errors()->first('title')
        );

        $this->assertEquals(
            'The url may not be greater than 255 characters.',
            $e->validator->errors()->first('url')
        );

        $this->assertEquals(
            'The description may not be greater than 255 characters.',
            $e->validator->errors()->first('description')
        );

        return;
    }

    $this->fail('Max length should trigger a ValidationException');
}
Again, we disable exception handling and create data that is one character too long to pass validation.
We assert each field to make sure they all have a max length validation error message.
Last, we need to return in the caught exception and use the $this->fail() as a safety harness to fail the test.
Next, we test the “under the max” scenario:
/** @test */
function max_length_succeeds_when_under_max()
{
    $url = 'http://';
    $url .= str_repeat('a', 255 - strlen($url));

    $data = [
        'title' => str_repeat('a', 255),
        'url' => $url,
        'description' => str_repeat('a', 255),
    ];

    $this->post('/submit', $data);

    $this->assertDatabaseHas('links', $data);
}
We make the form data long enough to pass max:255 validation and assert that the data is in the database after submitting the data.
Run the test suite and make sure everything is passing:
$ php artisan test tests/Feature/SubmitLinksTest

   PASS  Tests\Feature\SubmitLinksTest
  ✓ guest can submit a new link
  ✓ link is not created if validation fails
  ✓ link is not created with an invalid url
  ✓ max length fails when too long
  ✓ max length succeeds when under max

  Tests:  5 passed
  Time:   0.58s
完結
註:後台終端機的命令列編輯器沒有Windows視窗這邊的編輯好用,可以用虛擬主機後台的網頁版的編輯器或者直接透過Bitvise-FTP開啟檔案,並指定用Atom來編輯遠端的檔案。