作者: 陳 富國
現職:弘光科技大學 資管系 助理教授 | 專長:醫療/照護資訊系統、3D列印技術、機電資訊整合互動系統、虛擬機器環境/Java執行環境作業系統/分散式作業系統、軟體工程/物件導向軟體技術
【筆記-SQL】使用MySQL Workbench建立資料庫的E-R圖
在開發一個系統時,先行將系統所要處理的資料模型建立出來是一個必要的關鍵動作,ER模型的繪製在很多設計工具都有支援,但MySQL Workbench提供了一個設計圖與資料庫直接連接的解決方案,ER圖設計好之後,資料庫那邊的資料表格及相關的關聯也建立起來。
【筆記-Laravel】Laravel專案的執行
初入此坑,大部份的教學都教php artisa serve來啟動新專案的服務…,這是在沒有執行引擎的環境下必須這樣測試開發的專案,只是,這樣好累,特別是在虛擬主機上,還要…
其實不用這麼累的,如果我們有架設網頁的執行環境,像是在Windows下的XAMPP,或在我主機上的虛擬主機,都可以直接透過瀏覽器來運行開發的專案,作法是:
1.將public目錄下的.htaccess與index.php移至根目錄
2.修改index.php,將2個require敘述裏的路徑刪除 “../”
(略)
require __DIR__.'/vendor/autoload.php';
(略)
$app = require_once __DIR__.'/bootstrap/app.php';
改完後就可以直接下url,http://localhost/projects/layout_example/
這是使用xampp在Windows上開發的方式,虛擬主機也是一樣的做法。
問題:如果在Windows下,務必要把avast這個防毒軟體關掉,這個防毒軟體會把根目錄裏的server.php當成病毒刪除,若發生刪除的現象,可以從別的專案複製server.php過來,並且再次執行 (關掉avast)。
【筆記-Laravel】Laravel pivot tables: 簡單到進階的資料表格多對多關係建立
這個學習主要在講解應用Laravel樞紐表實作資料表格的多對多關係,這邊用專案與參與者的多對多關係:一個專案可以有多位的參與者,一個參與者可以參與多個專案,多對多的關係要分解成二個一對多的關係: 專案基本資料 —-< 專案與參與者 >—- 參與者基本資料。
學習來源:Laravel Pivot Tables: Simple to Advanced Many-to-Many
【筆記-Laravel】Laravel的目錄結構
底下表格是從Laravel官方文件複製過來的5、6、7版的目錄結構,完全一樣,沒有變動。
| 5.8 | 6.x | 7.x |
The Root Directory
The App Directory
放置應用程式的核心程式碼,此部份目錄底下目錄細節在後敘述。
The Bootstrap Directory
此目錄包含用來啟動框架的app.php檔案,此目錄亦放置了cache 目錄,包含了框架為了效能最佳化所產生的檔案。
The Config Directory
應用程式設置目錄。
The Database Directory
包含資料庫遷移、模型工廠、以及種子,如果有必要的話,可以在這個目錄放置SQLite資料庫。
The Public Directory
放置 index.php 檔, 應用程式的進入點,其中定義了自動載入機制(autoloading),這個目錄也放置了如images, JavaScript, and CSS等檔案。
The Resources Directory
放置了所有的 views 檔案,以及那些未經編繹的LESS, SASS, 或 JavaScript,這個目錄也放置了語系檔案。
The Routes Directory
包含了所有應用程發的路由定義,Laravel預設底下幾個檔案: web.php, api.php, console.php and channels.php.
web.php 檔案包含了包含了由 RouteServiceProvider所產生放置於web中介軟體群組的路由檔案,這些路由提供了會談狀態、CSRF 保護機制、以及cookie加密。 如果應用程式未包含一個無狀態的 RESTful API,所有的路由將會大致放置於 web.php 檔案。
api.php 檔案包含那些由RouteServiceProvider 放置於 api 中介軟體群組的路由檔案,這些路由提供了rate limiting。這些路由基本上是無狀態的,使得透過這些路由進到應用程式的所有請求會透過tokens被authenticated(身份認證),,並且無法存取會談 session 狀態。
console.php 用來定義所有閉包中控台指令,每個閉包指令繫結一個命令實例,充許一個簡單的方法與每一個指令IO方法互動,即使這個檔案沒有定義 HTTP 路由,它定義了中控台模式的應用程式進入點(路由)。
channels.php 註冊應用程式所支援的事件廣播頻道。
The Storage Directory
此目錄包含了所有編譯過的Blade樣板、檔案型式的狀態、檔案快取、及其他由框架(Laravel)所產生的檔案。 這個目錄分成 app, framework, p及 logs 幾個目錄。app目錄可以用來儲存應用程式所產生的任何檔案,framework目錄用來儲存由框架所產生的檔案及快取資料,最後,logs目錄包含了應用程式的記錄檔。
storage/app/public 目錄可以用來儲存使用者產生的檔案,像是avatars個人資料檔案,這些本來就應該開放大眾存取的。你應該在public/storage建立一個symbolic link指向這個目錄,可以用” php artisan storage:link “命令建立這個目錄符號連結 (虛擬目錄的意思)。
The Tests Directory
此目錄包含了自動測試案例,PHPUnit 是一個立即可用的測試範例,每個測試類別都應用Test結尾,你可以使用 phpunit 或 php vendor/bin/phpunit 指令來執行你的測試。
The Vendor Directory
此目錄放置 Composer 依存資料。
The App Directory
這個目錄是應用程式的主要部份,框架使用PSR-4 autoloading standard 來自動載入這個目錄。
app 目錄包含了各種不同的子目錄,像是 Console, Http, 和Providers,Console 和 Http 目錄內含提供進入應用程式核心的API。 HTTP 協定和CLI 都是用來和應用程式互動的機制,但是並不實際包含應用程式邏輯。換句話說,有二種方式發出命令給應用程式, Console 目錄包含所有的Artisan(工匠)命令, 而Http 目錄則是用來包含應用程式的控制器/controllers, 中介軟體/middleware, 和請求/requests。
當你使用make工匠(artisan)命令建立類別時,會在app目錄下產生各種不同的子目錄,例如 ,app/Jobs 目錄會在你使用 make:job 工匠/Artisan 命令建立一個job/工作類別後被建立。
Many of the classes in the app 目錄下的許多類別可以透過Artisan命令建立,可以執行php artisan list make 命令來知道可用的命令。
The Broadcasting Directory 廣播目錄
The Broadcasting directory contains all of the broadcast channel classes for your application. These classes are generated using the make:channel command. This directory does not exist by default, but will be created for you when you create your first channel. To learn more about channels, check out the documentation on event broadcasting. 預設這個目錄是不存在的,除非你執行了make:channel命令。在一個頻道裏,事件可以被廣播…
The Console Directory 中控台目錄
The Console directory contains all of the custom Artisan commands for your application. These commands may be generated using the make:command command. This directory also houses your console kernel, which is where your custom Artisan commands are registered and your scheduled tasks are defined.
The Events Directory 事件目錄
This directory does not exist by default, but will be created for you by the event:generate and make:event Artisan commands. The Events directory houses event classes. Events may be used to alert other parts of your application that a given action has occurred, providing a great deal of flexibility and decoupling.
The Exceptions Directory 例外目錄
這個目錄是用來放置應用程式的例外處理,也是一個好的地方用來放置任何你應用程式所丟出的任何例外。如果你希望客制化例外如何被記錄或生成,你應該修改這個目錄下的Handler類別。
The Exceptions directory contains your application’s exception handler and is also a good place to place any exceptions thrown by your application. If you would like to customize how your exceptions are logged or rendered, you should modify the Handler class in this directory.
The Http Directory
幾乎所有用來處理應用程式請求的邏輯都被放在這個目錄中。
The Http directory contains your controllers, middleware, and form requests. Almost all of the logic to handle requests entering your application will be placed in this directory.
The Jobs Directory
這個目錄用來放置應用程式的可排隊工作,應用程式的工作可以用排隊的方式執行,或者在現有的請求生命週期中同步執行。
This directory does not exist by default, but will be created for you if you execute the make:job Artisan command. The Jobs directory houses the queueable jobs for your application. Jobs may be queued by your application or run synchronously within the current request lifecycle. Jobs that run synchronously during the current request are sometimes referred to as “commands” since they are an implementation of the command pattern. 那些同步執行的工作有時被看做是命令,因為這些工作是command pattern的一個實作。
The Listeners Directory 事件監聽器目錄
這個目錄包含了所有事件的處理,事件監聽器接收到一個事件後,會執行對應於事件的處理邏輯。
This directory does not exist by default, but will be created for you if you execute the event:generate or make:listener Artisan commands. The Listeners directory contains the classes that handle your events. Event listeners receive an event instance and perform logic in response to the event being fired. For example, a UserRegistered event might be handled by a SendWelcomeEmail listener.
The Mail Directory 郵件目錄
這個目錄包含了所有應用程式所發出的郵件。
This directory does not exist by default, but will be created for you if you execute the make:mail Artisan command. The Mail directory contains all of your classes that represent emails sent by your application. Mail objects allow you to encapsulate all of the logic of building an email in a single, simple class that may be sent using the Mail::send method.
The Notifications Directory 通知目錄
這個目錄包含所有由應用程式發出的交易通知,例如,一個在應用程式內部發生的事件通知。Lavavel的通知機制抽象化了在email, Slack, SMS,或儲存於一個資料庫中的通知發送。
This directory does not exist by default, but will be created for you if you execute the make:notification Artisan command. The Notifications directory contains all of the “transactional” notifications that are sent by your application, such as simple notifications about events that happen within your application. Laravel’s notification features abstracts sending notifications over a variety of drivers such as email, Slack, SMS, or stored in a database.
The Policies Directory 政策目錄
This directory does not exist by default, but will be created for you if you execute the make:policy Artisan command. The Policies directory contains the authorization policy classes (授權政策類別) for your application. Policies are used to determine if a user can perform a given action against a resource. For more information, check out the authorization documentation. 這些規則用來決定一個使用者是否有權限在一個資源上執行動作。
The Providers Directory 提供者目錄
此目錄包含了所有服務提供者…
The Providers directory contains all of the service providers for your application. Service providers bootstrap your application by binding services in the service container, registering events, or performing any other tasks to prepare your application for incoming requests.
In a fresh Laravel application, this directory will already contain several providers. You are free to add your own providers to this directory as needed. 在一個剛建立的Laravel應用程式,這個目錄會包含數個提供者。我們可以依自己的需要來加入所需要的提供者。
The Rules Directory 規則目錄
此目錄包含了應用程式客制化的確認規則 (輸入資料的正確性確認)。
This directory does not exist by default, but will be created for you if you execute the make:rule Artisan command. The Rules directory contains the custom validation rule objects for your application. Rules are used to encapsulate complicated validation logic in a simple object. For more information, check out the validation documentation.
【筆記-Laravel】Laravel的頁面路由
建立所有頁面的路由,編輯routes/web.php
<?php

use Illuminate\Support\Facades\Route;

/*
|--------------------------------------------------------------------------
| Web Routes
|--------------------------------------------------------------------------
|
| Here is where you can register web routes for your application. These
| routes are loaded by the RouteServiceProvider within a group which
| contains the "web" middleware group. Now create something great!
|
*/

Route::get('/', function () { return view('pages.home'); });

Route::get('/contact', function () { return View('pages.contact'); });
上面將首頁(網頁根目錄)指向pages下的home.blade.php (在Laravel裏,檔案結構轉換成點的方式表達,並且省略掉附屬檔名blade.php)
/contact指向pages下的contact.blade.php
在這個例子,我們將所有的頁面分別放置在views目錄下的pages、includes、layouts目錄:
+---includes
|       footer.blade.php
|       head.blade.php
|       header.blade.php
|
+---layouts
|       default.blade.php
|
\---pages
        contact.blade.php
        home.blade.php
底下,我們將所有的頁面建立起來:
includes:
head.blade.php
<!DOCTYPE html>
<html lang="en">
<head>
  <meta charset="UTF-8">
  <meta name="viewport" content="width=device-width, initial-scale=1.0">
  <meta http-equiv="X-UA-Compatible" content="ie=edge">
  <title>Laravel layout example</title>
  <!-- 從CDN載入bootstrap -->
  <link rel="stylesheet" href="//netdna.bootstrapcdn.com/twitter-bootstrap/3.0.3/css/bootstrap-combined.min.css">
</head>
header.blade.php
<div class="navbar">
   <div class="navbar-inner">
       <a id="logo" href="/">Laravel頁面路由範例</a>
       <ul class="nav">
           <li><a href="/">首頁</a></li>
           <li><a href="/contact">與我聯繫</a></li>
       </ul>
   </div>
</div>
footer.blade.php
<div id="copyright text-right">© Copyright 2020 陳富國 弘光科技大學 資訊管理系</div>
layouts:
default.blade.php
<!doctype html>
<html>
<head>
   @include('includes.head')
</head>
<body>
<div class="container">
   <header class="row">
       @include('includes.header')
   </header>
   <div id="main" class="row">
           @yield('content')
   </div>
   <footer class="row">
       @include('includes.footer')
   </footer>
</div>
</body>
</html>
pages:
home.blade.php
@extends('layouts.default')
@section('content')
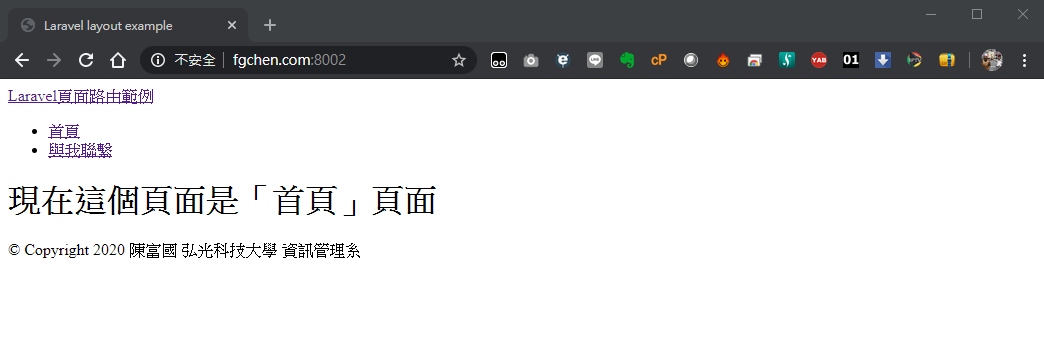
<h1>現在這個頁面是「首頁」頁面</h1>
@stop
contact.blade.php
@extends('layouts.default')
@section('content')
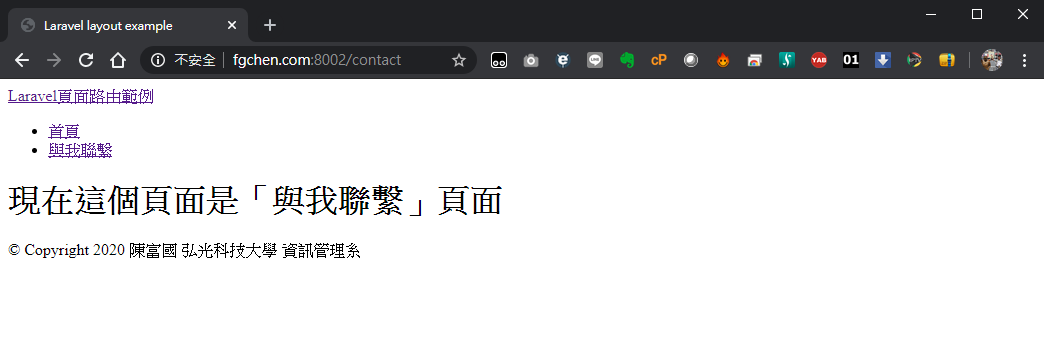
<h1>現在這個頁面是「與我聯繫」頁面</h1>
@stop
結果:
【筆記-Laravel】Laravel學習資源
Laravel 8
Frameworks
List of Demos
Documentations:
- Laravel 7 Official Document
- Laravel 5中文文件
- Laravel 7 中文文档(簡體)
- Laracasts
- Laravel modules
- Laravel 4 入門書
General tutorials:
- Laravel Tutorial
- Laravel Tutorial
- ItSolutionStuff.com
- Larvel 7 Basic to Advanced
- Learn Laravel (Best Laravel Tutorials for Beginners)
- Building Web Applications From Scratch With Laravel
- Laravel Tutorial: Step by Step Guide to Building Your First Laravel Application
- Create your First Application with Laravel
- How to Create Multi Level Dynamic Menu In Laravel Treeview
- Laravel 5.5 Socialite : Login with Twitter, Facebook, Google, Github, Linkedin etc #Part1
View, Routing, and Blade template (刀鋒樣板)
- Laravel Menus
- Laravel Routing Made Easy
- Different ways for passing data to view in Laravel (四個把資料送到View的方式)
- 路由 in Laravel 7 中文文檔(簡體)
- reate Layout Using Laravel Blade Templating Engine
- Integrate Bootstrap Template with Laravel
- Laravel 學習筆記(11) – Route 進階
- aravel – 設計一個好的 Blade Template, 使用 @parent
- Laravel Routing – 8 Advanced Tips: Languages, APIs, Groups, Validation
- [ LARAVEL ] 初心者之路#05 – LARAVEL ROUTING 路由控制
Authentication & Authorization (密碼驗證與授權)
- Laravel 5.5 Middleware Tutorial : How to Create Login with Multiple Level Access in laravel 5.5
- Laravel Multiple Guards Authentication: Setup and Login
- Laravel 7/6 Multi Auth (Authentication) Tutorial
Roles and Permissions
Repository
Service provider
Flash message (我翻譯成轉場訊息,其他可能的翻譯:快閃訊息、提醒訊息…)
CRUD
- Create PHP Laravel 7/6 CRUD Web App with MySQL Database
- Laravel 7 CRUD Tutorial: Build a CRUD App with MySQL and Bootstrap 4
- Laravel 5.8 REST CRUD API Tutorial – Build a CRM [PART 1]: Eloquent Models and Relationships
- Laravel 7/6 REST API CRUD Tutorial – Build a CRM [PART 2]: Eloquent Models and Relationships
- Laravel 5.8 Ajax Crud Tutorial using DataTables
Admin (後台管理)
Database Model & E-R relationships
- Eloquent by Example
- Laravel Eloquent Tutorial With Examples
- Pivot tables and many-to-many relationships
- Using Laravel Eloquent’s Many to Many Relationship
- Polymorphic relationships in Laravel and their use cases
- 介绍 Eloquent 关联中的多态关联(Polymorphic Relations)
Real system examples: order system,inventory management system, etc.
- Laravel E-Commerce Application Development – Order Management
- Building an Order Tracking System in Laravel Powered by Twilio SMS
- estarter-ecommerce-for-laravel (my build)
- E-commerce-Food-Order-System-Laravel-Project
Laravel Application Market
Micro-framework
【筆記-Laravel】Laravel 7 CRUD 範例
資料來源:Laravel 7 CRUD Example | Laravel 7 Tutorial Step By Step
說明:
這是PHP Laravel的一個CRUD範例,示範如何一步一步建立一個CRUD的應用。
PHP Laravel是一個後端系統框架,可以讓一個程式設計師專注於應用程式問題邏輯(解決商用/工業問題),不用花太多心思在技術細節上,也就是說,一個資訊系的學生只需要建立技術觀念,在不需要實作技術細節的狀況下,就能建立一個面面俱到的應用程式。一般來說,一個資訊系的學生要要能力寫一個應用系統往往要學非常多的學科、技術、觀念等,才有辦法建立一個”完整”的應用程式,難度之高,連我都覺得寫系統是一個超級有挑戰的工作,底下這張圖非常傳神,”嚇死一堆寶寶了”,不少念了四年的資訊系學生不想碰程式設計(特別是女生,大部份是因為社會刻板印象吧,自覺女生本來應該很”不理工”。)。因為要寫一個好的系統不容易,導入適當的框架到學生的學習是有必要的,不要coding底層細節來建立一個完整的系統,只是要學Laravel框架,基礎也是要有的,JavaScript、HTML、CSS、PHP、Bootstrap(前端UI)、SQL、資料庫模型、系統分析與設計…,有好的基礎才能在框架協助下建立好的應用程式(框架不是銀子彈)。

新增專案:
- laravel new crud-example
或者使用下列的指令:
- composer create-project –prefer-dist laravel/laravel crud-example
執行完畢會新增一個目錄crud-example,進入該目錄,並且更新前端的相依資料
- cd crud-example
- npm install
編輯.env檔,修改資料庫連接資料:
DB_CONNECTION=mysql
DB_HOST=127.0.0.1
DB_PORT=3306
DB_DATABASE=wellsche_crud_example
DB_USERNAME=wellsche_laravel
DB_PASSWORD=xxxxxxxx
首先編輯/app/Providers/AppServiceProvider.php,加入表料庫schema相關的修改:
<?php

namespace App\Providers;
use Illuminate\Support\Facades\Schema;
use Illuminate\Support\ServiceProvider;

class AppServiceProvider extends ServiceProvider
{
    /**
     * Register any application services.
     *
     * @return void
     */
    public function register()
    {
        //
    }

    /**
     * Bootstrap any application services.
     *
     * @return void
     */
    public function boot()
    {
      Schema::defaultStringLength(191);
    }
}
執行:
- php artisan migrate
所需要的資料表格schema會建立好
建立model與mirgation檔
- php artisan make:model Corona -m
上面指令會產生2個檔案:
- app目錄:Corona.php
- database/migrations目錄:[timestamp]create_coronas_table.php
編輯[timestamp]create_coronas_table.php
原來的create_coronas_table.php裏的up函式:
public function up()
{
    Schema::create('coronas', function (Blueprint $table) {
        $table->id();
        $table->timestamps();
    });
}
改為:(加入2個字串表格欄位:country_name與symptoms,1個整數表格欄位cases)
public function up()
{
        Schema::create('coronas', function (Blueprint $table) {
            $table->id();
            $table->string('country_name');
            $table->string('symptoms');
            $table->integer('cases');
            $table->timestamps();
        });
 }
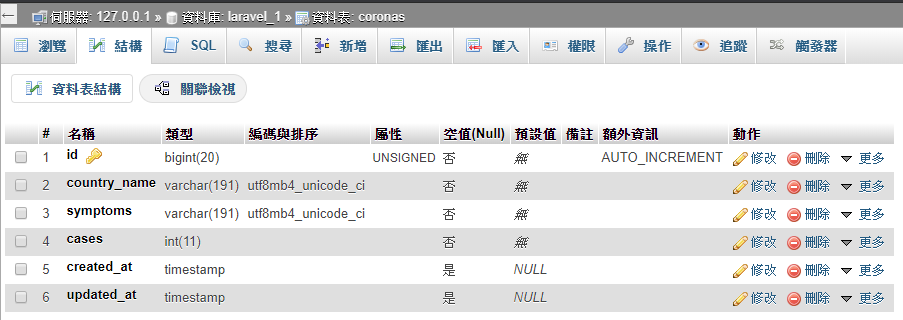
上面定義了corons資料表格的欄位schema,定義完後再下一次指令,完成資料表格的schema設定:
- php artisan migrate
此時可到資料庫那邊檢視coronas這個表格的欄位建立情形。
如果要反轉migration的過程,可以執行php artisan migrate:rollback來刪除coronas這個表格 (會執行down()函式)。
接著編輯Corona.php,來加入fillable的屬性:(設置’country_name’, ‘symptoms’, ‘cases’這三個欄位是可以填寫的。)
<?php

// Corona.php

namespace App;

use Illuminate\Database\Eloquent\Model;

class Corona extends Model
{
    protected $fillable = ['country_name', 'symptoms', 'cases'];
}
Step 3. 建立路由與控制器
- php artisan make:controller CoronaController –resource
會在CoronaController.php(app\Http\Controllers)建立6個方法:
- index 顯示Coronas資料清單
- Create 顯示Coronas的新增表單
- Store 將Create那邊的表單所傳來的資料儲存至資料庫。
- Show 顯示一個特定的Coronas資料
- Edit 顯示Coronas資料的修改表單
- Update 將Edit那邊的資料新增至資料庫
- Destroy 刪除一筆Corona
CoronaController.php列表:
<?php

namespace App\Http\Controllers;

use Illuminate\Http\Request;

class CoronaController extends Controller
{
    /**
     * Display a listing of the resource.
     *
     * @return \Illuminate\Http\Response
     */
    public function index()
    {
        //
    }

    /**
     * Show the form for creating a new resource.
     *
     * @return \Illuminate\Http\Response
     */
    public function create()
    {
        //
    }

    /**
     * Store a newly created resource in storage.
     *
     * @param  \Illuminate\Http\Request  $request
     * @return \Illuminate\Http\Response
     */
    public function store(Request $request)
    {
        //
    }

    /**
     * Display the specified resource.
     *
     * @param  int  $id
     * @return \Illuminate\Http\Response
     */
    public function show($id)
    {
        //
    }

    /**
     * Show the form for editing the specified resource.
     *
     * @param  int  $id
     * @return \Illuminate\Http\Response
     */
    public function edit($id)
    {
        //
    }

    /**
     * Update the specified resource in storage.
     *
     * @param  \Illuminate\Http\Request  $request
     * @param  int  $id
     * @return \Illuminate\Http\Response
     */
    public function update(Request $request, $id)
    {
        //
    }

    /**
     * Remove the specified resource from storage.
     *
     * @param  int  $id
     * @return \Illuminate\Http\Response
     */
    public function destroy($id)
    {
        //
    }
}
編輯routes\web.php,插入以下程式碼:
// web.php

Route::get('/', function () {
    return view('welcome');
});
Route::resource('coronas', 'CoronaController');
透過–resource, 你可以使用這個方法resource()產生以上所有的路由,而不需要一一個別地指定以上的路由。
Actually, by adding the following code line, we have registered the multiple routes for our app. We can check it using the following command.
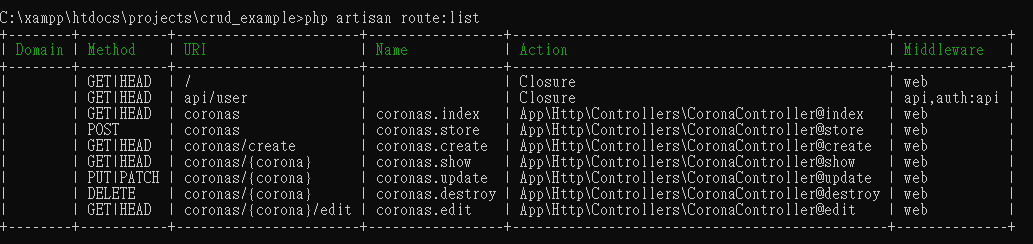
實際上,藉由加入該程式碼,我們已經為我們的應用註冊了多個路由,我們可使用底下的命令來檢視這些路由:
php artisan route:list
輸出:
Step 4: Configure Bootstrap 4
安裝Bootstrap和Vue套件:
- composer require laravel/ui
安裝bootstrap ui鷹架:
- php artisan ui bootstrap
編譯初生的鷹架:
- npm install && npm run dev
Step 5: Create the views
建立並編輯views目錄下的layout.blade.php,加入下列的code:
<!DOCTYPE html>
<html lang="en">
<head>
  <meta charset="UTF-8">
  <meta name="viewport" content="width=device-width, initial-scale=1.0">
  <meta http-equiv="X-UA-Compatible" content="ie=edge">
  <title>Laravel 7 CRUD Example</title>
  <link href="{{ asset('css/app.css') }}" rel="stylesheet" type="text/css" />
</head>
<body>
  <div class="container">
    @yield('content')
  </div>
  <script src="{{ asset('js/app.js') }}" type="text/js"></script>
</body>
</html>
一樣,在views目錄建立三個檔案:
- create.blade.php
- edit.blade.php
- index.blade.php
在create.blade.php加入:
@extends('layout')

@section('content')
<style>
  .uper {
    margin-top: 40px;
  }
</style>
<div class="card uper">
  <div class="card-header">
    Add Corona Virus Data
  </div>
  <div class="card-body">
    @if ($errors->any())
      <div class="alert alert-danger">
        <ul>
            @foreach ($errors->all() as $error)
              <li>{{ $error }}</li>
            @endforeach
        </ul>
      </div><br />
    @endif
      <form method="post" action="{{ route('coronas.store') }}">
          <div class="form-group">
              @csrf
              <label for="country_name">Country Name:</label>
              <input type="text" class="form-control" name="country_name"/>
          </div>
          <div class="form-group">
              <label for="symptoms">Symptoms :</label>
              <textarea rows="5" columns="5" class="form-control" name="symptoms"></textarea>
          </div>
          <div class="form-group">
              <label for="cases">Cases :</label>
              <input type="text" class="form-control" name="cases"/>
          </div>
          <button type="submit" class="btn btn-primary">Add Data</button>
      </form>
  </div>
</div>
@endsection
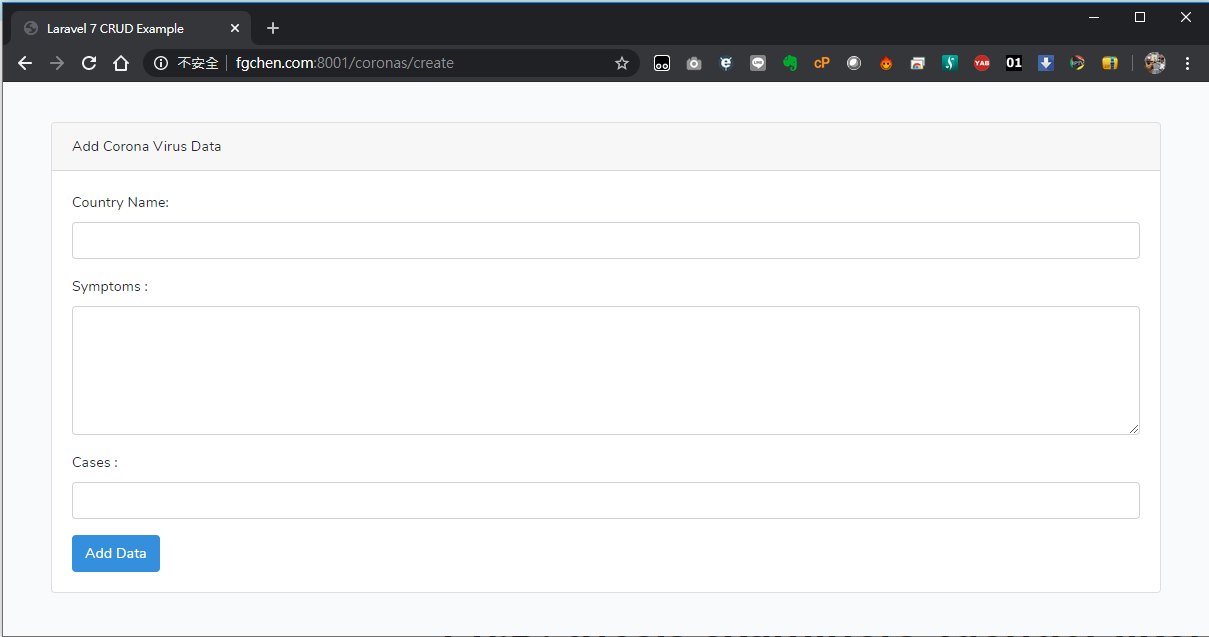
編輯CoronaController.php,在create方法下加入
// CoronaController.php

public function create()
{
   return view('create');
}
此時,到http://fgchen.com:8000/coronas/create,會看到底下的畫面:
Step 6: Add Validation rules and save data
在這個步驟,我們要加上Laravel form Validation
編輯CoronalController.php,加入app\Corona的名稱空間的使用:
<?php

// CoronaController.php

namespace App\Http\Controllers;

use Illuminate\Http\Request;
use App\Corona;
並且在CoronalController.php的store方法加入:
// CoronaController.php

public function store(Request $request)
{
        $validatedData = $request->validate([
            'country_name' => 'required|max:255',
            'symptoms' => 'required',
            'cases' => 'required|numeric',
        ]);
        $show = Corona::create($validatedData);

        return redirect('/coronas')->with('success', 'Corona Case is successfully saved');
}
store()方法接收到從建立表單來的$request資料物件,我們使用$request->validate這個方法定義資料的確認規則,使用關聯陣列分別對不同欄位給定確認規則,每一個欄位的確認規則以”|”指定多的規則。
加入的規則在確保當使用者沒有給資料(required)、最大255個字元、數值的規則下,驗證失效,畫面會有適當的紅色提示字眼:

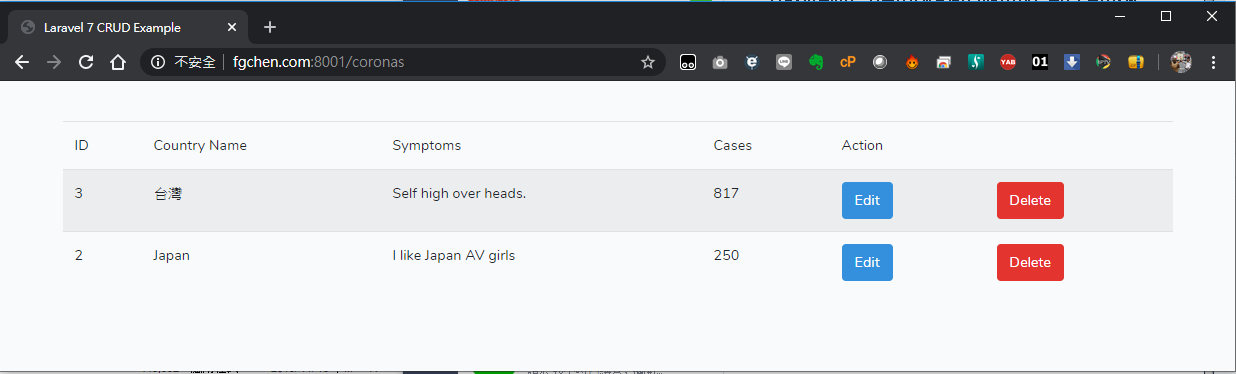
Step 7: Display the data
我們接著編輯CoronaController的index功能:
// CoronaController.php

public function index()
{
        $coronacases = Corona::all();

        return view('index', compact('coronacases'));
}
建立views目錄下的index.blade.php
@extends('layout')

@section('content')
<style>
  .uper {
    margin-top: 40px;
  }
</style>
<div class="uper">
  @if(session()->get('success'))
    <div class="alert alert-success">
      {{ session()->get('success') }}
    </div><br />
  @endif
  <table class="table table-striped">
    <thead>
        <tr>
          <td>ID</td>
          <td>Country Name</td>
          <td>Symptoms</td>
          <td>Cases</td>
          <td colspan="2">Action</td>
        </tr>
    </thead>
    <tbody>
        @foreach($coronacases as $case)
        <tr>
            <td>{{$case->id}}</td>
            <td>{{$case->country_name}}</td>
            <td>{{$case->symptoms}}</td>
            <td>{{$case->cases}}</td>
            <td><a href="{{ route('coronas.edit', $case->id)}}" class="btn btn-primary">Edit</a></td>
            <td>
                <form action="{{ route('coronas.destroy', $case->id)}}" method="post">
                  @csrf
                  @method('DELETE')
                  <button class="btn btn-danger" type="submit">Delete</button>
                </form>
            </td>
        </tr>
        @endforeach
    </tbody>
  </table>
<div>
@endsection
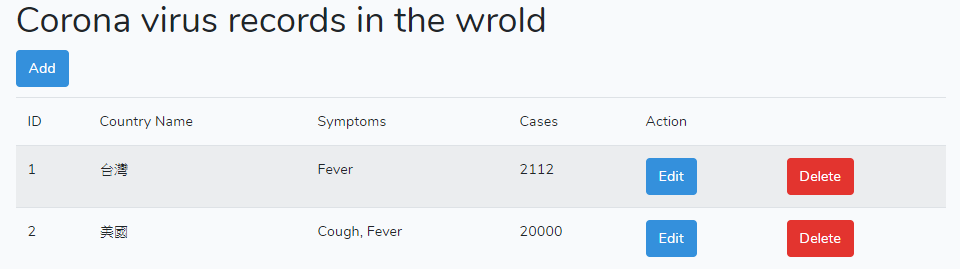
結果畫面:
Step 8: Create Edit and Update Operation
我們接著編輯CoronaController的edit功能:
// CoronaController.php

public function edit($id)
{
        $coronacase = Corona::findOrFail($id);

        return view('edit', compact('coronacase'));
}
建立與編輯edit.blade.php
@extends('layout')

@section('content')
<style>
  .uper {
    margin-top: 40px;
  }
</style>
<div class="card uper">
  <div class="card-header">
    Edit Corona Virus Data
  </div>
  <div class="card-body">
    @if ($errors->any())
      <div class="alert alert-danger">
        <ul>
            @foreach ($errors->all() as $error)
              <li>{{ $error }}</li>
            @endforeach
        </ul>
      </div><br />
    @endif
      <form method="post" action="{{ route('coronas.update', $coronacase->id ) }}">
          <div class="form-group">
              @csrf
              @method('PATCH')
              <label for="country_name">Country Name:</label>
              <input type="text" class="form-control" name="country_name" value="{{ $coronacase->country_name }}"/>
          </div>
          <div class="form-group">
              <label for="symptoms">Symptoms :</label>
              <textarea rows="5" columns="5" class="form-control" name="symptoms">{{ $coronacase->symptoms }}</textarea>
          </div>
          <div class="form-group">
              <label for="cases">Cases :</label>
              <input type="text" class="form-control" name="cases" value="{{ $coronacase->cases }}"/>
          </div>
          <button type="submit" class="btn btn-primary">Update Data</button>
      </form>
  </div>
</div>
@endsection
編輯CoronaController的update功能:
// CoronaController.php

public function update(Request $request, $id)
{
        $validatedData = $request->validate([
            'country_name' => 'required|max:255',
            'symptoms' => 'required',
            'cases' => 'required|numeric',
        ]);
        Corona::whereId($id)->update($validatedData);

        return redirect('/coronas')->with('success', 'Corona Case Data is successfully updated');
}
Step 9: Create Delete Functionality
編輯CoronaController destroy 方法:
// CoronaController.php

public function destroy($id)
{
        $coronacase = Corona::findOrFail($id);
        $coronacase->delete();

        return redirect('/coronas')->with('success', 'Corona Case Data is successfully deleted');
}
整個CoronaController.php列表:
<?php

// CoronaController.php

namespace App\Http\Controllers;

use Illuminate\Http\Request;
use App\Corona;

class CoronaController extends Controller
{
    /**
     * Display a listing of the resource.
     *
     * @return \Illuminate\Http\Response
     */
    public function index()
    {
        $coronacases = Corona::all();

        return view('index', compact('coronacases'));
    }

    /**
     * Show the form for creating a new resource.
     *
     * @return \Illuminate\Http\Response
     */
    public function create()
    {
        return view('create');
    }

    /**
     * Store a newly created resource in storage.
     *
     * @param  \Illuminate\Http\Request  $request
     * @return \Illuminate\Http\Response
     */
    public function store(Request $request)
    {
        $validatedData = $request->validate([
            'country_name' => 'required|max:255',
            'symptoms' => 'required',
            'cases' => 'required|numeric',
        ]);
        $show = Corona::create($validatedData);

        return redirect('/coronas')->with('success', 'Corona Case is successfully saved');
    }

    /**
     * Display the specified resource.
     *
     * @param  int  $id
     * @return \Illuminate\Http\Response
     */
    public function show($id)
    {
        //
    }

    /**
     * Show the form for editing the specified resource.
     *
     * @param  int  $id
     * @return \Illuminate\Http\Response
     */
    public function edit($id)
    {
        $coronacase = Corona::findOrFail($id);

        return view('edit', compact('coronacase'));
    }

    /**
     * Update the specified resource in storage.
     *
     * @param  \Illuminate\Http\Request  $request
     * @param  int  $id
     * @return \Illuminate\Http\Response
     */
    public function update(Request $request, $id)
    {
        $validatedData = $request->validate([
            'country_name' => 'required|max:255',
            'symptoms' => 'required',
            'cases' => 'required|numeric',
        ]);
        Corona::whereId($id)->update($validatedData);

        return redirect('/coronas')->with('success', 'Corona Case Data is successfully updated');
    }

    /**
     * Remove the specified resource from storage.
     *
     * @param  int  $id
     * @return \Illuminate\Http\Response
     */
    public function destroy($id)
    {
        $coronacase = Corona::findOrFail($id);
        $coronacase->delete();

        return redirect('/coronas')->with('success', 'Corona Case Data is successfully deleted');
    }
}
最後,我自己在首頁index.blade.php加上一個”Add a new coron virus record”按鈕:
@extends('layout')

@section('content')
<style>
  .uper {
    margin-top: 40px;
  }
</style>
<div class="uper">
  @if(session()->get('success'))
    <div class="alert alert-success">
      {{ session()->get('success') }}
    </div><br />
  @endif
  <h1 class="dislay-1">Corona virus records in the wrold</h1>
  <a class="btn btn-primary" href="{{ route('coronas.create') }}" role="button" style="margin-bottom:10px">Add</a>
  <table class="table table-striped">
    <thead>
        <tr>
          <td>ID</td>
          <td>Country Name</td>
          <td>Symptoms</td>
          <td>Cases</td>
          <td colspan="2">Action</td>
        </tr>
    </thead>
    <tbody>
        @foreach($coronacases as $case)
        <tr>
            <td>{{$case->id}}</td>
            <td>{{$case->country_name}}</td>
            <td>{{$case->symptoms}}</td>
            <td>{{$case->cases}}</td>
            <td><a href="{{ route('coronas.edit', $case->id)}}" class="btn btn-primary">Edit</a></td>
            <td>
                <form action="{{ route('coronas.destroy', $case->id)}}" method="post">
                  @csrf
                  @method('DELETE')
                  <button class="btn btn-danger" type="submit">Delete</button>
                </form>
            </td>
        </tr>
        @endforeach
    </tbody>
  </table>
<div>
@endsection