主機的移轉

一、一行指令複製MySQL所有資料庫到新的server

mysqldump –all-databases -u[user] -p[pwd] | ssh user@[host/IP] mysql -u[user] -p[pwd]

超強!

二、scp指令複製整個目錄到新的Server:

scp -rp sourcedirectory user@dest:/path

三、裝完 httpd後要處理幾個地方

conf.d/userdir.conf

<IfModule mod_userdir.c>
    #
    # UserDir is disabled by default since it can confirm the presence
    # of a username on the system (depending on home directory
    # permissions).
    #
    #UserDir disabled

    #
    # To enable requests to /~user/ to serve the user's public_html
    # directory, remove the "UserDir disabled" line above, and uncomment
    # the following line instead:
    #
    UserDir public_html
</IfModule>


httpd.conf 加上:

<Directory /home/*/public_html>
  Options Indexes FollowSymLinks
  AllowOverride None
  Require all granted
</Directory>

SELinux

chcon -R -t httpd_sys_content_t ~/public_html/

關閉SeLinux

setenforce 0


My  Domain:

http://kkhostdomain.supersite2.myorderbox.com/

維修筆記 20170710

舊電腦,DOS系統,IDE hardisk

沒有磁碟機的情況下要如何製作可開機的硬碟?

  1. 將硬碟先掛在D
  2. FDISK
  3. Format D:/s
  4. xcopy c:\*.* d: /s/e

上面的動作未缺將D硬碟的主要分割(primary partition)設為Active,在原有的DOS下只能將第1顆硬碟的主要分割設為Active,除非要用磁碟片開機… (全部丟了…)

後來,用一個作法,到Windows系統上,使用diskpart工具

使用usb硬碟外接裝置將硬碟掛上系統

使用diskpart

  1. select disk 2   (使用list disk檢查硬碟的代號)
  2. select partition 1 (主要分割應該是1)
  3. active (設為啟用)


【OpenVPN】 安裝、除錯 重點整理

因為學校架設的防火牆使得在外無法連線辦公室的電腦、主機什麼的,除非要請電算中心設定開放…,因此,動念,把一台可對外的Linux主機設置OpenVPN,提供在學校外時,做為跳板以連線到在學校的主機資源。

OpenVPN可裝在Linux或Windows上,其程式核心係Server端與Client端同體的設計,要做為Server端或Client端,透過設定檔Server.conf或client.ovpn來加以變化。

連線驗證有二種方式:數位憑證與帳號密碼,數位憑證需要產生每一個使用端所需要的憑證(不管是server或client)。

通訊協定:UDP或TCP,一開始建置預設是UDP,但是UDP/1194這個埠一直無法連線,猜測應該是電算中心的防火牆過濾掉(最近學校電算中心弄了一個很奇怪的作法,全學校的網路變成一個NAT架構,通通透過中華電信的NAT網進出網際網路…,搞得網路變得複雜,網路路由邏輯不單純),搞了很久(1天多),換用tcp/1194通了…。

推薦的網路教學:How To Setup and Configure an OpenVPN Server on CentOS 7

server.conf

#################################################
# Sample OpenVPN 2.0 config file for            #
# multi-client server.                          #
#                                               #
# This file is for the server side              #
# of a many-clients <-> one-server              #
# OpenVPN configuration.                        #
#                                               #
# OpenVPN also supports                         #
# single-machine <-> single-machine             #
# configurations (See the Examples page         #
# on the web site for more info).               #
#                                               #
# This config should work on Windows            #
# or Linux/BSD systems.  Remember on            #
# Windows to quote pathnames and use            #
# double backslashes, e.g.:                     #
# "C:\\Program Files\\OpenVPN\\config\\foo.key" #
#                                               #
# Comments are preceded with '#' or ';'         #
#################################################

# Which local IP address should OpenVPN
# listen on? (optional)
;local a.b.c.d
local 192.192.246.126

# Which TCP/UDP port should OpenVPN listen on?
# If you want to run multiple OpenVPN instances
# on the same machine, use a different port
# number for each one.  You will need to
# open up this port on your firewall.
port 1194

# TCP or UDP server?
proto tcp
;proto udp

# "dev tun" will create a routed IP tunnel,
# "dev tap" will create an ethernet tunnel.
# Use "dev tap0" if you are ethernet bridging
# and have precreated a tap0 virtual interface
# and bridged it with your ethernet interface.
# If you want to control access policies
# over the VPN, you must create firewall
# rules for the the TUN/TAP interface.
# On non-Windows systems, you can give
# an explicit unit number, such as tun0.
# On Windows, use "dev-node" for this.
# On most systems, the VPN will not function
# unless you partially or fully disable
# the firewall for the TUN/TAP interface.
;dev tap
dev tun

# Windows needs the TAP-Win32 adapter name
# from the Network Connections panel if you
# have more than one.  On XP SP2 or higher,
# you may need to selectively disable the
# Windows firewall for the TAP adapter.
# Non-Windows systems usually don't need this.
;dev-node MyTap

# SSL/TLS root certificate (ca), certificate
# (cert), and private key (key).  Each client
# and the server must have their own cert and
# key file.  The server and all clients will
# use the same ca file.
#
# See the "easy-rsa" directory for a series
# of scripts for generating RSA certificates
# and private keys.  Remember to use
# a unique Common Name for the server
# and each of the client certificates.
#
# Any X509 key management system can be used.
# OpenVPN can also use a PKCS #12 formatted key file
# (see "pkcs12" directive in man page).
ca ca.crt
cert server.crt
key server.key  # This file should be kept secret

# Diffie hellman parameters.
# Generate your own with:
#   openssl dhparam -out dh2048.pem 2048
dh dh2048.pem

# Network topology
# Should be subnet (addressing via IP)
# unless Windows clients v2.0.9 and lower have to
# be supported (then net30, i.e. a /30 per client)
# Defaults to net30 (not recommended)
;topology subnet

# Configure server mode and supply a VPN subnet
# for OpenVPN to draw client addresses from.
# The server will take 10.8.0.1 for itself,
# the rest will be made available to clients.
# Each client will be able to reach the server
# on 10.8.0.1. Comment this line out if you are
# ethernet bridging. See the man page for more info.
server 10.8.0.0 255.255.255.0

# Maintain a record of client <-> virtual IP address
# associations in this file.  If OpenVPN goes down or
# is restarted, reconnecting clients can be assigned
# the same virtual IP address from the pool that was
# previously assigned.
ifconfig-pool-persist ipp.txt

# Configure server mode for ethernet bridging.
# You must first use your OS's bridging capability
# to bridge the TAP interface with the ethernet
# NIC interface.  Then you must manually set the
# IP/netmask on the bridge interface, here we
# assume 10.8.0.4/255.255.255.0.  Finally we
# must set aside an IP range in this subnet
# (start=10.8.0.50 end=10.8.0.100) to allocate
# to connecting clients.  Leave this line commented
# out unless you are ethernet bridging.
;server-bridge 10.8.0.4 255.255.255.0 10.8.0.50 10.8.0.100

# Configure server mode for ethernet bridging
# using a DHCP-proxy, where clients talk
# to the OpenVPN server-side DHCP server
# to receive their IP address allocation
# and DNS server addresses.  You must first use
# your OS's bridging capability to bridge the TAP
# interface with the ethernet NIC interface.
# Note: this mode only works on clients (such as
# Windows), where the client-side TAP adapter is
# bound to a DHCP client.
;server-bridge

# Push routes to the client to allow it
# to reach other private subnets behind
# the server.  Remember that these
# private subnets will also need
# to know to route the OpenVPN client
# address pool (10.8.0.0/255.255.255.0)
# back to the OpenVPN server.
;push "route 120.107.96.0 255.255.255.0"
;push "route 192.168.20.0 255.255.255.0"

# To assign specific IP addresses to specific
# clients or if a connecting client has a private
# subnet behind it that should also have VPN access,
# use the subdirectory "ccd" for client-specific
# configuration files (see man page for more info).

# EXAMPLE: Suppose the client
# having the certificate common name "Thelonious"
# also has a small subnet behind his connecting
# machine, such as 192.168.40.128/255.255.255.248.
# First, uncomment out these lines:
;client-config-dir ccd
;route 192.168.40.128 255.255.255.248
# Then create a file ccd/Thelonious with this line:
#   iroute 192.168.40.128 255.255.255.248
# This will allow Thelonious' private subnet to
# access the VPN.  This example will only work
# if you are routing, not bridging, i.e. you are
# using "dev tun" and "server" directives.

# EXAMPLE: Suppose you want to give
# Thelonious a fixed VPN IP address of 10.9.0.1.
# First uncomment out these lines:
;client-config-dir ccd
;route 10.9.0.0 255.255.255.252
# Then add this line to ccd/Thelonious:
#   ifconfig-push 10.9.0.1 10.9.0.2

# Suppose that you want to enable different
# firewall access policies for different groups
# of clients.  There are two methods:
# (1) Run multiple OpenVPN daemons, one for each
#     group, and firewall the TUN/TAP interface
#     for each group/daemon appropriately.
# (2) (Advanced) Create a script to dynamically
#     modify the firewall in response to access
#     from different clients.  See man
#     page for more info on learn-address script.
;learn-address ./script

# If enabled, this directive will configure
# all clients to redirect their default
# network gateway through the VPN, causing
# all IP traffic such as web browsing and
# and DNS lookups to go through the VPN
# (The OpenVPN server machine may need to NAT
# or bridge the TUN/TAP interface to the internet
# in order for this to work properly).
;push "redirect-gateway def1 bypass-dhcp"

# Certain Windows-specific network settings
# can be pushed to clients, such as DNS
# or WINS server addresses.  CAVEAT:
# http://openvpn.net/faq.html#dhcpcaveats
# The addresses below refer to the public
# DNS servers provided by opendns.com.
;push "dhcp-option DNS 208.67.222.222"
;push "dhcp-option DNS 208.67.220.220"

push "dhcp-option DNS 8.8.8.8"
push "dhcp-option DNS 8.8.4.4"

# Uncomment this directive to allow different
# clients to be able to "see" each other.
# By default, clients will only see the server.
# To force clients to only see the server, you
# will also need to appropriately firewall the
# server's TUN/TAP interface.
;client-to-client

# Uncomment this directive if multiple clients
# might connect with the same certificate/key
# files or common names.  This is recommended
# only for testing purposes.  For production use,
# each client should have its own certificate/key
# pair.
#
# IF YOU HAVE NOT GENERATED INDIVIDUAL
# CERTIFICATE/KEY PAIRS FOR EACH CLIENT,
# EACH HAVING ITS OWN UNIQUE "COMMON NAME",
# UNCOMMENT THIS LINE OUT.
;duplicate-cn

# The keepalive directive causes ping-like
# messages to be sent back and forth over
# the link so that each side knows when
# the other side has gone down.
# Ping every 10 seconds, assume that remote
# peer is down if no ping received during
# a 120 second time period.
keepalive 10 120

# For extra security beyond that provided
# by SSL/TLS, create an "HMAC firewall"
# to help block DoS attacks and UDP port flooding.
#
# Generate with:
#   openvpn --genkey --secret ta.key
#
# The server and each client must have
# a copy of this key.
# The second parameter should be '0'
# on the server and '1' on the clients.
;tls-auth ta.key 0 # This file is secret

# Select a cryptographic cipher.
# This config item must be copied to
# the client config file as well.
# Note that 2.4 client/server will automatically
# negotiate AES-256-GCM in TLS mode.
# See also the ncp-cipher option in the manpage
cipher AES-256-CBC

# Enable compression on the VPN link and push the
# option to the client (2.4+ only, for earlier
# versions see below)
;compress lz4-v2
;push "compress lz4-v2"

# For compression compatible with older clients use comp-lzo
# If you enable it here, you must also
# enable it in the client config file.
;comp-lzo

# The maximum number of concurrently connected
# clients we want to allow.
;max-clients 100

# It's a good idea to reduce the OpenVPN
# daemon's privileges after initialization.
#
# You can uncomment this out on
# non-Windows systems.
user nobody
group nobody

# The persist options will try to avoid
# accessing certain resources on restart
# that may no longer be accessible because
# of the privilege downgrade.
persist-key
persist-tun

# Output a short status file showing
# current connections, truncated
# and rewritten every minute.
status openvpn-status.log

# By default, log messages will go to the syslog (or
# on Windows, if running as a service, they will go to
# the "\Program Files\OpenVPN\log" directory).
# Use log or log-append to override this default.
# "log" will truncate the log file on OpenVPN startup,
# while "log-append" will append to it.  Use one
# or the other (but not both).
log         openvpn.log
;log-append  openvpn.log

# Set the appropriate level of log
# file verbosity.
#
# 0 is silent, except for fatal errors
# 4 is reasonable for general usage
# 5 and 6 can help to debug connection problems
# 9 is extremely verbose
verb 3

# Silence repeating messages.  At most 20
# sequential messages of the same message
# category will be output to the log.
;mute 20

# Notify the client that when the server restarts so it
# can automatically reconnect.
;explicit-exit-notify 1

client.ovpn

client
dev tun
proto tcp
remote VPN_SERVER_IP  1194
resolv-retry infinite
persist-key
persist-tun
verb 3

ca "C:\\Users\\Wells\\OpenVPN\\ca.crt"
cert "C:\\Users\\Wells\\OpenVPN\\client.crt"
key "C:\\Users\\Wells\\OpenVPN\\client.key"

路由、防火牆等除錯指令

Linux

  • nmap
    • nmap –min-parallelism 100 -sT -sU localhost
  • netstat

Windows

  • ipconfig
  • route print

每位軟體工程師都需要的5項軟實力 | Soft & Share

來源: 每位軟體工程師都需要的5項軟實力 | Soft & Share


來源: 每位軟體工程師都需要的5項軟實力

自我學習的能力

  1. 不要把學習交給老師或專家,為自己的學習負責 。
  2. 定好學習的範疇。
  3. 了解為何要學這。
  4. 從多種來源學習目標主題。
  5. 邊學邊做, 有實習才能學到。
  6. 教你學到的, 在教學的組織過程會發現自己所知的斷層。

積極的心理認知與自我管理能力(精進你的心智)

  1. 不要自我設限。
  2. 想成為什麼樣的人先假裝你是那樣的人,接著你會越來越像。
  3. 克服恐懼,走出舒適圈,你將從成功挑戰自己害怕的事獲得成長。
  4. 動機讓你開始做某件事, 但成功來自不管你喜歡或不喜歡, 你都會持續做你該做的事。
  5. 給自己訓練自我管理的挑戰,如挑一件你不喜歡的事但對你有用的事持續做。
  6. 不要跟別人比較,跟之前的自己比較,你要一天比一天更好。
  7. 看清楚自己目前的狀況,接受目前的你,並從目前的狀況開始改善。
  8. 不要想說要賺多少錢或升官到什麼等級後才要開始過想要的生活,這會讓你到死都還沒開始生活。

最大化你的生產力

  1. 坐到電腦前對自己要做什麼事瞭然於胸(如果你沒有idea, 你可能一坐到電腦前就開始上Facebook或收email, 然後一小時就這麼過去了)。
  2. 每天計畫要做什麼,一天結束反省今天是否如期完成或要做任何計劃改善。
  3. 用Kanban做一週計畫, 用蕃茄鐘切分每日工作專心時段, John建議如果一個工作超過3個蕃茄鐘時段( 25分鐘專心, 5分鐘休息),那就要把工作再切細一點。以他的經驗,一天專心完成五個蕃茄鐘的工作,已經算是很高的效率。
  4. 如果你的時間不夠,其實你只要砍掉看電視的時間,想像如果一週你花差不多30小時看電視,那看電視幾乎是另一個工作。

把自己的工作當你的事業經營

  1. 這是個觀念的轉變,這個轉變讓很多人因此薪資三級跳。
  2. 不要把自己當成員工,你就是一家公司,經營你自己的事業,你的老闆是你的客戶。
  3. 如果你是一家公司,你就要行銷,要有自己的品牌。
  4. 經營你的部落格或做Podcast、Youtube…,運用社群媒體讓別人主動來找你。
  5. 提供超乎別人預期的價值,凸顯你的專長。

人際關係能力

與人打交道和溝通的能力

John不多說這部分,建議大家看一本他每年要看兩次, 已經看了20次以上的書

卡內基溝通與人際關係:如何贏取友誼與影響他人﹝2015年新版﹞

2017 暑 關西(大阪、神戶) + 山陰山陽(岡山、廣島、米子、鳥取) + 九州(小倉、門司港口)

Day 1:

桃園機場

香草 JW-172 5:00  AM  —>大阪 -> 新大阪車站

->岡山 JR 新幹線

岡山 <–>小倉 JR 新幹線

小倉<–>門司港 JR 鹿兒島本線  280日元/趟

註:使用山陽山陰七日券

Day 2:

岡山—四國-高松-金刀比羅宮-栗林公園

岡山 -> 高松  JR在來線

高松 <–> 琴平  琴平電車 來回 1230 (1-day pass)

中餐:中野 烏龍麵 350~

金刀比羅宮 785階

奧社  1368階

高松 –> 宇多津  JR在來線

晚餐:吟味壽司(sushiro) 車站前 400 m

宇多津 -> 岡山

Day 3:

7:16 JR新幹線

–> 廣島 7 :50

7:57  JR 山陽本線

–> 宮島口  8:26

8:40 R  JR – 渡輪(每小時4班)  約10分鐘

–> 宮島

嚴島神社  (海上鳥居)

10:10 渡輪

–>宮島口

10:33

–>廣島 11:02

11:36

–> 岡山 12:15

13:04 JR 八雲

-> 米子 15:18

松江 鳥根縣立美術館

Day 4:

米子–境港—米子(jr約55分到出雲)—出雲(出雲駛北口搭一火田bus,20分到出雲大社—出雲—松江(松江城、島根美術館、宍道湖夕陽)

Day 5

米子—鳥取JR站(0號乘車處,巴士,25分鐘)—鳥取砂丘—鳥取(jr,,1小時)—由良(柯南)—米子


D6:米子 – 神戶


Day 7

神戶(動物園)->大阪(天神橋)


Day 8

大阪

【食】

  1. 吟味壽司  スシロー イオンタウン宇多津店 
  2. 横濱魚萬 岡山駅前店
  3. 横濱魚萬 鳥取駅前店
  4. 焼肉ぐりぐり家 岡山駅前店
  5. はま寿司 米子店,三本松口車站

【交通方式】

 JR-交通券山陽山陰七日券

https://www.westjr.co.jp/global/tc/ticket/pass/sanyo_sanin/

https://www.settour.com.tw/ec/prodline/tkt/step1.html?prodNo=TKT0000002793

JR 關西地區鐵路一日週遊券-實體票(HARUKA)

https://www.settour.com.tw/ec/prodline/tkt/step1.html?prodNo=TKT0000002793

【住宿】

岡山:Hotel AreaOne OkaYama 19~21

米子市:Super hotel, 有天然溫泉,早餐,車站前,21~24

神戶:Hotel 1-2-3,早餐,24~25

大阪:Hotel 1-2-3 天王寺 JR 寺田町站,早餐,25~26

Super hotel 米子駅前
【程式設計-C#】打磚塊遊戲 – 動作

【程式設計-C#】打磚塊遊戲 – 動作

【程式設計-C#】打磚塊遊戲 – 動作

(到上一篇【程式設計】打磚塊遊戲 – 處理物件及畫面美工)
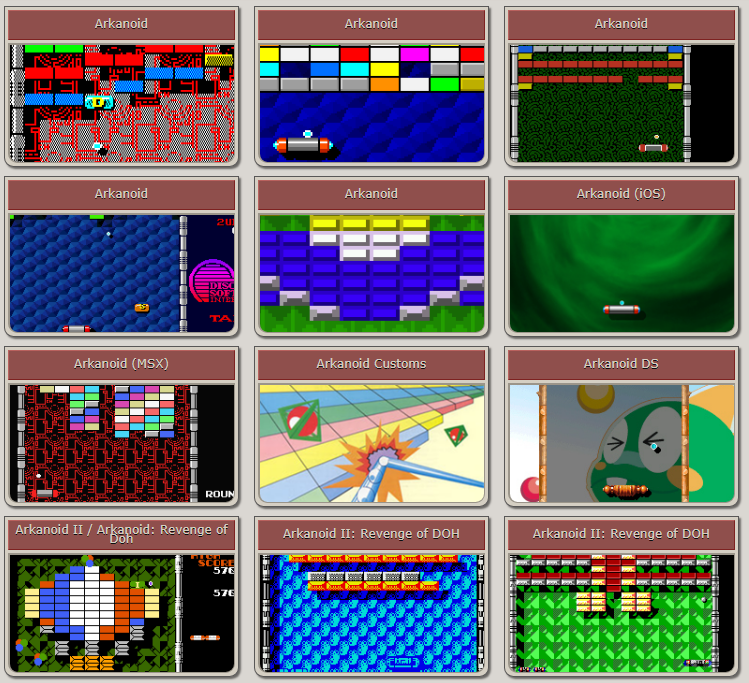
打磚塊遊戲設計資源 (請按下面圖片):

接下來,在這個教學裏,我們要實現底下遊戲動作: 打磚塊專案檔20180522

  1. 球的移動及碰到邊界的處理
  2. 處理球拍的移動 (鍵盤 + 滑鼠)
  3. 球拍擊中球的判斷及處理
  4. 球擊中磚塊的判斷及處理
  5. 遊戲結束條件:1.球掉出下邊界;2.按ESC鍵
  6. 進入到下一關:擊中全部磚塊,所有磚塊消失。(你會怎麼做?)

首先,我們所有的動作皆透過計時器物件來實現,將計時器物件拖拉至程式主畫面,設定interval,依照人類視覺暫留特性,每秒只要高於16個影像,看起來的東西就會覺得是連貫的,電影的FPS為24,遊戲則要更高,至少30以上,所以,我們的計時器的interval  = 1 / 40  * 1000 =  25

一、球的移動及碰到邊界的處理 BrickBreakout – 2 – 1

程式一開始先宣告:

int X_Inc = 5, Y_Inc = 5;
// 水平移動增量 X_Inc (正:往右邊,負:往左邊)
// 垂直移動增量 Y_Inc(正:往下邊,負:往上面)

計時器的Tick事件:

private void timer1_Tick(object sender, EventArgs e)
{
    ball.Left += Y_Inc; //水平
    ball.Top += X_Inc; //垂直

    //邊界碰撞
    if (ball.Left < 0 || ball.Left > this.Bounds.Width) Y_Inc = -Y_Inc; //左右邊界
    if (ball.Top > this.Bounds.Height || ball.Top < 0) X_Inc = -X_Inc; //上下邊界
}

二、處理球拍的移動 (鍵盤 + 滑鼠)

在timer1的Tick事件中加入:

private void timer1_Tick(object sender, EventArgs e)
{
    //球的移動處理
    ball.Left += Y_Inc;
    ball.Top += X_Inc;

    //球的邊界碰撞
    if (ball.Left < 0 || ball.Left > this.Bounds.Width) Y_Inc = -Y_Inc; //左右邊界
    if (ball.Top > this.Bounds.Height || ball.Top < 0) X_Inc = -X_Inc; //上下邊界

    //球拍的移動
    if (Cursor.Position.X >= (this.Bounds.Width - racket.Width))//如果游標在右邊界處 
        racket.Left = this.Bounds.Width - racket.Width;//減去 球拍的水平位置,否則的話,球拍會在視窗 
    else racket.Left = Cursor.Position.X; //球拍的水平位置 = 游標的水平位置

}

除了使用滑鼠移動游標來移動球拍,我們另外抓取按鍵事件來移動球拍,作法是在Form表單中的KeyDown事件抓取左右按鍵:

private void Form1_KeyDown(object sender, KeyEventArgs e)
{
    if (e.KeyCode == Keys.Left) Cursor.Position = new Point(Cursor.Position.X  - 20, Cursor.Position.Y);
    if (e.KeyCode == Keys.Right) Cursor.Position = new Point(Cursor.Position.X + 20, Cursor.Position.Y);
}

三、球拍擊中球的判斷及處理 BrickBreakout – 2-2

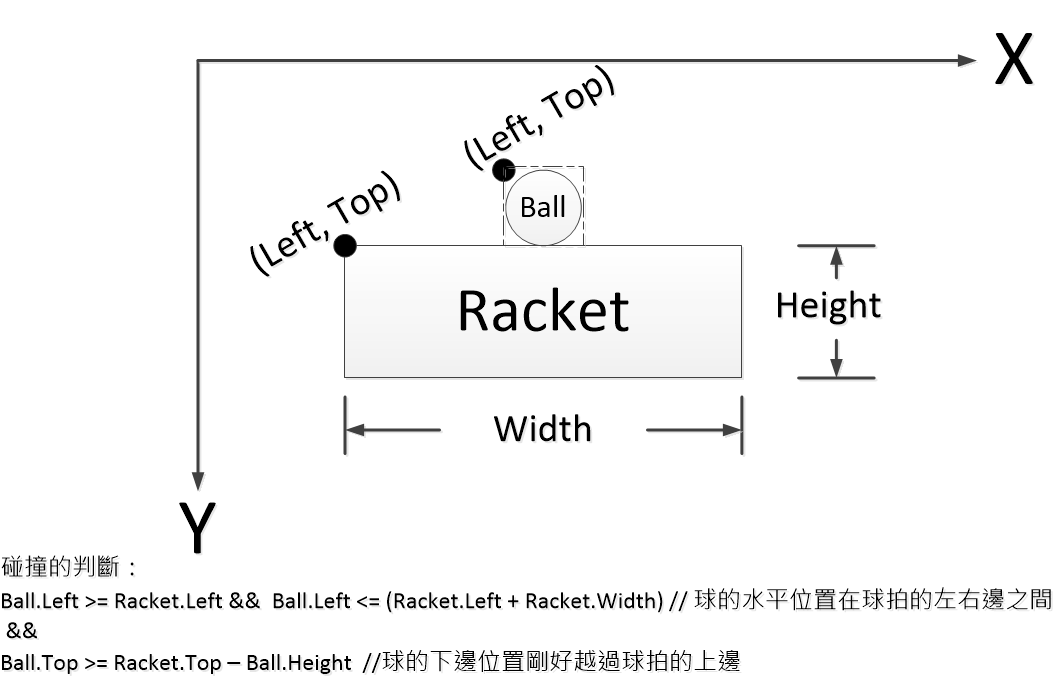
判斷球拍是否擊中球,並且在確認擊中之後,球的垂直移動方向由往下變往上。

private void timer1_Tick(object sender, EventArgs e)
{
    //球的邊界碰撞
    if (ball.Left <= 0 || ball.Left >= (this.Bounds.Width - ball.Width)) X_Inc = -X_Inc; //左右邊界
    if (ball.Top >= (this.Bounds.Height - ball.Height) || ball.Top <= 0) Y_Inc = -Y_Inc; //上下邊界

    //球拍是否擊中球:
    if (ball.Left >= racket.Left && ball.Left <= (racket.Left + racket.Width) && ball.Top >= (racket.Top - ball.Height)) Y_Inc = -Y_Inc;

    //球拍的移動
    if (Cursor.Position.X >= (this.Bounds.Width - racket.Width))//如果游標在右邊界處 
        racket.Left = this.Bounds.Width - racket.Width;//減去 球拍的水平位置,否則的話,球拍會在視窗 
    else racket.Left = Cursor.Position.X; //球拍的水平位置 = 游標的水平位置

    //球移動
    ball.Left += X_Inc;
    ball.Top += Y_Inc;
}

四、球擊中磚塊的判斷及處理 BrickBreakout – 2-3

球擊中磚塊的判斷跟球拍是否擊中球作法類似,擊中確認後,我們只需要將該磚塊的Visible設為false,使磚塊看不見就好了!(簡單吧?!)

程式在timer1的Tick事件中加了這個部份的處理:

//一一測試每顆磚塊是否被球擊中
for (int i = 0; i < bricks.GetLength(0); i++)
{
    for (int j = 0; j < bricks.GetLength(1); j++)
    {
        if (bricks[i, j].Visible == true) // 若磚塊是可見的話…,表示磚塊尚未被擊中
        {
            if (ball.Left >= bricks[i, j].Left && ball.Left <= (bricks[i, j].Left + bricks[i, j].Width) && ball.Top <= (bricks[i, j].Top + bricks[i, j].Height))
            {
                Y_Inc = -Y_Inc;
                bricks[i, j].Visible = false; //判定擊中後,球的垂直移動方向改變,並將磚塊的Visible屬性設false,使其看不見
                goto HitBrickExit; //一旦擊中,就不用測試其他的磚塊…,跳離這個測試以節省時間
            }
        }
    }
}
HitBrickExit:

另外,再加上球掉出下邊界外的處理:

//球掉到下邊界外,也就是球拍沒擊中球…,遊戲結束
if (ball.Top >= (this.Bounds.Height - ball.Height))
{
    timer1.Enabled = false; //中止計時器1
    lblGameOver.Visible = true; //顯示出遊戲結束訊息
}

再加上幾個按鍵的處理:

private void Form1_KeyDown(object sender, KeyEventArgs e)
{
    if (e.KeyCode == Keys.Left) Cursor.Position = new Point(Cursor.Position.X - 20, Cursor.Position.Y);
    if (e.KeyCode == Keys.Right) Cursor.Position = new Point(Cursor.Position.X + 20, Cursor.Position.Y);
    if (e.KeyCode == Keys.Escape) this.Close(); //按Esc離開遊戲
    if (e.KeyCode == Keys.F1) //重新開始遊戲
    {
        ball.Left = (this.Bounds.Width - ball.Width) / 2; //球位置,置於視窗中心
        ball.Top = (this.Bounds.Height - ball.Height) / 2;
        timer1.Enabled = true; //重新啟動計時器1
        lblGameOver.Visible = false; //遊戲訊息隱藏
        place_bricsk(); //重新排列所有的磚塊
    }
}

遊戲錄影:

音效的處理請參考下一篇:【程式設計】打磚塊遊戲 – 播放背景音樂與音效 (同時)

問題、意見、遊戲改進提議等歡迎在文章下面的迴響交流。謝謝。

網頁前端工程師的學習路徑


Learn How To Become a Front-End Web Developer From Scratch

HTML Basics

1. HTML Basics
2. What is HTML
3. The Basic Structure of a WebPage
4. How To Add Text To a WebPage
5. How To Add a Image To Your Website
6. How To Link Web Pages Together
7. How To Create a List
8. Your Final Project For This Section

CSS Basics

9. What is CSS?
10. How To Link an External Style Sheet
11. Working With CSS Classes and ID’s
12. Your CSS Project For This Section
13. Solution To The CSS Class Project

How To Create Your Very First Website With HTML and CSS

14. Create a Basic Webpage With HTML and CSS
15. Working With Coding Editors
16. Creating a Wire frame For Our Website
17. The Basic Structure of a Webpage
18. HTML Content Containers
19. Creating Our Websites Navigation
20. Building Our Portfolio Page
21. Adding Images To Our Portfolio Page
22. Building Out Our Footer
23. Getting Started With CSS
24. External and Internal CSS
25. Working With ID Selectors
26. Centering Our Websites Wrapper
27. Taking a Mobile Friendly Approach To Web Development
28. Styling Our Website With Colour
29. Working With CSS Classes
30. Adding Comments in CSS
31. Adding Fonts To Our Website
32. Styling Our Portfolio Page
33. Creating a Horizontal Navigation
34. Fixing Up Our Footer and Navigation
35. Creating Our About Page
36. Styling Our About Page
37. Create a Contact Page
38. Creating Our Blog Page
39. Creating Our Portfolio Page
40. Adding a Grid To Our Portfolio Page
41. Final Adjustments To Our About Page
42. Final Adjustments To Our Header and Footer
43. Finishing Up Our Portfolio Page
44. Finding a Domain Name For Your Website
45. Finding a Webhost
46. Connecting Your Domain Name and Web Hosting Account

JavaScript Basics

47. Introductory
48. Creating Your Very First JavaScript Program
49. Examples of JavaScript On The Web
50. How To Link An External JavaScript File To An HTML Document
51. Working With The JavaScript Console
52. The JavaScript Console Challenge
53. JavaScript Console Challenge Solution
54. What is a JavaScript Variable?
55. How To Assign Names To Your Variables
56. An Introduction To Strings and Numbers
57. How To Capture Input From a User
58. Combining Strings Together
59. Working With Strings In Further Detail
60. The Variable Coding Challenge
61. The Variable Coding Challenge Solution
62. What Are Numbers
63. How We Do Math In JavaScript
64. Working With The Math Object
65. The Numbers Challenge
66. Solution To The Numbers Challenge
67. What Are Conditional Statements
68. Working With Comparison Operators
69. Working With Booleans
70. Comments In JavaScript
71. Combining Multiple Tests Into a Single Condition
72. Working With Conditional Statements Challenge
73. Working With Conditional Statements Challenge Solution
74. What are JavaScript Functions?
75. How To Return a Value From a Function
76. Giving Information To a Function
77. The Variable Scope
78. Working With Functions Challenge
79. Working With Functions Challenge Solution
80. Introductory To JavaScript Loops
81. Working Further With While Loops
82. Do While Loops
83. Working With For Loops
84. How To Break Out of a Loop
85. The JavaScript Loop Challenge
86. Solution To The JavaScript Loop Challenge
87. Working With JavaScript Arrays
88. How To Access Items In An Array
89. How To Add Items To An Array
90. How To Remove Items From an Array

WordPress Basics

91. What is WordPress
92. Self-Hosted or WordPress.com
93. Setting up Your Domain Name and Hosting Accounts
94. Setting Up your Nameservers
95. How To Install WordPress In Less Than 5 Minutes
96. Introductory To The WordPress Dashboard
97. How To Change your Site Title and Description
98. How To Create Posts and Pages
99. How To Add Images Into Your Posts
100. How To Add Video Content To Your Posts
101. How To Correctly Format Your Posts and Pages
102. How To Set-up Your Websites Navigation
103. How To Change Your Homepage Layout
104. Discussion Settings
105. How To Disable Comments In WordPress
106. How To Customize a WordPress Theme
107. How To Add a Featured Posts Thumbnail
108. Genesis and Canvas Theme Frameworks
109. WordPress Widgets
110. How To Add Users To Your Website
111. What is a WordPress Plugin?
112. A List of Common WordPress Plugins
113. How To Install and Setup WP Super Cache
114. How To Duplicate a Page or Post
115. How To Generate a Google XML Sitemap
116. How To Set-up and Install a MailChimp Sign-up Form
117. How To Add a Forum To a WordPress Website
118. HelloBar WordPress Plugin Review and Tutorial
119. How To Install and Activate BackupWordpress
120. How To Update WordPress, Themes, and Plugins
121. How To Install Google Analytics on a WordPress Website
122. How To Install Askimet Spam Protection WordPress Plugin
123. Canvas Theme Framework Review
124. How To Add a Custom Menu To The Genesis WordPress Theme

Bootstrap 4 Basics

125. Let’s Create a Simple Landing Page With Bootstrap 4
126. How To Install and Set-up Bootstrap 4
127. Introducing The Jumbotron Component
128. How To Create a Sign-up Form
129. Adding Basic Information To Our Website
130. Styling and Final Touches

Creating an E-commerce Store With Shopify

131. What This Section Will Be Covering
132. What is Shopify?
133. Getting Started With Shopify
134. Configuring Basic Account Settings
135. How To Publish Posts and Pages
136. How To Add Products To Your Store
137. Picking a Theme For Your Store
138. How To Setup Your Websites Navigation Menus
139. Customizing Your Shopify Stores Theme
140. How To Add Discounts To Your Store
141. How To Buy and Connect a Domain Name
142. Introductory To Shopify Apps
143. Conclusion

AUTODESK FUSION 360 教學


Fusion 360 電子書(資料來源/擁有者:AutodeskEducationTaiwan)

第一次玩3D 設計就上手 – Fusion 360 錦囊妙計  電子書練習題下載 (若下載失效…,備份在雲端硬碟)

Autodesk 官方教學文件

Fusion 360影音教學