【筆記-Laravel】Laravel的目錄結構

底下表格是從Laravel官方文件複製過來的5、6、7版的目錄結構,完全一樣,沒有變動。

5.8 6.x 7.x


The Root Directory

The App Directory

放置應用程式的核心程式碼,此部份目錄底下目錄細節在後敘述。

The Bootstrap Directory

此目錄包含用來啟動框架的app.php檔案,此目錄亦放置了cache 目錄,包含了框架為了效能最佳化所產生的檔案。

The Config Directory

應用程式設置目錄。

The Database Directory

包含資料庫遷移、模型工廠、以及種子,如果有必要的話,可以在這個目錄放置SQLite資料庫。

The Public Directory

放置 index.php 檔, 應用程式的進入點,其中定義了自動載入機制(autoloading),這個目錄也放置了如images, JavaScript, and CSS等檔案。

The Resources Directory

放置了所有的 views 檔案,以及那些未經編繹的LESS, SASS, 或 JavaScript,這個目錄也放置了語系檔案。

The Routes Directory

包含了所有應用程發的路由定義,Laravel預設底下幾個檔案: web.phpapi.phpconsole.php and channels.php.

web.php 檔案包含了包含了由 RouteServiceProvider所產生放置於web中介軟體群組的路由檔案,這些路由提供了會談狀態、CSRF 保護機制、以及cookie加密。 如果應用程式未包含一個無狀態的 RESTful API,所有的路由將會大致放置於 web.php 檔案。

api.php 檔案包含那些由RouteServiceProvider 放置於 api 中介軟體群組的路由檔案,這些路由提供了rate limiting。這些路由基本上是無狀態的,使得透過這些路由進到應用程式的所有請求會透過tokens被authenticated(身份認證),,並且無法存取會談 session 狀態。

console.php 用來定義所有閉包中控台指令,每個閉包指令繫結一個命令實例,充許一個簡單的方法與每一個指令IO方法互動,即使這個檔案沒有定義 HTTP 路由,它定義了中控台模式的應用程式進入點(路由)。

channels.php 註冊應用程式所支援的事件廣播頻道。

The Storage Directory

此目錄包含了所有編譯過的Blade樣板、檔案型式的狀態、檔案快取、及其他由框架(Laravel)所產生的檔案。 這個目錄分成 appframework, p及 logs 幾個目錄。app目錄可以用來儲存應用程式所產生的任何檔案,framework目錄用來儲存由框架所產生的檔案及快取資料,最後,logs目錄包含了應用程式的記錄檔。

storage/app/public 目錄可以用來儲存使用者產生的檔案,像是avatars個人資料檔案,這些本來就應該開放大眾存取的。你應該在public/storage建立一個symbolic link指向這個目錄,可以用” php artisan storage:link “命令建立這個目錄符號連結 (虛擬目錄的意思)。

The Tests Directory

此目錄包含了自動測試案例,PHPUnit 是一個立即可用的測試範例,每個測試類別都應用Test結尾,你可以使用 phpunit 或 php vendor/bin/phpunit 指令來執行你的測試。

The Vendor Directory

此目錄放置 Composer 依存資料。


The App Directory

這個目錄是應用程式的主要部份,框架使用PSR-4 autoloading standard 來自動載入這個目錄。

app 目錄包含了各種不同的子目錄,像是 ConsoleHttp, 和ProvidersConsoleHttp 目錄內含提供進入應用程式核心的API。 HTTP 協定和CLI 都是用來和應用程式互動的機制,但是並不實際包含應用程式邏輯。換句話說,有二種方式發出命令給應用程式, Console 目錄包含所有的Artisan(工匠)命令, 而Http 目錄則是用來包含應用程式的控制器/controllers, 中介軟體/middleware, 和請求/requests。

當你使用make工匠(artisan)命令建立類別時,會在app目錄下產生各種不同的子目錄,例如 ,app/Jobs 目錄會在你使用 make:job 工匠/Artisan 命令建立一個job/工作類別後被建立。

Many of the classes in the app 目錄下的許多類別可以透過Artisan命令建立,可以執行php artisan list make 命令來知道可用的命令。

The Broadcasting Directory    廣播目錄

The Broadcasting directory contains all of the broadcast channel classes for your application. These classes are generated using the make:channel command. This directory does not exist by default, but will be created for you when you create your first channel. To learn more about channels, check out the documentation on event broadcasting. 預設這個目錄是不存在的,除非你執行了make:channel命令。在一個頻道裏,事件可以被廣播…

The Console Directory 中控台目錄

The Console directory contains all of the custom Artisan commands for your application. These commands may be generated using the make:command command. This directory also houses your console kernel, which is where your custom Artisan commands are registered and your scheduled tasks are defined.

The Events Directory  事件目錄

This directory does not exist by default, but will be created for you by the event:generate and make:event Artisan commands. The Events directory houses event classes. Events may be used to alert other parts of your application that a given action has occurred, providing a great deal of flexibility and decoupling.

The Exceptions Directory  例外目錄

這個目錄是用來放置應用程式的例外處理,也是一個好的地方用來放置任何你應用程式所丟出的任何例外。如果你希望客制化例外如何被記錄或生成,你應該修改這個目錄下的Handler類別。

The Exceptions directory contains your application’s exception handler and is also a good place to place any exceptions thrown by your application. If you would like to customize how your exceptions are logged or rendered, you should modify the Handler class in this directory.

The Http Directory

幾乎所有用來處理應用程式請求的邏輯都被放在這個目錄中。

The Http directory contains your controllers, middleware, and form requests. Almost all of the logic to handle requests entering your application will be placed in this directory.

The Jobs Directory

這個目錄用來放置應用程式的可排隊工作,應用程式的工作可以用排隊的方式執行,或者在現有的請求生命週期中同步執行。

This directory does not exist by default, but will be created for you if you execute the make:job Artisan command. The Jobs directory houses the queueable jobs for your application. Jobs may be queued by your application or run synchronously within the current request lifecycle. Jobs that run synchronously during the current request are sometimes referred to as “commands” since they are an implementation of the command pattern. 那些同步執行的工作有時被看做是命令,因為這些工作是command pattern的一個實作。

The Listeners Directory 事件監聽器目錄

這個目錄包含了所有事件的處理,事件監聽器接收到一個事件後,會執行對應於事件的處理邏輯。

This directory does not exist by default, but will be created for you if you execute the event:generate or make:listener Artisan commands. The Listeners directory contains the classes that handle your events. Event listeners receive an event instance and perform logic in response to the event being fired. For example, a UserRegistered event might be handled by a SendWelcomeEmail listener.

The Mail Directory  郵件目錄

這個目錄包含了所有應用程式所發出的郵件。

This directory does not exist by default, but will be created for you if you execute the make:mail Artisan command. The Mail directory contains all of your classes that represent emails sent by your application. Mail objects allow you to encapsulate all of the logic of building an email in a single, simple class that may be sent using the Mail::send method.

The Notifications Directory   通知目錄

這個目錄包含所有由應用程式發出的交易通知,例如,一個在應用程式內部發生的事件通知。Lavavel的通知機制抽象化了在email, Slack, SMS,或儲存於一個資料庫中的通知發送。

This directory does not exist by default, but will be created for you if you execute the make:notification Artisan command. The Notifications directory contains all of the “transactional” notifications that are sent by your application, such as simple notifications about events that happen within your application. Laravel’s notification features abstracts sending notifications over a variety of drivers such as email, Slack, SMS, or stored in a database.

The Policies Directory  政策目錄

This directory does not exist by default, but will be created for you if you execute the make:policy Artisan command. The Policies directory contains the authorization policy classes (授權政策類別) for your application. Policies are used to determine if a user can perform a given action against a resource. For more information, check out the authorization documentation.  這些規則用來決定一個使用者是否有權限在一個資源上執行動作。

The Providers Directory 提供者目錄

此目錄包含了所有服務提供者…

The Providers directory contains all of the service providers for your application. Service providers bootstrap your application by binding services in the service container, registering events, or performing any other tasks to prepare your application for incoming requests.

In a fresh Laravel application, this directory will already contain several providers. You are free to add your own providers to this directory as needed. 在一個剛建立的Laravel應用程式,這個目錄會包含數個提供者。我們可以依自己的需要來加入所需要的提供者。

The Rules Directory  規則目錄

此目錄包含了應用程式客制化的確認規則 (輸入資料的正確性確認)。

This directory does not exist by default, but will be created for you if you execute the make:rule Artisan command. The Rules directory contains the custom validation rule objects for your application. Rules are used to encapsulate complicated validation logic in a simple object. For more information, check out the validation documentation.

【筆記-Laravel】Laravel的頁面路由

建立所有頁面的路由,編輯routes/web.php

<?php

use Illuminate\Support\Facades\Route;

/*
|--------------------------------------------------------------------------
| Web Routes
|--------------------------------------------------------------------------
|
| Here is where you can register web routes for your application. These
| routes are loaded by the RouteServiceProvider within a group which
| contains the "web" middleware group. Now create something great!
|
*/

Route::get('/', function () { return view('pages.home'); });

Route::get('/contact', function () { return View('pages.contact'); });

上面將首頁(網頁根目錄)指向pages下的home.blade.php (在Laravel裏,檔案結構轉換成點的方式表達,並且省略掉附屬檔名blade.php)

/contact指向pages下的contact.blade.php

在這個例子,我們將所有的頁面分別放置在views目錄下的pages、includes、layouts目錄:

+---includes
|       footer.blade.php
|       head.blade.php
|       header.blade.php
|
+---layouts
|       default.blade.php
|
\---pages
        contact.blade.php
        home.blade.php

底下,我們將所有的頁面建立起來:

includes:

head.blade.php

<!DOCTYPE html>
<html lang="en">
<head>
  <meta charset="UTF-8">
  <meta name="viewport" content="width=device-width, initial-scale=1.0">
  <meta http-equiv="X-UA-Compatible" content="ie=edge">
  <title>Laravel layout example</title>
  <!-- 從CDN載入bootstrap -->
  <link rel="stylesheet" href="//netdna.bootstrapcdn.com/twitter-bootstrap/3.0.3/css/bootstrap-combined.min.css">
</head>

header.blade.php

<div class="navbar">
   <div class="navbar-inner">
       <a id="logo" href="/">Laravel頁面路由範例</a>
       <ul class="nav">
           <li><a href="/">首頁</a></li>
           <li><a href="/contact">與我聯繫</a></li>
       </ul>
   </div>
</div>

footer.blade.php

<div id="copyright text-right">© Copyright 2020 陳富國 弘光科技大學 資訊管理系</div>

layouts:

default.blade.php

<!doctype html>
<html>
<head>
   @include('includes.head')
</head>
<body>
<div class="container">
   <header class="row">
       @include('includes.header')
   </header>
   <div id="main" class="row">
           @yield('content')
   </div>
   <footer class="row">
       @include('includes.footer')
   </footer>
</div>
</body>
</html>

pages:

home.blade.php

@extends('layouts.default')
@section('content')
   <h1>現在這個頁面是「首頁」頁面</h1>
@stop

contact.blade.php

@extends('layouts.default')
@section('content')
   <h1>現在這個頁面是「與我聯繫」頁面</h1>
@stop


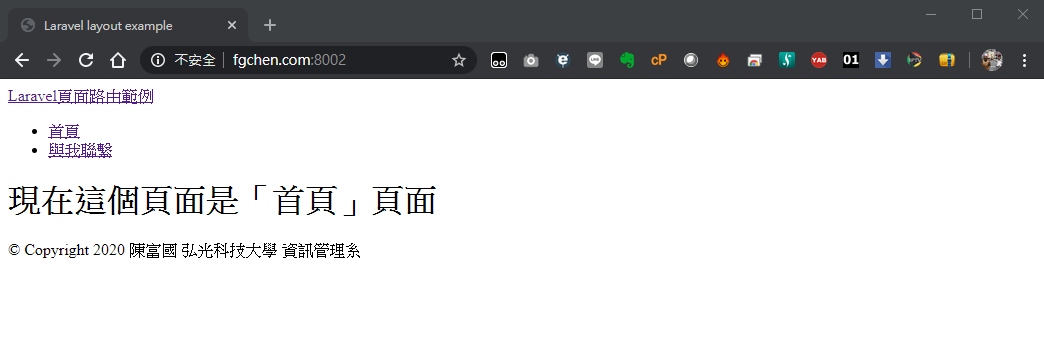
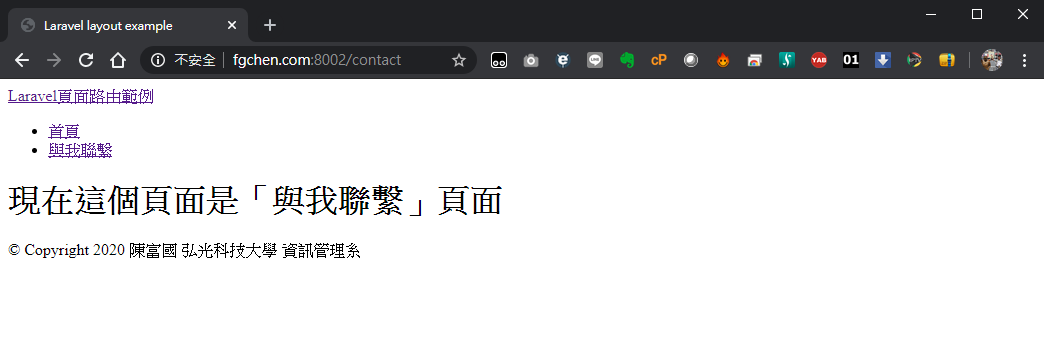
結果:

【筆記-Laravel】Laravel 7 CRUD 範例

資料來源:Laravel 7 CRUD Example | Laravel 7 Tutorial Step By Step

說明:

這是PHP Laravel的一個CRUD範例,示範如何一步一步建立一個CRUD的應用。

PHP Laravel是一個後端系統框架,可以讓一個程式設計師專注於應用程式問題邏輯(解決商用/工業問題),不用花太多心思在技術細節上,也就是說,一個資訊系的學生只需要建立技術觀念,在不需要實作技術細節的狀況下,就能建立一個面面俱到的應用程式。一般來說,一個資訊系的學生要要能力寫一個應用系統往往要學非常多的學科、技術、觀念等,才有辦法建立一個”完整”的應用程式,難度之高,連我都覺得寫系統是一個超級有挑戰的工作,底下這張圖非常傳神,”嚇死一堆寶寶了”,不少念了四年的資訊系學生不想碰程式設計(特別是女生,大部份是因為社會刻板印象吧,自覺女生本來應該很”不理工”。)。因為要寫一個好的系統不容易,導入適當的框架到學生的學習是有必要的,不要coding底層細節來建立一個完整的系統,只是要學Laravel框架,基礎也是要有的,JavaScript、HTML、CSS、PHP、Bootstrap(前端UI)、SQL、資料庫模型、系統分析與設計…,有好的基礎才能在框架協助下建立好的應用程式(框架不是銀子彈)。

圖片來源 https://aprogrammerlife.com/most-viewed/computer-science-students-1010?fbclid=IwAR1zeYTa61eJSeOA76JVvz6riE9-7ZohZFlVcm3UFt9lXkWbCI0n_Ms0_hg


新增專案:

  • laravel new crud-example

或者使用下列的指令:

  • composer create-project –prefer-dist laravel/laravel crud-example

執行完畢會新增一個目錄crud-example,進入該目錄,並且更新前端的相依資料

  • cd crud-example
  • npm install 

編輯.env檔,修改資料庫連接資料:

DB_CONNECTION=mysql
DB_HOST=127.0.0.1
DB_PORT=3306
DB_DATABASE=wellsche_crud_example
DB_USERNAME=wellsche_laravel
DB_PASSWORD=xxxxxxxx

首先編輯/app/Providers/AppServiceProvider.php,加入表料庫schema相關的修改:

<?php

namespace App\Providers;
use Illuminate\Support\Facades\Schema;
use Illuminate\Support\ServiceProvider;

class AppServiceProvider extends ServiceProvider
{
    /**
     * Register any application services.
     *
     * @return void
     */
    public function register()
    {
        //
    }

    /**
     * Bootstrap any application services.
     *
     * @return void
     */
    public function boot()
    {
      Schema::defaultStringLength(191);
    }
}

執行:

  • php artisan migrate

所需要的資料表格schema會建立好

建立model與mirgation檔

  • php artisan make:model Corona -m

上面指令會產生2個檔案:

  1. app目錄:Corona.php
  2. database/migrations目錄:[timestamp]create_coronas_table.php

編輯[timestamp]create_coronas_table.php

原來的create_coronas_table.php裏的up函式:

public function up()
{
    Schema::create('coronas', function (Blueprint $table) {
        $table->id();
        $table->timestamps();
    });
}


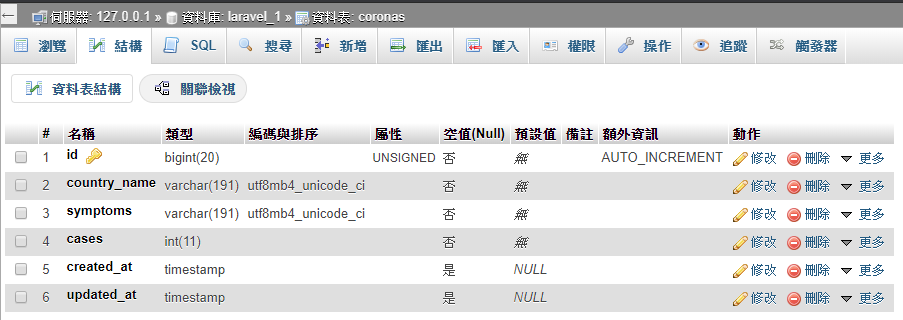
改為:(加入2個字串表格欄位:country_name與symptoms,1個整數表格欄位cases)

public function up()
{
        Schema::create('coronas', function (Blueprint $table) {
            $table->id();
            $table->string('country_name');
            $table->string('symptoms');
            $table->integer('cases');
            $table->timestamps();
        });
 }

上面定義了corons資料表格的欄位schema,定義完後再下一次指令,完成資料表格的schema設定:

  • php artisan migrate

此時可到資料庫那邊檢視coronas這個表格的欄位建立情形。

如果要反轉migration的過程,可以執行php artisan migrate:rollback來刪除coronas這個表格 (會執行down()函式)。

接著編輯Corona.php,來加入fillable的屬性:(設置’country_name’, ‘symptoms’, ‘cases’這三個欄位是可以填寫的。)

<?php

// Corona.php

namespace App;

use Illuminate\Database\Eloquent\Model;

class Corona extends Model
{
    protected $fillable = ['country_name', 'symptoms', 'cases'];
}

Step 3. 建立路由與控制器

  • php artisan make:controller CoronaController –resource

會在CoronaController.php(app\Http\Controllers)建立6個方法:

  1. index 顯示Coronas資料清單
  2. Create 顯示Coronas的新增表單
  3. Store 將Create那邊的表單所傳來的資料儲存至資料庫。
  4. Show  顯示一個特定的Coronas資料
  5. Edit 顯示Coronas資料的修改表單
  6. Update 將Edit那邊的資料新增至資料庫
  7. Destroy 刪除一筆Corona

CoronaController.php列表:

<?php

namespace App\Http\Controllers;

use Illuminate\Http\Request;

class CoronaController extends Controller
{
    /**
     * Display a listing of the resource.
     *
     * @return \Illuminate\Http\Response
     */
    public function index()
    {
        //
    }

    /**
     * Show the form for creating a new resource.
     *
     * @return \Illuminate\Http\Response
     */
    public function create()
    {
        //
    }

    /**
     * Store a newly created resource in storage.
     *
     * @param  \Illuminate\Http\Request  $request
     * @return \Illuminate\Http\Response
     */
    public function store(Request $request)
    {
        //
    }

    /**
     * Display the specified resource.
     *
     * @param  int  $id
     * @return \Illuminate\Http\Response
     */
    public function show($id)
    {
        //
    }

    /**
     * Show the form for editing the specified resource.
     *
     * @param  int  $id
     * @return \Illuminate\Http\Response
     */
    public function edit($id)
    {
        //
    }

    /**
     * Update the specified resource in storage.
     *
     * @param  \Illuminate\Http\Request  $request
     * @param  int  $id
     * @return \Illuminate\Http\Response
     */
    public function update(Request $request, $id)
    {
        //
    }

    /**
     * Remove the specified resource from storage.
     *
     * @param  int  $id
     * @return \Illuminate\Http\Response
     */
    public function destroy($id)
    {
        //
    }
}


編輯routes\web.php,插入以下程式碼:

// web.php

Route::get('/', function () {
    return view('welcome');
});
Route::resource('coronas', 'CoronaController');

透過–resource, 你可以使用這個方法resource()產生以上所有的路由,而不需要一一個別地指定以上的路由。

Actually, by adding the following code line, we have registered the multiple routes for our app. We can check it using the following command.

實際上,藉由加入該程式碼,我們已經為我們的應用註冊了多個路由,我們可使用底下的命令來檢視這些路由:

php artisan route:list

輸出:


Step 4: Configure Bootstrap 4

安裝Bootstrap和Vue套件:

  • composer require laravel/ui

安裝bootstrap ui鷹架:

  • php artisan ui bootstrap

編譯初生的鷹架:

  • npm install && npm run dev

Step 5: Create the views

建立並編輯views目錄下的layout.blade.php,加入下列的code:

<!DOCTYPE html>
<html lang="en">
<head>
  <meta charset="UTF-8">
  <meta name="viewport" content="width=device-width, initial-scale=1.0">
  <meta http-equiv="X-UA-Compatible" content="ie=edge">
  <title>Laravel 7 CRUD Example</title>
  <link href="{{ asset('css/app.css') }}" rel="stylesheet" type="text/css" />
</head>
<body>
  <div class="container">
    @yield('content')
  </div>
  <script src="{{ asset('js/app.js') }}" type="text/js"></script>
</body>
</html>

一樣,在views目錄建立三個檔案:

  1. create.blade.php
  2. edit.blade.php
  3. index.blade.php

在create.blade.php加入:

@extends('layout')

@section('content')
<style>
  .uper {
    margin-top: 40px;
  }
</style>
<div class="card uper">
  <div class="card-header">
    Add Corona Virus Data
  </div>
  <div class="card-body">
    @if ($errors->any())
      <div class="alert alert-danger">
        <ul>
            @foreach ($errors->all() as $error)
              <li>{{ $error }}</li>
            @endforeach
        </ul>
      </div><br />
    @endif
      <form method="post" action="{{ route('coronas.store') }}">
          <div class="form-group">
              @csrf
              <label for="country_name">Country Name:</label>
              <input type="text" class="form-control" name="country_name"/>
          </div>
          <div class="form-group">
              <label for="symptoms">Symptoms :</label>
              <textarea rows="5" columns="5" class="form-control" name="symptoms"></textarea>
          </div>
          <div class="form-group">
              <label for="cases">Cases :</label>
              <input type="text" class="form-control" name="cases"/>
          </div>
          <button type="submit" class="btn btn-primary">Add Data</button>
      </form>
  </div>
</div>
@endsection

編輯CoronaController.php,在create方法下加入

// CoronaController.php

public function create()
{
   return view('create');
}

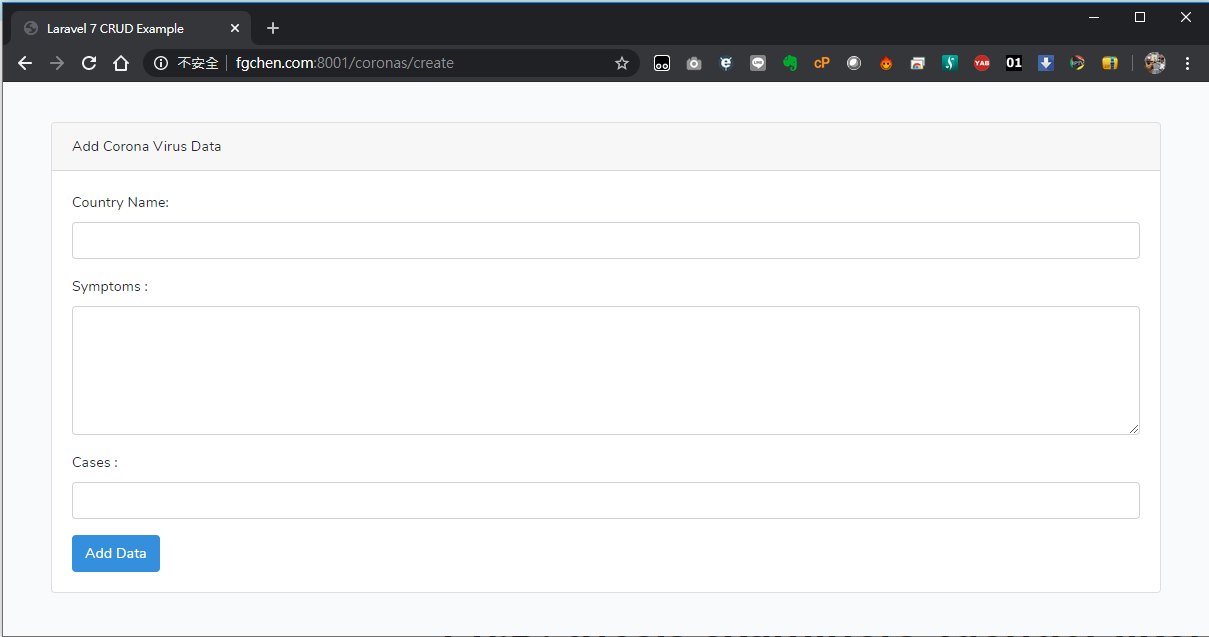
此時,到http://fgchen.com:8000/coronas/create,會看到底下的畫面:


Step 6: Add Validation rules and save data

在這個步驟,我們要加上Laravel form Validation

編輯CoronalController.php,加入app\Corona的名稱空間的使用:

<?php

// CoronaController.php

namespace App\Http\Controllers;

use Illuminate\Http\Request;
use App\Corona;

並且在CoronalController.php的store方法加入:

// CoronaController.php

public function store(Request $request)
{
        $validatedData = $request->validate([
            'country_name' => 'required|max:255',
            'symptoms' => 'required',
            'cases' => 'required|numeric',
        ]);
        $show = Corona::create($validatedData);
   
        return redirect('/coronas')->with('success', 'Corona Case is successfully saved');
}


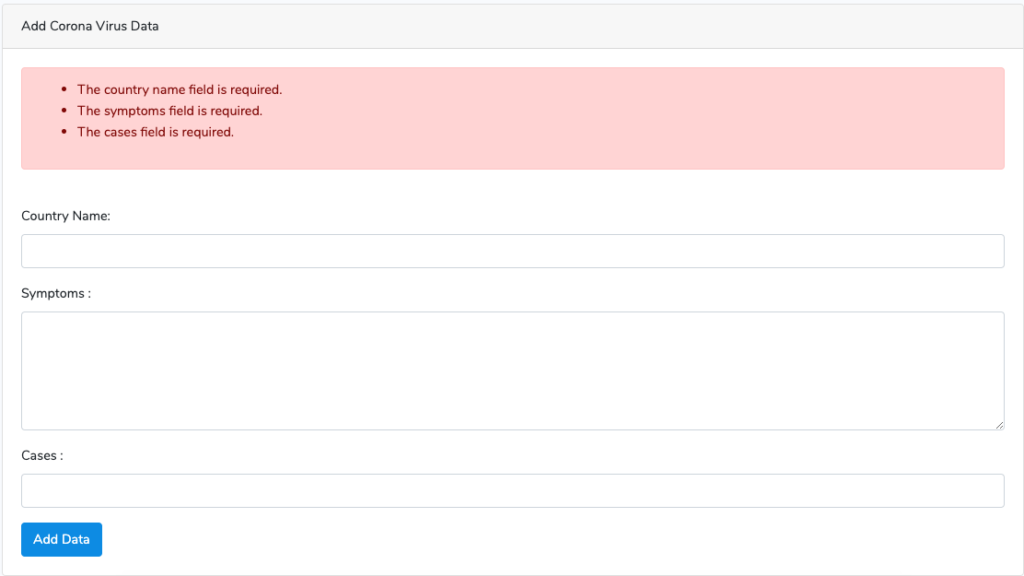
store()方法接收到從建立表單來的$request資料物件,我們使用$request->validate這個方法定義資料的確認規則,使用關聯陣列分別對不同欄位給定確認規則,每一個欄位的確認規則以”|”指定多的規則。

加入的規則在確保當使用者沒有給資料(required)、最大255個字元、數值的規則下,驗證失效,畫面會有適當的紅色提示字眼:


Step 7: Display the data

我們接著編輯CoronaController的index功能:

// CoronaController.php

public function index()
{
        $coronacases = Corona::all();

        return view('index', compact('coronacases'));
}


建立views目錄下的index.blade.php

@extends('layout')

@section('content')
<style>
  .uper {
    margin-top: 40px;
  }
</style>
<div class="uper">
  @if(session()->get('success'))
    <div class="alert alert-success">
      {{ session()->get('success') }}  
    </div><br />
  @endif
  <table class="table table-striped">
    <thead>
        <tr>
          <td>ID</td>
          <td>Country Name</td>
          <td>Symptoms</td>
          <td>Cases</td>
          <td colspan="2">Action</td>
        </tr>
    </thead>
    <tbody>
        @foreach($coronacases as $case)
        <tr>
            <td>{{$case->id}}</td>
            <td>{{$case->country_name}}</td>
            <td>{{$case->symptoms}}</td>
            <td>{{$case->cases}}</td>
            <td><a href="{{ route('coronas.edit', $case->id)}}" class="btn btn-primary">Edit</a></td>
            <td>
                <form action="{{ route('coronas.destroy', $case->id)}}" method="post">
                  @csrf
                  @method('DELETE')
                  <button class="btn btn-danger" type="submit">Delete</button>
                </form>
            </td>
        </tr>
        @endforeach
    </tbody>
  </table>
<div>
@endsection

結果畫面:

Step 8: Create Edit and Update Operation

我們接著編輯CoronaController的edit功能:

// CoronaController.php

public function edit($id)
{
        $coronacase = Corona::findOrFail($id);

        return view('edit', compact('coronacase'));
}

建立與編輯edit.blade.php

@extends('layout')

@section('content')
<style>
  .uper {
    margin-top: 40px;
  }
</style>
<div class="card uper">
  <div class="card-header">
    Edit Corona Virus Data
  </div>
  <div class="card-body">
    @if ($errors->any())
      <div class="alert alert-danger">
        <ul>
            @foreach ($errors->all() as $error)
              <li>{{ $error }}</li>
            @endforeach
        </ul>
      </div><br />
    @endif
      <form method="post" action="{{ route('coronas.update', $coronacase->id ) }}">
          <div class="form-group">
              @csrf
              @method('PATCH')
              <label for="country_name">Country Name:</label>
              <input type="text" class="form-control" name="country_name" value="{{ $coronacase->country_name }}"/>
          </div>
          <div class="form-group">
              <label for="symptoms">Symptoms :</label>
              <textarea rows="5" columns="5" class="form-control" name="symptoms">{{ $coronacase->symptoms }}</textarea>
          </div>
          <div class="form-group">
              <label for="cases">Cases :</label>
              <input type="text" class="form-control" name="cases" value="{{ $coronacase->cases }}"/>
          </div>
          <button type="submit" class="btn btn-primary">Update Data</button>
      </form>
  </div>
</div>
@endsection

編輯CoronaController的update功能:

// CoronaController.php

public function update(Request $request, $id)
{
        $validatedData = $request->validate([
            'country_name' => 'required|max:255',
            'symptoms' => 'required',
            'cases' => 'required|numeric',
        ]);
        Corona::whereId($id)->update($validatedData);

        return redirect('/coronas')->with('success', 'Corona Case Data is successfully updated');
}

Step 9: Create Delete Functionality

編輯CoronaController destroy 方法:

// CoronaController.php

public function destroy($id)
{
        $coronacase = Corona::findOrFail($id);
        $coronacase->delete();

        return redirect('/coronas')->with('success', 'Corona Case Data is successfully deleted');
}

整個CoronaController.php列表:

<?php

// CoronaController.php

namespace App\Http\Controllers;

use Illuminate\Http\Request;
use App\Corona;

class CoronaController extends Controller
{
    /**
     * Display a listing of the resource.
     *
     * @return \Illuminate\Http\Response
     */
    public function index()
    {
        $coronacases = Corona::all();

        return view('index', compact('coronacases'));
    }

    /**
     * Show the form for creating a new resource.
     *
     * @return \Illuminate\Http\Response
     */
    public function create()
    {
        return view('create');
    }

    /**
     * Store a newly created resource in storage.
     *
     * @param  \Illuminate\Http\Request  $request
     * @return \Illuminate\Http\Response
     */
    public function store(Request $request)
    {
        $validatedData = $request->validate([
            'country_name' => 'required|max:255',
            'symptoms' => 'required',
            'cases' => 'required|numeric',
        ]);
        $show = Corona::create($validatedData);
   
        return redirect('/coronas')->with('success', 'Corona Case is successfully saved');
    }

    /**
     * Display the specified resource.
     *
     * @param  int  $id
     * @return \Illuminate\Http\Response
     */
    public function show($id)
    {
        //
    }

    /**
     * Show the form for editing the specified resource.
     *
     * @param  int  $id
     * @return \Illuminate\Http\Response
     */
    public function edit($id)
    {
        $coronacase = Corona::findOrFail($id);

        return view('edit', compact('coronacase'));
    }

    /**
     * Update the specified resource in storage.
     *
     * @param  \Illuminate\Http\Request  $request
     * @param  int  $id
     * @return \Illuminate\Http\Response
     */
    public function update(Request $request, $id)
    {
        $validatedData = $request->validate([
            'country_name' => 'required|max:255',
            'symptoms' => 'required',
            'cases' => 'required|numeric',
        ]);
        Corona::whereId($id)->update($validatedData);

        return redirect('/coronas')->with('success', 'Corona Case Data is successfully updated');
    }

    /**
     * Remove the specified resource from storage.
     *
     * @param  int  $id
     * @return \Illuminate\Http\Response
     */
    public function destroy($id)
    {
        $coronacase = Corona::findOrFail($id);
        $coronacase->delete();

        return redirect('/coronas')->with('success', 'Corona Case Data is successfully deleted');
    }
}

最後,我自己在首頁index.blade.php加上一個”Add a new coron virus record”按鈕:

@extends('layout')

@section('content')
<style>
  .uper {
    margin-top: 40px;
  }
</style>
<div class="uper">
  @if(session()->get('success'))
    <div class="alert alert-success">
      {{ session()->get('success') }}
    </div><br />
  @endif
  <h1 class="dislay-1">Corona virus records in the wrold</h1>
  <a class="btn btn-primary" href="{{ route('coronas.create') }}" role="button" style="margin-bottom:10px">Add</a>
  <table class="table table-striped">
    <thead>
        <tr>
          <td>ID</td>
          <td>Country Name</td>
          <td>Symptoms</td>
          <td>Cases</td>
          <td colspan="2">Action</td>
        </tr>
    </thead>
    <tbody>
        @foreach($coronacases as $case)
        <tr>
            <td>{{$case->id}}</td>
            <td>{{$case->country_name}}</td>
            <td>{{$case->symptoms}}</td>
            <td>{{$case->cases}}</td>
            <td><a href="{{ route('coronas.edit', $case->id)}}" class="btn btn-primary">Edit</a></td>
            <td>
                <form action="{{ route('coronas.destroy', $case->id)}}" method="post">
                  @csrf
                  @method('DELETE')
                  <button class="btn btn-danger" type="submit">Delete</button>
                </form>
            </td>
        </tr>
        @endforeach
    </tbody>
  </table>
<div>
@endsection


【筆記-Laravel】建立第一支Laravel應用程式

根據:Laravel Tutorial: Step by Step Guide to Building Your First Laravel Application

  • composer create-project --prefer-dist laravel/laravel links "7.*"


  • 使用phpMyAdmin建立一個供專案使用的資料庫、使用者帳號/密碼,修改.env
DB_CONNECTION=mysql
DB_HOST=127.0.0.1
DB_PORT=3306
DB_DATABASE=wellsche_lara_links 
DB_USERNAME=wellsche_laravel
DB_PASSWORD=XXXXXXXX
  • php artisan migrate

遇到錯誤,說是key的長度超過,修改 app/Providers/AppServiceProvider.php,加上:

use Illuminate\Support\Facades\Schema;
(略)
public function boot()
{
    //
    Schema::defaultStringLength(191);
}
  • composer require laravel/ui
    php artisan ui bootstrap --auth


提示:Please run “npm install && npm run dev” to compile your fresh scaffolding.

  • npm install && npm run dev
  • php artisan make:migration create_links_table –create=links

上面指令會在database/migrations下產生一個{{建立日期}}_create_links_table.php,編輯這個檔案,修改/加入up方法:

Schema::create('links', function (Blueprint $table) {
      $table->increments('id');
      $table->string('title');
      $table->string('url')->unique();
      $table->text('description');
      $table->timestamps();
});

執行:

  • php artisan migrate
    php artisan migrate:fresh
    php artisan make:model --factory Link


  • 編輯 database/factories/LinkFactory.php,加入:
<?php

/** @var \Illuminate\Database\Eloquent\Factory $factory */

use App\Link;
use Faker\Generator as Faker;

$factory->define(Link::class, function (Faker $faker) {
    return [
        'title' => substr($faker->sentence(2), 0, -1),
        'url' => $faker->url,
        'description' => $faker->paragraph,
    ];
});

上面使用$faker->sentence()方法產生一個標題,並用substr去除句子最後的點。

  • php artisan make:seeder LinksTableSeeder
  • 編輯 database/seeds/LinksTableSeeder.php,加入:
public function run()
{
    factory(App\Link::class, 5)->create();
}
  • 編輯database/seeds/DatabaseSeeder.php,加入:
public function run()
{
    $this->call(LinksTableSeeder::class);
}

上面的方法用來啟用LinksTableSeeder。

  • php artisan migrate:fresh --seed


對links資料表格插入一筆資料:

INSERT INTO `links` (`id`, `title`, `url`, `description`, `created_at`, `updated_at`) VALUES
(1, 'Rerum doloremque', 'http://russel.info/suscipit-et-iste-debitis-beatae-repudiandae-eveniet.html', 'Dolorem voluptas voluptatum voluptatem consequuntur amet dolore odit. Asperiores ullam alias vel soluta ut in. Facere quia et sit laudantium culpa ea possimus.', '2020-04-04 16:44:33', '2020-04-04 16:44:33');

Routing and Views

編輯 routes/web.php,原本內容為:

Route::get('/', function () {
    return view('welcome');
});

改為:

Route::get('/', function () {
    $links = \App\Link::all();

    return view('welcome', ['links' => $links]);
});


接著編輯 resources/views/welcome.blade.php,加入一個迴圈敘圈來顯示所有的連結:

@foreach ($links as $link)
    <a href="{{ $link->url }}">{{ $link->title }}</a>
@endforeach

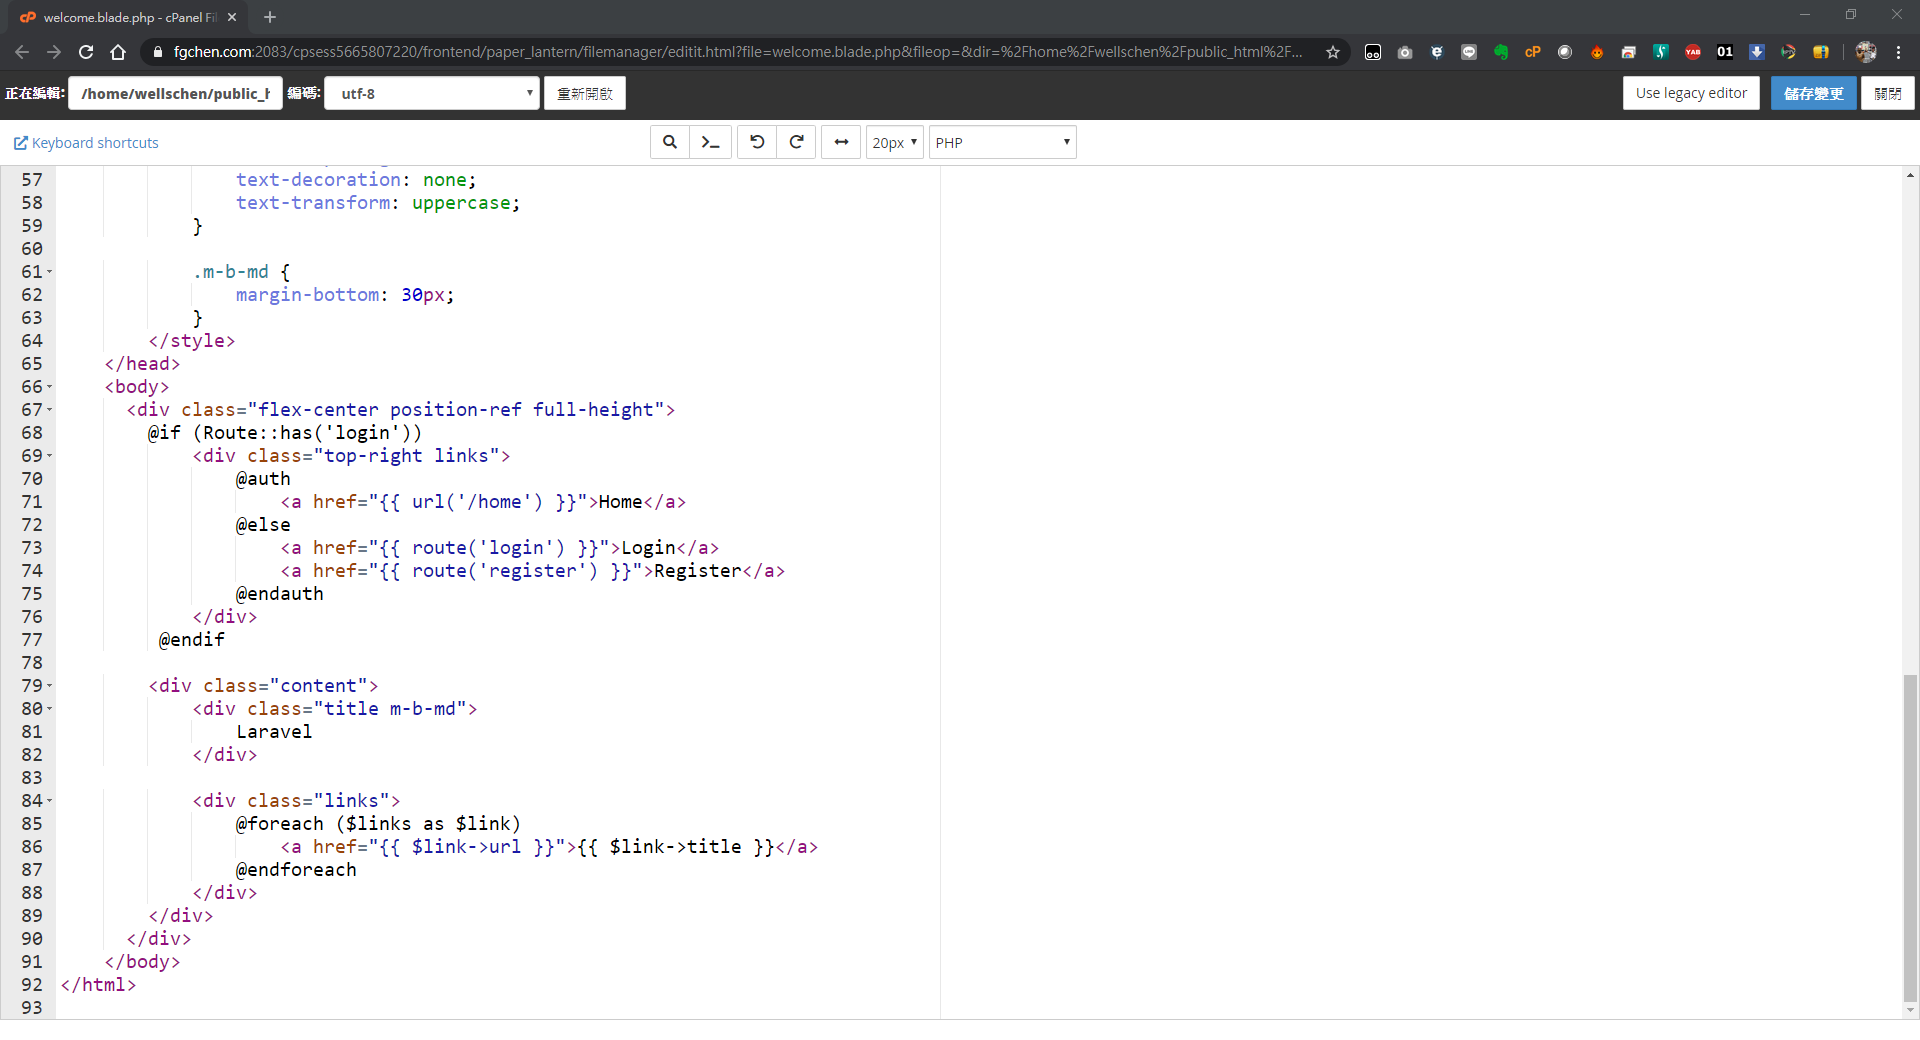
整個welcome.blade.php程式碼列表如下:

<body>
    <div class="flex-center position-ref full-height">
        @if (Route::has('login'))
            <div class="top-right links">
                @auth
                    <a href="{{ url('/home') }}">Home</a>
                @else
                    <a href="{{ route('login') }}">Login</a>
                    <a href="{{ route('register') }}">Register</a>
                @endauth
            </div>
        @endif

        <div class="content">
            <div class="title m-b-md">
                Laravel
            </div>

            <div class="links">
                @foreach ($links as $link)
                    <a href="{{ $link->url }}">{{ $link->title }}</a>
                @endforeach
            </div>
        </div>
    </div>
</body>

啟動Web服務:

  • php artisan serve --host=fgchen.com

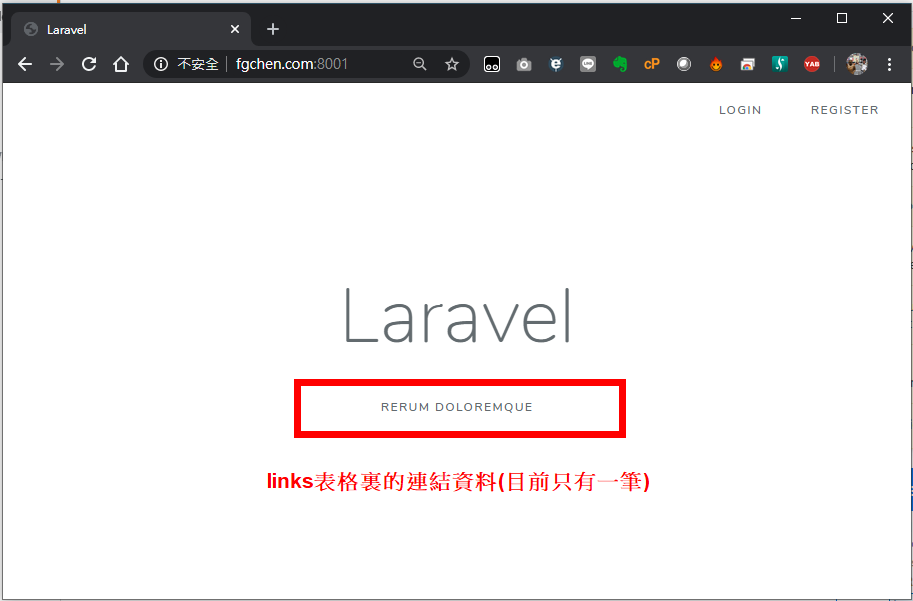
    結果顯示:Laravel development server started: http://fgchen.com:8001   (不一定是8001,會從8000開始找沒用的埠)

看到底下的畫面:

links資料表格的內容 :


製作顯示連結新增表單

  • 編輯routes/web.php,加入submit頁面路由:
Route::get('/submit', function () {
    return view('submit');
});
  • 建立resources/views/submit.blade.php,內容:
@extends('layouts.app')
@section('content')
    <div class="container">
        <div class="row">
            <h1>Submit a link</h1>
        </div>
        <div class="row">
            <form action="/submit" method="post">
                @csrf
                @if ($errors->any())
                    <div class="alert alert-danger" role="alert">
                        Please fix the following errors
                    </div>
                @endif
                <div class="form-group">
                    <label for="title">Title</label>
                    <input type="text" class="form-control @error('title') is-invalid @enderror" id="title" name="title" placeholder="Title" value="{{ old('title') }}">
                    @error('title')
                        <div class="invalid-feedback">{{ $message }}</div>
                    @enderror
                </div>
                <div class="form-group">
                    <label for="url">Url</label>
                    <input type="text" class="form-control @error('url') is-invalid @enderror" id="url" name="url" placeholder="URL" value="{{ old('url') }}">
                    @error('url')
                        <div class="invalid-feedback">{{ $message }}</div>
                    @enderror
                </div>
                <div class="form-group">
                    <label for="description">Description</label>
                    <textarea class="form-control @error('description') is-invalid @enderror" id="description" name="description" placeholder="description">{{ old('description') }}</textarea>
                    @error('description')
                        <div class="invalid-feedback">{{ $message }}</div>
                    @enderror
                </div>
                <button type="submit" class="btn btn-primary">Submit</button>
            </form>
        </div>
    </div>
@endsection
  • 瀏覽器輸入:http://fgchen.com:8001/submit (埠號不一定是8001)
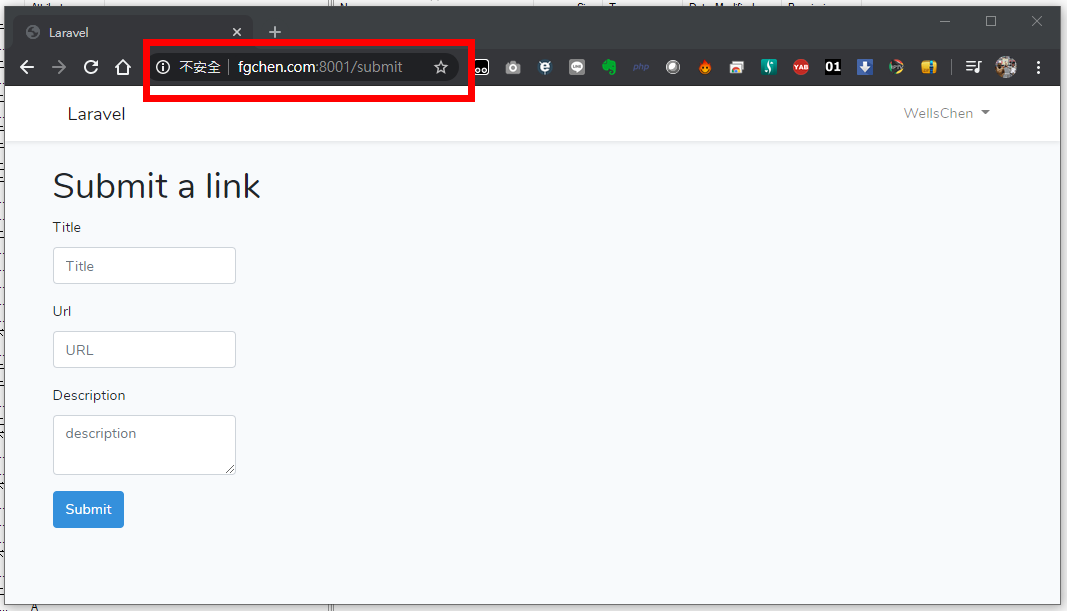
底下,說明上面程式碼主要的重點。

blade模板條件用來測試檢驗是否有任何驗證上的錯誤,一旦有錯誤發生,啟動程式會發出警告訊息,提示使用者必需修正不合法的表單欄位值。

@if ($errors->any())
    <div class="alert alert-danger" role="alert">
        Please fix the following errors
    </div>
@endif

每一個表單欄位進行有效性的檢查,如果有錯誤會顯示一個錯誤訊、並且輸出一個"has-error"類別: (這是Bootstrap的表單驗證機制,請參考Bootstrap Forms文件說明)

<div class="form-group">
    <label for="title">Title</label>
    <input type="text" class="form-control @error('title') is-invalid @enderror" id="title" name="title" placeholder="Title" value="{{ old('title') }}">
    @error('title')
        <div class="invalid-feedback">{{ $message }}</div>
    @enderror
</div>

如果使用送出無效的資料,網頁路由會儲存此會議階段的驗證,並且將使用者重導向回到該表單。{{ old('title') }}會填上原先送出的資料,如果一個使用者忘了填寫某些欄位,那麼這些已填的欄位資料會在驗證錯誤與顯示錯誤訊息後填寫至重導向後的表單。

如果一個欄位資料出現錯誤,@error指示器(directive)提供一個錯誤訊息變數,讓你在該指示器區塊中使用:

@error('title')
    <div class="invalid-feedback">{{ $message }}</div>
@enderror

另外一種用來檢查與顯示錯誤的方式是使用 $error 變數,可在一個驗證失效與重導向後用於view中:

@if($errors->has('title'))
    <div class="invalid-feedback">{{ $errors->first('title') }}</div>
@endif

@error 指示器也使用了相同的變數,二種方式你可以自己的喜好,選擇使用。

Submitting the Form/送出表單內容

一切就緒後,我們準備將表單內容送出,再次編輯routes/web.php這個檔案,新增頁面路由來進行POST的需求:

use Illuminate\Http\Request;

Route::post('/submit', function (Request $request) {
    $data = $request->validate([
        'title' => 'required|max:255',
        'url' => 'required|url|max:255',
        'description' => 'required|max:255',
    ]);

    $link = tap(new App\Link($data))->save();

    return redirect('/');
});

注意:Illuminate\Http\Request 這行務必要放在web.php頂端處。

這個路由相較於其他的路由複雜了些。

首先,我們注入了 Illuminate\Http\Request物件, 此物件用來處理POST機制的資料,以及POST需求的其他資料。

接著,我們使用了該需求的 validate() 方法來驗證該表單資料,這個驗證的表單方法出現於Laravel 5.5,這是一個很好的快捷方法來使用驗證的其他方法,額外的好處是驗證的欄位儲存在回傳變數 $data 中,我們可以用他們來演化我們的模型。

我們需要三個欄位,並且使用管線字元/pipe character (‘|’)定義多組的規則(也就是規則的組合)。 we can define multiple rules. 這三個欄位所能定義的規則最大長度為255個字元,url欄位需要一個有效的URL(超連結)。

如果驗證失敗,一個例外會被丟出來,網頁路由會回傳給使用者原始的輸入資料,以及驗證的錯誤。

接著,我們使用tap()輔助方法來建立一個新的 Link 模型物件/實例,並儲存起來。使用 tap 可以允許我們來喚用l save() ,並且,在儲存完成後,回傳該模型物件。

一般來說,我們必須在沒有使用tap的情況下執行下列工作,只是增加了一些些的語法糖 (什麼是語法糖?Google一下他的意涵。)。

$link = new \App\Link($data);
$link->save();

return $link;

如果你要使用資料(data)來演化一個新的模型,我們可透過”批量賦值(mass assignment)”的方式允許所有的欄位可以是”fillable”的。 “fillable”屬性的設置目的可以用來避免欄位被大量的賦予不是你在陣列裏所指定的那些資料。 (以後看到實例再來補充說明。)

mass assignment 被翻譯成批量賦值,參考文章:Laravel中批量賦值Mass-Assignment的真正含義詳解

思考一分鐘:在資料模型中,我們正從那些請求與批量賦值取得使用的輸入,需對使用者輸入資料的危險性有所察知,避免使用者直接透過一個表單來操弄資料。

在我們的例子中,我們驗證每一個欄位,使得這些欄位在批量賦值的過程中是安全的。為了允許我們的模型可以指定值給那些欄位,開啟 app/Link.php 檔案,並且透過更新進行檢視,像底下的方式:

<?php

namespace App;

use Illuminate\Database\Eloquent\Model;

class Link extends Model
{
    protected $fillable = [
        'title',
        'url',
        'description'
    ];
}

如果不要批量賦值,可以像我們底下的程式碼進行:

$data = $request->validate([
    'title' => 'required|max:255',
    'url' => 'required|url|max:255',
    'description' => 'required|max:255',
]);

$link = new \App\Link;
$link->title = $data['title'];
$link->url = $data['url'];
$link->description = $data['description'];

// Save the model
$link->save();

最後一件我們在POST路由所做的事情:在儲存連結成功之後,讓使用者頁面導向回到首頁。

此時此刻,我們的表單應該要避免送出那些包含有不合法欄位的連結。

如果該表單通過驗證,資料應該被儲存在資料庫中,然後使用者頁面被導向至首頁。

Testing the Form Submission/測式表單的提交

我們有一個基本的工作表單,但是我們應該確定的是持續地進行測試的撰寫。We have a basic working form, but we should make sure it continues to work by writing tests.

Laravel把HTTP測試變成一件容易的事,那些是在路由與中介軟體上的整合測試執行,我們寫了少量的功能測試來驗證我們的程式碼是如如預期地工作。

在我們開始之前,我們需要對在 phpunit.xml  檔案裏的事情進行些微的調整,我們也才好使用一個內置於記憶體中的SQLite資料庫管理系統。你必須確保適當的PHP模組是已安裝好的。

在Laravel 7, 專案的phpunit.xml 檔案組設定了一個內置於記憶體中的 SQLite資料庫。. 如果你正在使用一個較舊版本的Laravel,為了變更該資料庫的連結,你需要加上如下的操作::

<php>
        <!-- ... -->
    <env name="DB_CONNECTION" value="sqlite"/>
    <env name="DB_DATABASE" value=":memory:"/>
        <!-- ... -->
</php>

接著,移除掉那些伴隨著Laravel而來的預置測試:

rm tests/Feature/ExampleTest.php

我們已經準備好要透過HTTP請求來測試/submit表單,目的是要確保頁面路由的驗證、儲存、與頁面導向正常工作。

首先,我們建立一個新功能測試來看看頁面路由是否正常:(First, let’s create a new feature test to test against our route:)

php artisan make:test SubmitLinksTest

這個命令以適當的相依性建立了一個新的測試檔案,其中包含了一個我們要用來驗證我們有效的連結是否被儲存至資料庫的一個RefreshDatabase。 The command creates a new testing file with the proper dependencies, including a RefreshDatabase trait that we are going to use to verify that our links are being saved to the database when valid.

開啟新的  tests/Feature/SubmitLinksTest.php 檔案,在該類別中寫了幾個骨架測試 (let’s define a few skeleton tests in the body of the class that we are going to flesh out):

/** @test */
function guest_can_submit_a_new_link() {}

/** @test */
function link_is_not_created_if_validation_fails() {}

/** @test */
function link_is_not_created_with_an_invalid_url() {}

/** @test */
function max_length_fails_when_too_long() {}

/** @test */
function max_length_succeeds_when_under_max() {}

These tests should give you a high-level overview of what we are going to test: 這些測試應該給了你們一些我們即將進行測試的一個從高層次的概觀

註:verification 驗證建造出來的事物是否正確,validation 確認製造事物的過程是否正確。這跟製造業的QC與QA有類似的意涵,QC產品正確性檢查,QA製造過程的正確確認。

  1. Verify that valid links get saved in the database 驗證合法的連結儲存到資料庫。
  2. When validation fails, links are not in the database 當合法性確認失敗,連結沒有儲存至資料庫。
  3. Invalid URLs are not allowed 非法的URLs是不允許的
  4. Validation should fail when the fields are longer than the max:255 validation rule 當欄位值長度超過255個字元,合法性確認不通過。
  5. Validation should succeed when the fields are long enough according to max:255. 當欄位值長度在255個字元內,合法性確認通過。

我們可能會漏掉一些事情,但因為這是寫給初入門的第一支Laravel應用,這裏就只列出一些基本的HTTP測試。

Saving a valid link/合規連結的儲存

The first test we’ll write is the test that verifies that valid data gets stored in the database: 我們要進行的第一個測試是驗證合規的連結儲存至資料庫正確性

<?php

namespace Tests\Feature;

use Illuminate\Validation\ValidationException;
use Tests\TestCase;
use Illuminate\Foundation\Testing\RefreshDatabase;

class SubmitLinksTest extends TestCase
{
    use RefreshDatabase;

    /** @test */
    function guest_can_submit_a_new_link()
    {
        $response = $this->post('/submit', [
            'title' => 'Example Title',
            'url' => 'http://example.com',
            'description' => 'Example description.',
        ]);

        $this->assertDatabaseHas('links', [
            'title' => 'Example Title'
        ]);

        $response
            ->assertStatus(302)
            ->assertHeader('Location', url('/'));

        $this
            ->get('/')
            ->assertSee('Example Title');
    }
}

Take note of the RefreshDatabase trait which makes sure that each test has a new database to give each test a pristine database environment with all the migrations.

RefreshDatabase用來確保每一個測試都有一個原始乾淨的資料庫環境。

Our first test submits valid post data, which returns a response object that we can use to assert that our route responded as expected. We verify that the database contains a record with the title we just created. 我們的第一個測試提交了合規的post資料,當中回傳了一個回應物件,透過這個回應物件,我們可以測試我們的路由回應是否正常工作。我們驗證資料庫包含了一個我們所建立的標題資料。

富國註:assert,這個單字叫斷言,在Java裏,assert用來斷言某件事必然發生,如果沒有發生…就丟出一個assertion error。

接著,我們驗證回應是一個302狀態碼,以及一個指向首頁的 Location 檔頭資料。 Next, we verify that the response was a 302 status code with a Location header pointing to the homepage.

最後,我們回到首頁確連結是否正確地被顯示在首頁上。Last, we request the home page and verify that the link title is visible on the homepage.

讓我們執行我們的第一個測試來確認預期的事情是否通過驗證。Let’s run our first test to make sure things pass as expected.

Laravel 7 adds a new artisan test command, or you can use phpunit:

php artisan test

# Or run phpunit directly
vendor/bin/phpunit

You should see that the test suite passes: (畫面要加上來)

Testing Failed Validation

當一個使用者提交一個不好的資料,我們預期驗證過程會觸發一個例外,從而確認我們的確認層次的工作情形:

When a user generally submits bad data, we expect the validation to trigger an exception and we can use that to make sure our validation layer is working:

/** @test */
function link_is_not_created_if_validation_fails()
{
    $response = $this->post('/submit');

    $response->assertSessionHasErrors(['title', 'url', 'description']);
}


我們使用Laravel’s assertSessionHasErrors() 來發出session過程中發生合規錯誤的assertion。因為我們提交了空資料給頁面路由,我們預期required規則會觸發(這英文寫得怪,trigger後面沒有目標詞…  S V O)

We use Laravel’s assertSessionHasErrors() to make sure that the session has validation errors for each of our required fields. Because we submitted empty data to the route, we expect the required rule will trigger for each field.

Let’s run the test suite to verify our work thus far:

讓我們執行這系列的測試來驗證我們目前為止的工作:

$ php artisan test tests/Feature/SubmitLinksTest

   PASS  Tests\Feature\SubmitLinksTest
  ✓ guest can submit a new link
  ✓ link is not created if validation fails

  Tests:  2 passed
  Time:   0.32s

Testing URL Validation

We expect only valid URLs to pass validation so that our application doesn’t try to display invalid data. 我們預期僅有合法的URLs可以通過合法性確認,確保我們的應用程式不會試著顯示不合法的資料。

/** @test */
function link_is_not_created_with_an_invalid_url()
{
    $this->withoutExceptionHandling();

    $cases = ['//invalid-url.com', '/invalid-url', 'foo.com'];

    foreach ($cases as $case) {
        try {
            $response = $this->post('/submit', [
                'title' => 'Example Title',
                'url' => $case,
                'description' => 'Example description',
            ]);
        } catch (ValidationException $e) {
            $this->assertEquals(
                'The url format is invalid.',
                $e->validator->errors()->first('url')
            );
            continue;
        }

        $this->fail("The URL $case passed validation when it should have failed.");
    }
}

Laravel has a withoutExceptionHandling() method which disables Laravel’s route exception handling code used to generate an HTTP response after an exception.

withoutExceptionHandling()方法關閉頁面路由的例外處置。

We use this to our advantage so we can inspect the validation exception object and assert against the error messages.

我們設置並走訪每一個狀況(你可以加上你所想要涵蓋的情境),並在每一次的走訪中補捉ValidationException物件。

We loop through various cases (add your own if you’d like to cover more scenarios) and catch instances of ValidationException. If the text makes it past the exception handling, we manually fail the test because we expect the route throws a ValidationExcepiton exception each time.

在catch區塊中,我們使用validator 物件來檢查url錯誤,並且丟出實際的錯誤訊息。 The catch block uses the validator object to check the url error and asserts that the actual error message matches the expected validation error message.

I like using the try/catch technique, followed by a $this->fail() as a safety harness instead of using exception annotations provided by PHPUnit. Be sure to return in the caught exception to avoid confusing test failures. I feel catching the exception allows the ability to do assertions that wouldn’t otherwise be possible and provides a more granular control that I like in most cases.

Testing Max Length Validation

We will test a few scenarios with the max:255 validations rules: when the field fails max-length validation with a length of 256 characters, and when the field is long enough to pass validation at 255 characters.

Although Laravel contains the max validation rule functionality, I like to test it to verify that my application applies the rules. If someone removes the max validation rule, then the tests will catch it.

I like to test the threshold of min and max validation rules as an extra caution to make sure my application respects the min and max boundaries I set.

First, let’s test the “max length” scenario:

/** @test */
function max_length_fails_when_too_long()
{
    $this->withoutExceptionHandling();

    $title = str_repeat('a', 256);
    $description = str_repeat('a', 256);
    $url = 'http://';
    $url .= str_repeat('a', 256 - strlen($url));

    try {
        $this->post('/submit', compact('title', 'url', 'description'));
    } catch(ValidationException $e) {
        $this->assertEquals(
            'The title may not be greater than 255 characters.',
            $e->validator->errors()->first('title')
        );

        $this->assertEquals(
            'The url may not be greater than 255 characters.',
            $e->validator->errors()->first('url')
        );

        $this->assertEquals(
            'The description may not be greater than 255 characters.',
            $e->validator->errors()->first('description')
        );

        return;
    }

    $this->fail('Max length should trigger a ValidationException');
}

Again, we disable exception handling and create data that is one character too long to pass validation.

We assert each field to make sure they all have a max length validation error message.

Last, we need to return in the caught exception and use the $this->fail() as a safety harness to fail the test.

Next, we test the “under the max” scenario:

/** @test */
function max_length_succeeds_when_under_max()
{
    $url = 'http://';
    $url .= str_repeat('a', 255 - strlen($url));

    $data = [
        'title' => str_repeat('a', 255),
        'url' => $url,
        'description' => str_repeat('a', 255),
    ];

    $this->post('/submit', $data);

    $this->assertDatabaseHas('links', $data);
}

We make the form data long enough to pass max:255 validation and assert that the data is in the database after submitting the data.

Run the test suite and make sure everything is passing:

$ php artisan test tests/Feature/SubmitLinksTest

   PASS  Tests\Feature\SubmitLinksTest
  ✓ guest can submit a new link
  ✓ link is not created if validation fails
  ✓ link is not created with an invalid url
  ✓ max length fails when too long
  ✓ max length succeeds when under max

  Tests:  5 passed
  Time:   0.58s

完結

註:後台終端機的命令列編輯器沒有Windows視窗這邊的編輯好用,可以用虛擬主機後台的網頁版的編輯器或者直接透過Bitvise-FTP開啟檔案,並指定用Atom來編輯遠端的檔案。


【主機維護筆記】移轉cPanel網站至非虛擬網站之專屬主機

The job started on 1/30/2018.

安裝CentOS7 、相關的服務(mail server (postfix與dovecot)、apache httpd、php、MariaDB (MySQL)、webmin、usermin),及轉移cPanel的帳號

mail/smtp :

  1. SMTP驗證,參考文章:Configure a Dedicated Server with Webmin
  2. Outlook送信OK,但接收mail有問題…(2019/2/2,繼續努力中) ,0203 處理完,設定參考:MRA 伺服器: dovecot 設定

將虛擬主機上的帳號複製到新主機,虛擬主機的帳密資料儲存於/$HOME/$USER/etc/$DOMAIN/ 目錄中,其中/$HOME/$USER是網域管理者的家目錄,其中passwd和shadow這2個帳號即是所有帳號的名稱與加密密碼。

轉移Joomla,在這邊遇到一個問題,是有關於”Enabling Search Engine Friendly (SEF) URLs”,主機需進行相關的設定,Joomla的m2c元件才能正常運作,參考下面文章:

備份系統:

所有工作於02060930完成。

gmail收外部信的問題:拒絕自我簽署的憑證,意思就是要找一個可信任的憑證機構申請一個憑證(付費或免費),我找了SSL For Free這家申請了一個免費的憑證(90天效期)。

編輯/etc/dovecot/conf.d/10-ssl.conf

ssl_cert = </etc/pki/dovecot/sslcertificate.crt
ssl_key =  </etc/pki/dovecot/tangeseiki.com.key
ssl_ca = </etc/pki/dovecot/intermediate.crt

.問題,ISP會封鎖port 25的封包/流量,理由是不讓內部的連接外部的smtp主機,防止SPAM郵件!解法:另走一條路2525,透過2525轉至25:

iptables -t nat -I PREROUTING -p tcp --dport 2525 -j REDIRECT --to-port 25


會花那麼多時間,是因為很多東西都太新了,腦袋瓜的知識尚未跟上最新的網站技術發展,Joomla也是沒有什經驗,中間花了很多時間找資料,測試,找出root causes…。

【主機維護筆記】郵件系統異常 2018/08/21

狀況:發送郵件時發生550 unrouteable address異常

主機環境:Linux, CPanel, WHA

此次會發生這樣的問題,可能的原因:

1.前日圖資中心的網路防火牆讓學校內部的DNS封包出不了外面,我做了一些DNS處理,也因為不太熟悉DNS運作,把域名刪除,而導致後續的問題

2.也可能因為在解決問題的過程中,順道做了系統的升級…

解法:

1.DNS 及 MX 記錄檢查

檢查主機域名MX記錄

dig domain MX

2.Exim 設定

3.使用 Mail Troubleshooter檢查

4.Email -> Repair Mailbox Permissions (此次關鍵解決方式)

5.Web mail中的追踨傳送中可以觀察到正常/失敗的訊息原因

【SQL Server維護】在SQL Server內部建立與使用網路磁碟機

問題:在建立維護/備份計畫時,無法看到在檔案總管裏建立的網路磁碟機,以致於無法將備份存於網路磁碟上。

作法:(在SQL Server)

  1. 啟動xp_cmdshell (已啟動就免)
  2. 新增查詢執行 EXEC xp_cmdshell ‘net use Z: \\網路主機名稱\分享目錄  網路磁機帳戶密碼 /user:網路磁機帳戶’


25 Tips For Successful Online Course Facilitation (筆記)

Teaching in the online environment is quite different from teaching in the classroom and as such has a number of unique characteristics and limitations. The following guide (based on my experience) is designed to help you before, during and after an online teaching event.


Nowadays online course facilitation is extremely important to teachers, educators, and professors. At this post you will find a total of 25 Tips For Successful Online Course Facilitation separated in the following 4 sections:

  1. Before The Online Course Starts
  2. At The Beginning Of The Online Course
  3. During The Online Course
  4. After The Online Course Finishes

Do not hesitate to share with me your Tips for Successful Online Course Facilitation

How To Succeed As Online Course Facilitator?

  1. Before The Online Course Starts
    1. Familiarize yourself with the course delivery structure and the site/platform
    2. Develop an online delivery plan/schedule
    3. Check that all resources, activities and links work (i.e. they open in a new window), are current and relevant to the learning experience
    4. Update your contact information
    5. Contact learners, welcome them to the course and provide clear log-in instructions
  2. At The Beginning Of The Online Course
    1. Check that learners can log-in and provide support and troubleshoot as needed
    2. Facilitate introductions and community-building activities at beginning of the course e.g. have everyone introduce themselves in a café style forum
    3. Set clear expectations
    4. Confirm contact/turnaround times
    5. Emphasize the importance of interactions and that online communication between participants is key to building community and contributes to the course outcomes, profiles, forums, chats etc.
    6. Encourage sharing of experiences
  3. During The Online Course
    1. Be a positive online role model
    2. Send some sort of meaningful weekly communication, but, don’t overwhelm learners
    3. Ideally respond to learner’s communication within a reasonable time frame to resolve any difficulties/queries to ensure their learning is not interrupted e.g.  phone calls, email, messaging, and forum posts
    4. Provide guidance and direction to learners when needed
    5. Encourage online communication between participants
    6. Relate to learner experiences and ask thought provoking questions
    7. Promote learner independence/responsibility and learner collaboration
    8. Provide technical and other learner support as required
    9. Online learning can be isolated and lonely so provide positive encouragement and feedback
    10. Monitor learner progress, participation in activities and completion of assessment tasks and follow up as required
    11. Provide informative developmental feedback
  4. After The Online Course Finishes
    1. Wrap-up the course, thank learners for their participation
    2. Review learner feedback and make recommendations for improvement
    3. Engage in your own self-reflection for improvement and consolidation

Google雲端硬碟與Office應用程式的整合

Google給學校師生的超級大禮:Google G-Suit for Education,無限的硬碟空間容量,弘光也有喔~~ :弘光Gmail資訊連結(趁在學時務必取得帳號,等畢業後要申請,得要花500元新台幣加入校友會,由校友會這邊提出申請)。

我們有了無限大的空間後,就要妥善運用了。

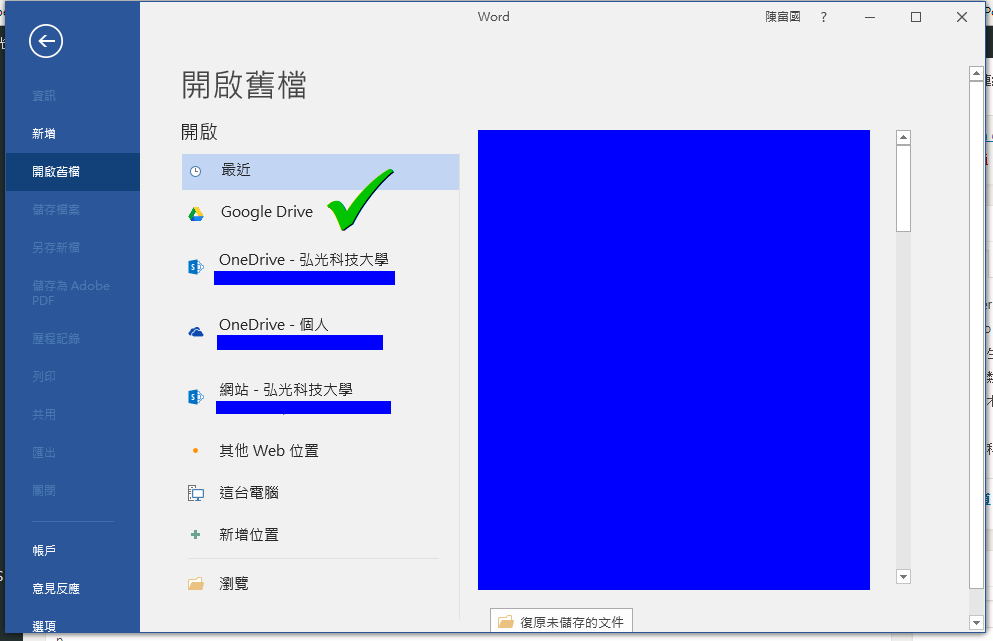
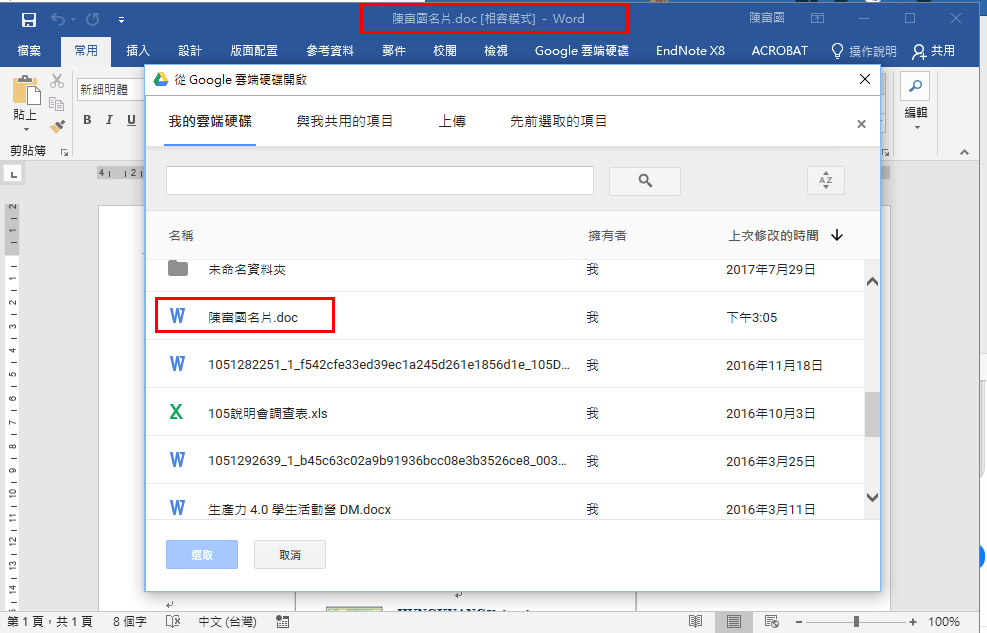
Google雲端硬碟提供了類Office的線上應用程式,但是,其格式並不與Office的格式100%相容,造成使用上一個很大的問題,我們有一個解決方案:使用「Google 雲端硬碟外掛程式 Microsoft Office 版

使用上不難,下載安裝Google 雲端硬碟外掛程式 Microsoft Office 版應用程式後,就會在Office應用程式裏插入一個外掛,提供一個Google雲端硬碟的儲存位置選項: