JavaScript/jQuery – 取得一些型態輸入的值範例

<!DOCTYPE html>
<html lang="en">
<head>
  <meta charset="UTF-8">
  <meta name="viewport" content="width=device-width, initial-scale=1.0">
  <meta http-equiv="X-UA-Compatible" content="ie=edge">
  <script src="https://code.jquery.com/jquery-3.5.1.min.js" integrity="sha256-9/aliU8dGd2tb6OSsuzixeV4y/faTqgFtohetphbbj0=" crossorigin="anonymous"></script>
  <title>Document</title>
</head>
<body>
  <div class="">
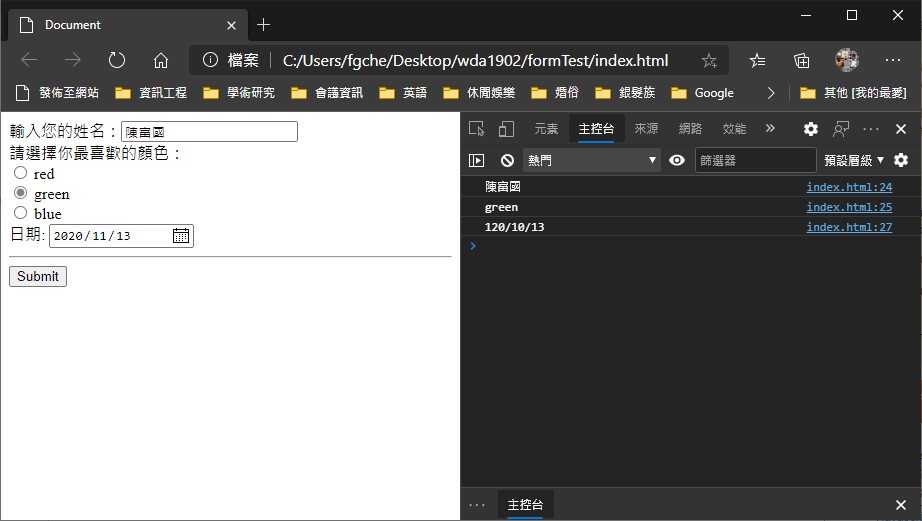
    輸入您的姓名:<input id="input_name" type="text" name="" value="">
    <br>
    請選擇你最喜歡的顏色:<br>
    <input type="radio" name="color" value="red"> red<br>
    <input type="radio" name="color" value="green"> green<br>
    <input type="radio" name="color" value="blue"> blue<br>
    日期: <input type="date" id="date-input" required>
    <hr>
    <button type="button" name="button" onclick="submitForm();">Submit</button>
  </div>
  <script type="text/javascript">
    function submitForm(){
      console.log( $('#input_name').val() ); //取得姓名的輸入
      console.log( $('input[name="color"]:checked').val() ); //取得顏色的選取值
      var date = new Date($('#date-input').val()); //取得選取的日期,並產生一個日期物件
      console.log( date.getFullYear() + '/' + date.getMonth() + '/' + date.getDate() );
    }
  </script>
</body>
</html>


在全端網頁設計的年代,若資料需要送到後端處理(資料庫的CRUD動作、或發信等功能),作法是從前端取得資料後,再透過ajax方法將資料傳到後端的程式語言PHP、.Net C#、NodeJS等,由後端的程式來處理所需使用的伺服器資源。

JavaScript – 隨機選取一張撲克牌

這個範例主要是示範如何用隨機數取值,隨機存取一張撲克牌。

之後延伸應用可以隨機抽5張牌、13張牌,或者做一個覆蓋在桌面的16張牌(二二配對、隨機放在16個二維的格子上,使用者隨機翻牌,若連續翻到2張花色一樣的,得分…)。

這個範例也能應用到籤詩的選取,例如梅花心易,


下載一組撲克牌圖片:http://acbl.mybigcommerce.com/52-playing-cards/

解開放在images目錄下

index.html

<!DOCTYPE html>
<html lang="en">
<head>
  <meta charset="UTF-8">
  <meta name="viewport" content="width=device-width, initial-scale=1.0">
  <title>Document</title>
  <style>
    body{
      display: flex;
      flex-direction: column;
      align-items: center;
    }
    img {
      width: 300px;
    }
    .button{
      border-radius: 20px;
      outline: none;
      margin: 10px auto;
      font-size: 40px;
    }    
  </style>

</head>
<body>
  <div id="card">
    <img src="images\blue_back.png">
  </div>
  <button class="font button" onclick="selectCard();">取卡</button>    

  
  <script>
    function selectCard(){
      var cards1 = ["", "A", "2", "3", "4", "5", "6", "7", "8", "9", "10", "J", "Q", "K"];    
      var card_n1 = cards1 [getRandom(1,14)];

      var cards2 = ["D", "H", "S", "C"];
      var card_n2 = getRandom(0,4);
      var card = card_n1 + cards2[card_n2];
      console.log( card  );

      var card_div = document.getElementById("card");

      card_div.innerHTML =  `<img src='images/${card}.png' alt='Playing Card'>`;      

    }

    function getRandom(min, max) { //  min <= x < max, x是整數亂數
      return Math.floor(Math.random() * (max - min) ) + min;
    }  


  </script>

</body>
</html>

以上程式取亂數是基於從下載資源下載下來的撲克牌檔名安排:AD、2D~10D、JD、QD、KD 方塊A~K,前面的是A~K,後面是花色 :D 方塊、H紅心、S黑桃、C梅花

鏟子(Spade)、紅心(Heart)、鑽石(Diamond)、三葉草(Club)、Jack(侍從)、Queen(王后)、King(國王)、Ace(第一)

Laravel E-Commerce Application Development( 27 Lessons )

來源:Laravel E-Commerce Application Development( 27 Lessons )

這個教學是一個完整建立一個EC網站教學,使用Laravel 5.8 與 Vue (前端),共有27個教學,根據裏面的教學可能作者沒有交待完整或建置過程有疏漏,使得無法建立的應用程式無法正常運作,此時可以使用作者提供的源碼先建立一個參考範例,再閱讀作者的教學。

這個電子商務要大致滿足以下的需求:

  • A catalog page where all products will be displayed to buyers. 買家觀看的產品目錄頁
  • A product details page where buyers can find more information about the product. 產品細節頁面,買家可以透過這個頁面發現商品更多的資訊。
  • A checkout system, where buyers can enter the shipping address and pay. 結帳系統,買家可以輸入送貨地址並且進行付款。
  • Login and registration pages so buyers can register or login to their account. 供買家登入與註冊的頁面。
  • Account dashboard for customers where they can see recent orders placed, or can change their account details. 帳號資訊與管理頁面,買家可以用來檢視訂單,或者修改帳號資料。
  • An admin area where shop owner can log in and manage followings: 後台管理介面,供商品管理者登入並且管理下列事項
    • Manage store settings. 管理商店設定
    • Manage products, categories, brands, product attributes. 管理產品、目錄、品牌、產品資料
    • Manage sales orders and can generate reports. 管理銷售訂單,並產生各式報表
    • Manage payment methods available to customers. 管理客戶的可用付款方法
    • Manage Shipping methods available to customers.  管理客戶的可用貨物物流方法
    • Manage admin users so other staff members use the admin area. 管理使用者帳號,讓其他職員/店員也能使用後台管理介面。

這個系統使用  Bootstrap E-commerce UI Kit 作為前端工具, Vali Admin 為後端管理介面範本,這2個工具都是使用Bootstrap 4為基底所開發出來的?


直接run作者提供的源碼 (20200622)

  • 下載並解開在 github上的源碼
  • 執行 composer install
  • 依照.env上的資料庫設定新增一個資料庫(homestead,並設置資料庫帳號與密碼)
  • 執行 php artisan migrate,建立專案的表格,不過注意,在這個步驟建立連外鍵時會出現許多錯誤,必須依照發生的錯誤訊息至Database\migrations目錄找相關的表格schema,把連外鍵的unsignedInteger改成unsignedBigInteger,例:
    • $table->unsignedBigInteger(‘attribute_id’);
      $table->foreign(‘attribute_id’)->references(‘id’)->on(‘attributes’);
    • 每次修改完要把已建立的資料表格完全刪除再重覆migrate執行
    • 若不想俢改,請下載已完成的修改 (下載解開至database\migrations):migration   或下載整個完整的專案 載點
  • 執行 php artisan migrate – -seed (2個橫線)
  • 執行 npm install  (需先安裝Nodejs)
  • 執行 npm run watch (這個步驟會將需要用到的前端套件複製到public目錄)
  • php artisan serve
  • 成功執行出現的畫面:


  1. Laravel E-Commerce Application Development – Introduction
  2. Laravel E-Commerce Application Development – Initial Project Setup
  3. Laravel E-Commerce Application Development – Assets Setup Using Laravel Mix
  4. Laravel E-Commerce Application Development – Admin Model and Migration
  5. Laravel E-Commerce Application Development – Backend Admin Authentication

筆記:admin.php

<?php

Route::group(['prefix'  =>  'admin'], function () {

    Route::get('login', 'Admin\LoginController@showLoginForm')->name('admin.login');
    Route::post('login', 'Admin\LoginController@login')->name('admin.login.post');
    Route::get('logout', 'Admin\LoginController@logout')->name('admin.logout');

    // Route::get('/', function () {
    //     return view('admin.dashboard.index');
    // });
    Route::group(['middleware' => ['auth:admin']], function () {

        Route::get('/', function () {
            return view('admin.dashboard.index');
        })->name('admin.dashboard');

    });

});

// Route::group(['middleware' => ['auth:admin']], function () {
//
//     Route::get('/', function () {
//         return view('admin.dashboard.index');
//     })->name('admin.dashboard');
//
// });


  1. Laravel E-Commerce Application Development – Base Controller and Repository
  2. Laravel E-Commerce Application Development – Settings Section Part 1
  3. Laravel E-Commerce Application Development – Settings Section Part 2
  4. Laravel E-Commerce Application Development – Categories Section Part 1
  5. Laravel E-Commerce Application Development – Categories Section Part 2
  6. Laravel E-Commerce Application Development – Attributes Section Part 1
  7. Laravel E-Commerce Application Development – Attributes Section Part 2
  8. Laravel E-Commerce Application Development – Attributes Section Part 3
  9. Laravel E-Commerce Application Development – Brands Section
  10. Laravel E-Commerce Application Development – Products Section Part 1
  11. Laravel E-Commerce Application Development – Products Section Part 2
  12. Laravel E-Commerce Application Development – Products Section Part 3
  13. Laravel E-Commerce Application Development – Products Section Part 4
  14. Laravel E-Commerce Application Development – Frontend Login & Registration
  15. Laravel E-Commerce Application Development – Categories Navigation
  16. Laravel E-Commerce Application Development – Catalog Listing
  17. Laravel E-Commerce Application Development – Product Details Page
  18. Laravel E-Commerce Application Development – Shopping Cart
  19. Laravel E-Commerce Application Development – Checkout
  20. Laravel E-Commerce Application Development – Payment Processing
  21. Laravel E-Commerce Application Development – Order Management
  22. Laravel E-Commerce Application Development – Wrap Up


【筆記-Laravel】Laravel的使用者驗證Auth


【筆記-Laravel】整合sb-admin後台的Laravel專案

SB Admin 2

Aleckrh laravel-sb-admin-2

我的實作案例

安裝:

  • Clone the repo and cd into it
  • Run composer install
  • Rename or copy .env.example file to .env
  • Run php artisan key:generate
  • Set your database credentials in your .env file
  • Run php artisan migrate ->將系統需要的資料表格建出來。